
![[A1111] AnimateDiff + IPAdapter + OpenPose Operation Guide](/content/images/size/w960/2024/01/00051-3562496567.png)
Note: This operation is highly VRAM-intensive. When creating a short video, after loading ControlNet calculations, it consumed around 16GB of VRAM. If your VRAM is insufficient, it is recommended to use the ComfyUI method for better results.
A1111 with AnimateDiff
The installation process here is similar to ComfyUI. Please install the following extensions:
Additionally, it is highly recommended to install FreeU:
AnimateDiff Models
You can download the action models and action Lora from here:
Additionally, here are a few recommended action models for generating animations:
These model files need to be placed in this folder:
extensions/sd-webui-animatediff/model
If you download action Lora, it should be placed here:
extensions/sd-webui-animatediff/model/Lora
Once downloaded, if you need to use ControlNet, please put the required files in this location:
models/ControlNet
Of course, your main model needs to be placed in models/Stable-diffusion. If you have VAE, it should be placed in models/VAE.
AnimateDiff Interface Overview
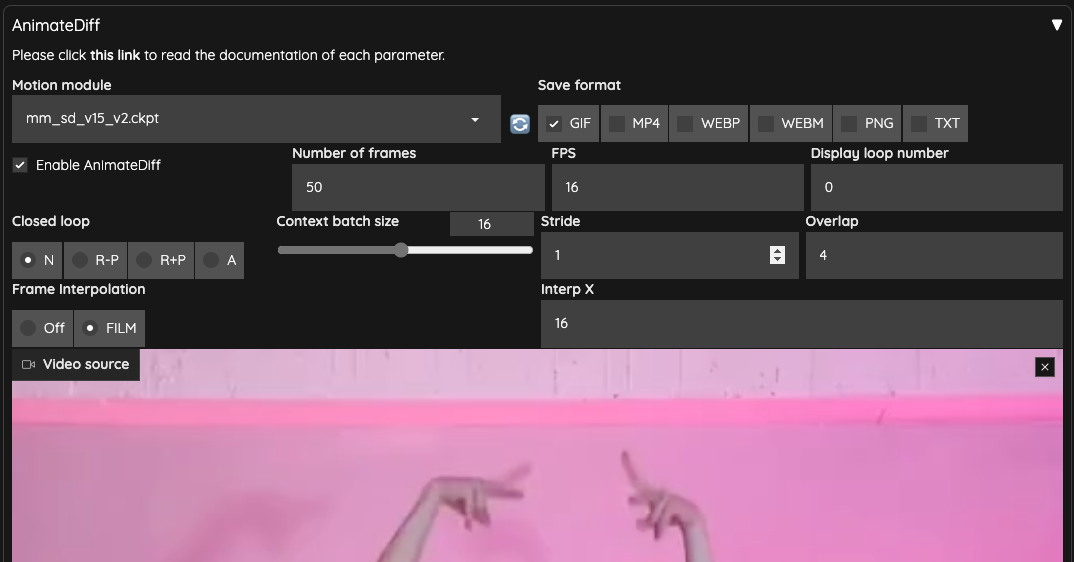
After completing all installations, you will have an AnimateDiff user interface.
Enable AnimateDiff: Check this to enable the AnimateDiff feature.Motion module: Select the motion model here.Save format: Choose the output format, and you can checkTXTif you want to save text information.Number of frames: Default is0. When usingVideo sourceorVideo path, it will be automatically calculated. Otherwise, it will be calculated based onContext batch size. Please avoid using a number close toContext batch size, as mentioned in issue #213.FPS: Frames per second.Display loop number: If outputting asGIF, this indicates how many times it should loop. Default is0for continuous looping.Context batch size: Represents how many frames AnimateDiff processes at once. Default is16, which is a good value. Note: Different motion models may limit the maximum value of this number.Closed loop: Attempts to create a looping animation. There are four operation modes, and it won't take effect whenNumber of framesis less than or equal toContext batch size.N: Not used. Effective only whenNumber of frames(excluding0) is less thanContext batch size.R-P: Reduces the number of loop animation content (context) and does not perform interpolated actions using Prompt Travel.R+P: Reduces the number of loop animation content (context) and performs interpolated actions using Prompt Travel.A: Connects the frames at the beginning to the frames at the end to create a looping animation, using Prompt Travel for interpolated actions.
Stride: This is difficult to explain but is mainly used to ensure that AnimateDiff maintains time synchronization between frames. Default is1. You can refer to the original author's explanation WebUI Parameters. Similar to ComfyUI, this setting seems ineffective in vid2vid.Overlap: Specifies how many frames to reserve as overlap for upper and lower context when processing images with AnimateDiff. Default is-1, and it usesContext batch size / 4. This setting is only effective whenNumber of framesis greater thanContext batch sizeorNumber of framesis0.Frame Interpolation: Default isOFF. If usingFILM, it will use Deforum for video frame interpolation after AnimateDiff processing.Interp X: When usingFrame Interpolation = FILM, it takes X frames of output interpolated frames to interpolate into the input frames. It will extend the entire video, and you may need to speed up the video after output.Video Source: Upload the video here.Video Path: If no video is uploaded, you can enter the path of the video here. You need to place the frames of the video in this folder.Move motion module to CPU (default if lowvram): In case of low VRAM, move the model to the system memory.Remove motion module from any memory: Remove the motion model from any memory.
After uploading the video, some of the above parameters will be automatically populated.
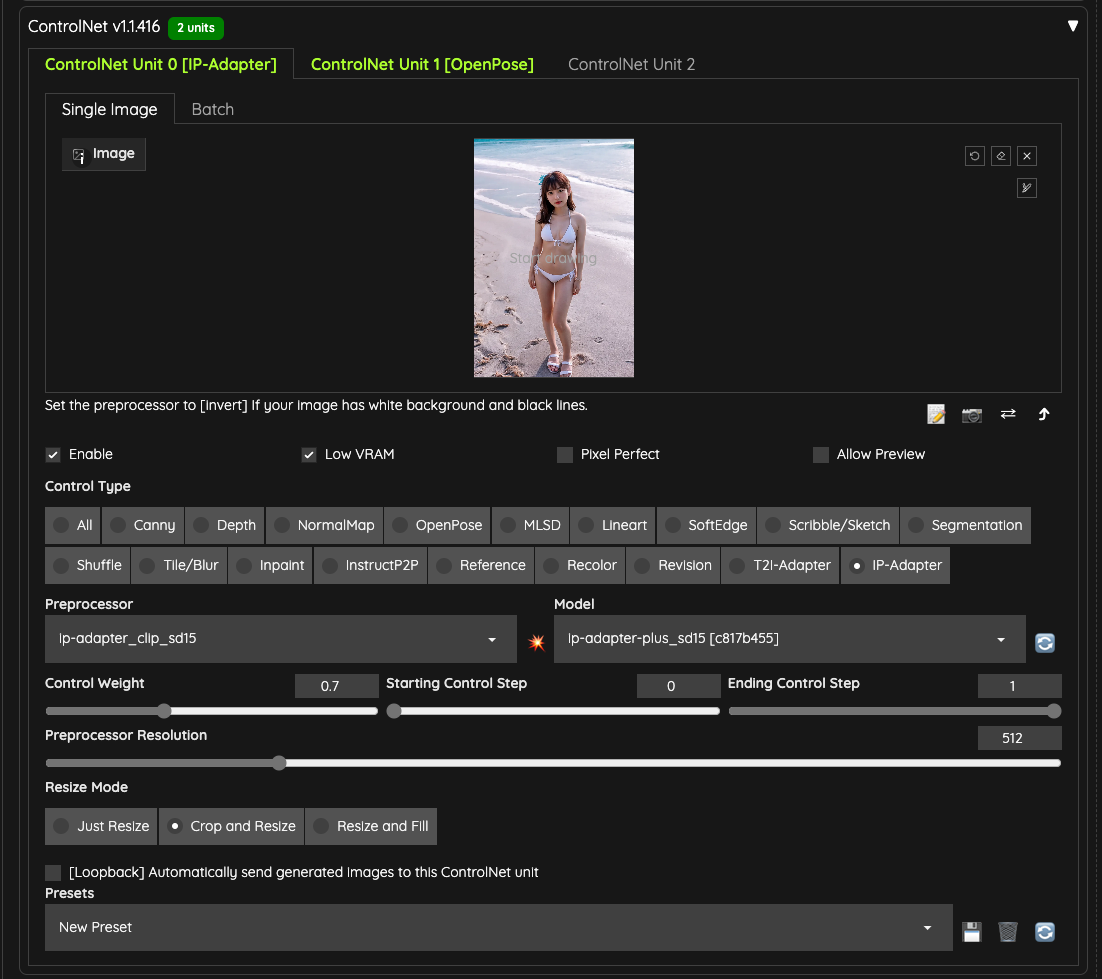
ControlNet
Next, we need to prepare two ControlNets for use,
- OpenPose
- IPAdapter
Here, I am using IPAdapter and chose the ip-adapter-plus_sd15 model. The weight is set to 0.7 to avoid excessive interference with the output.
Additionally, I prepared the same number of OpenPose skeleton images as the uploaded video and placed them in the /output/openpose folder for this ControlNet to read.
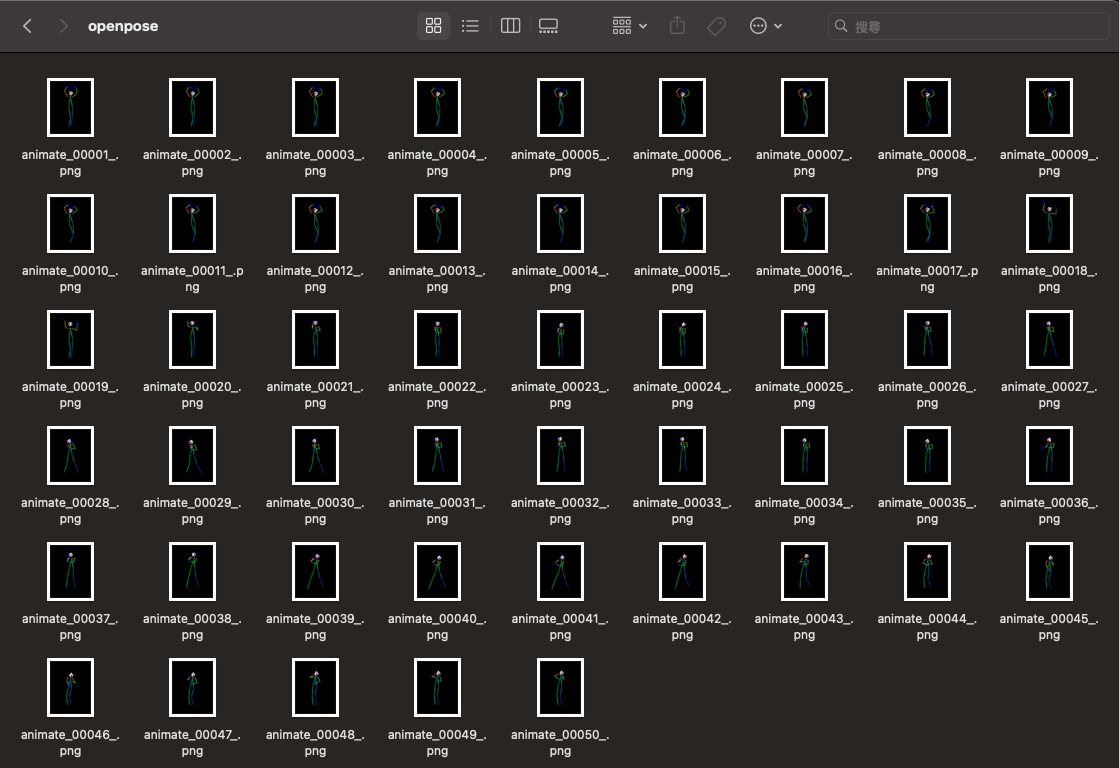
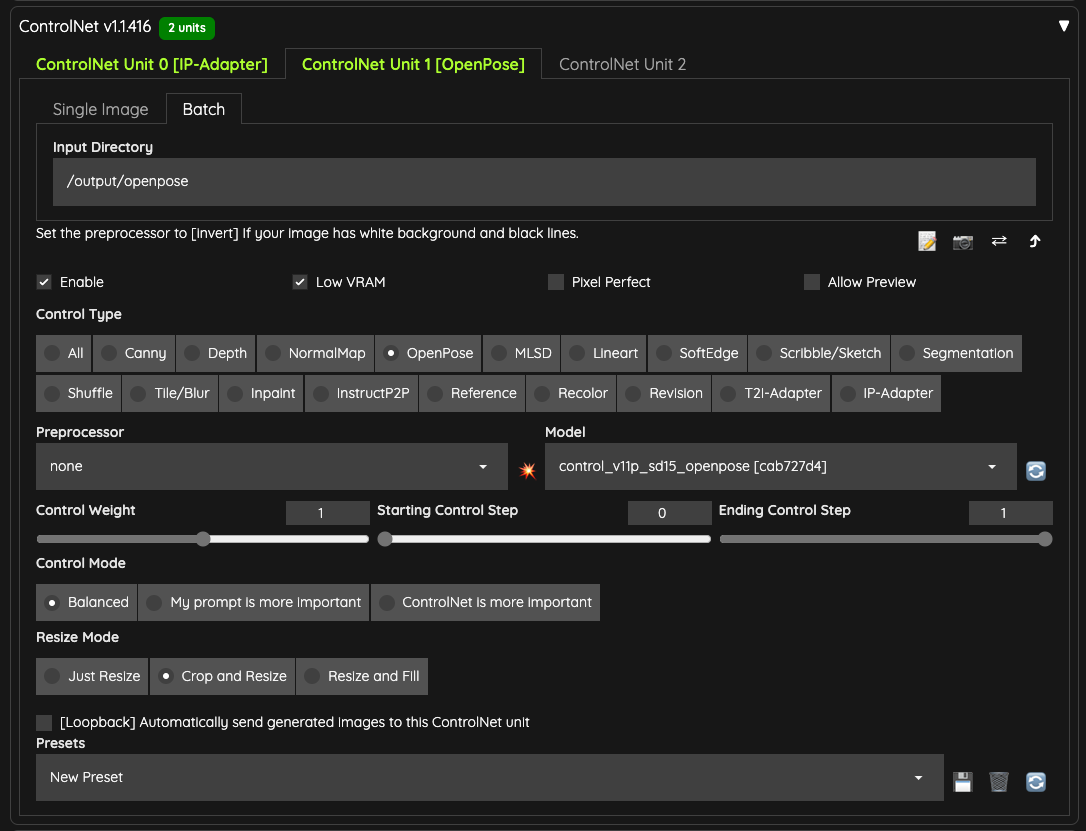
If you don't have a tool to output a skeleton map, you can use the ControlNet preprocessor to help you. However, the prerequisite is that you still need to export all frames of the video as images.
You can use tools like FFmpeg to export all frames of the video as images, then place them in the Batch input folder, and use the DWPose or related OpenPose preprocessor for processing.
In my case, I'm using a skeleton map directly here to save some VRAM and time since preprocessing also takes a while.
Configuring the Text2Image
Pay attention to the Batch sizes, and I'll explain a bit here:
- A1111 is different from ComfyUI in that ComfyUI considers the entire process as one
Batch Counts. Therefore, in ComfyUI, you need to setBatch sizesto be the same as the number of frames read to avoid animation appearing unsmooth. - In A1111, it will be based on the
Number of framesread by the AnimateDiff plugin and the source of your prepared ControlNet OpenPose. In this article's example, you will have50drawing steps. - If your
Batch sizes/Batch Countsare set to1, it means that all T2I will only be done50times. - In the case of the video in this article, with
Batch sizesset to4, it means that during the T2I process,50 x 4 = 200images will be generated in total. Because AnimateDiff has modified i2ibatch, in the image processing part, AnimateDiff will use these200images for computation (whether this is the actual operation needs detailed examination of the source code, currently, it's my personal speculation).- According to the official Github, currently modifying
Batch Sizeshas no effect, and future support may be added. The official statement:
You do not need to change batch size at all when you are using this extension.
We are currently developing an approach to support batch size on WebUI in the near future.
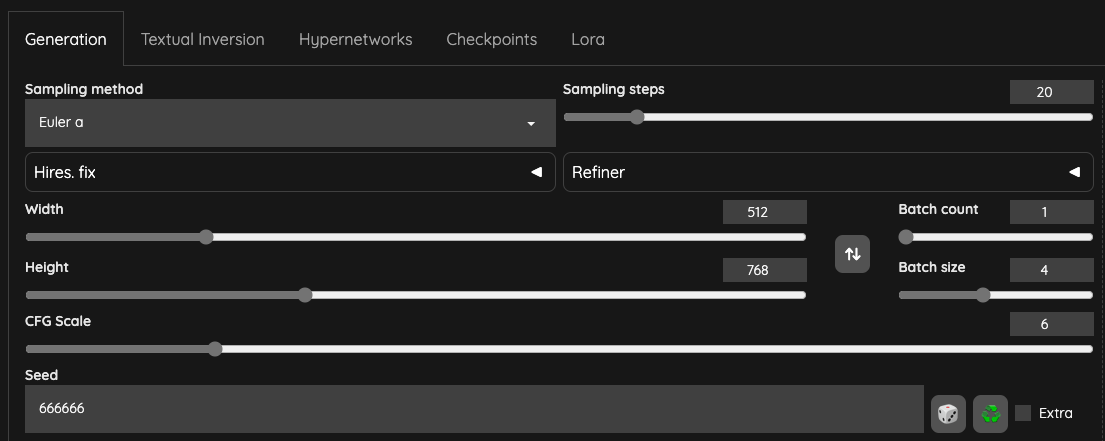
Keep the Seed setting to a fixed value because you wouldn't want to output images with completely different styles.
ADetailer
Finally, we use ADetailer to fix the face.
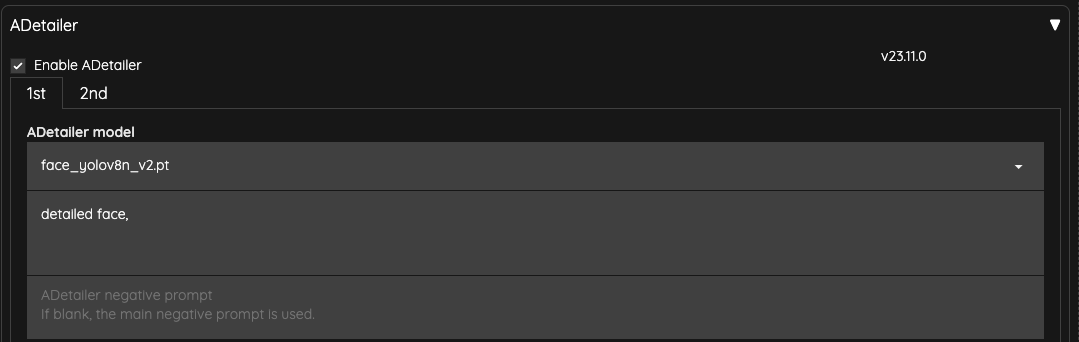
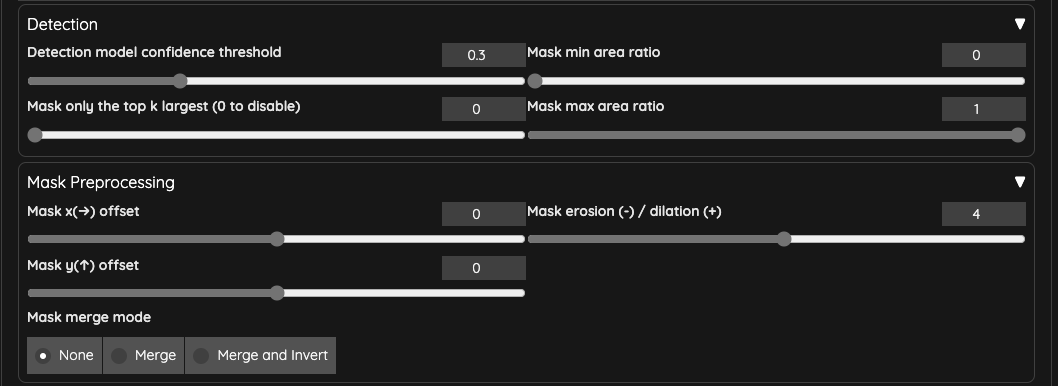
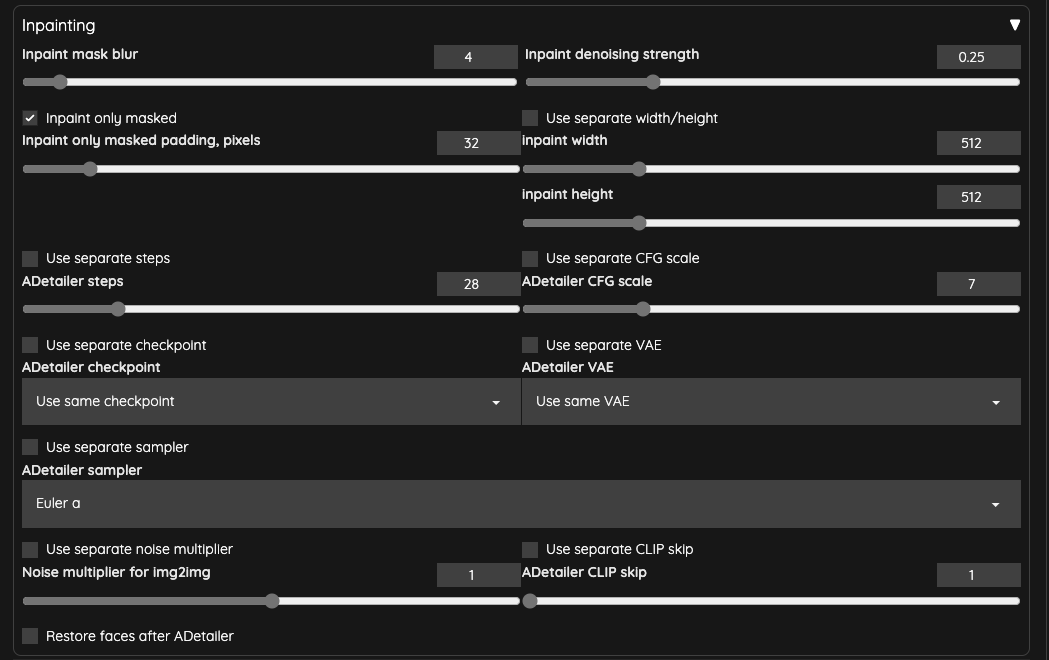
I reduced the Inpaint denoising strength of ADetailer to 0.25 to ensure that the face is not excessively redrawn, causing flickering issues.
Generation
Regarding prompts, since we use IPAdapter, we can take the image from IPAdapter and use PNGInfo to obtain our prompts. Afterward, adjustments can be made to the prompts.
Finally, let's take a look at the output results.
These three videos have been processed separately, and the output FPS is set to 16FPS. The different output settings are as follows:
Frame Interpolation = NO,Batch Size = 1Frame Interpolation = FILM,Batch Size = 4Frame Interpolation = FILM,Batch Size = 4,Stride = 4
You will notice that when using a higher Batch Size, the overall smoothness of the animation significantly improves.
Batch Size
When you are not using vid2vid but directly outputting text as a GIF, your Batch Size will determine the number of frames in the GIF (not Batch Counts). This is also explained in the Batch Size section of the author's documentation.
If you are using ControlV2V, moderately increasing Batch Size will bring good results. You can try experimenting with it.
Frame Interpolation = FILM / Interp X
When Frame Interpolation = FILM is enabled, in this article's data, I used the default value of Interp X = 10. The original video's Number of frames is 50. In the end, the generated GIF file contains a total of 491 frames.
In other words, with this option enabled, approximately 10 frames are interpolated for each frame of our original video. As a result, the final output GIF file becomes a slow-motion video.
The actual code operation is as follows:
film_in_between_frames_count = calculate_frames_to_add(len(frame_list), params.interp_x)
So, the original video of about 3.2 seconds is extended to approximately 30.2 seconds after this interpolation process. You will need to use other tools to shorten the entire video length back to the original duration.
If you have FFmpeg installed, you can use setpts to speed up the video. In the case of this article's video, this command can be used to shorten it to the same speed as the original:
ffmpeg -i input.mp4 -filter:v "setpts=0.1*PTS" output.mp4
Additional Settings
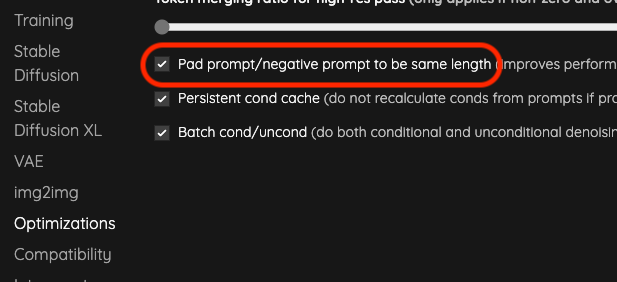
If you encounter issues using --xformers, you can adjust the AnimateDiff settings. Using sdp may solve the problem.

Additionally, because it uses the vid2vid with t2i operation, if there are issues in generating images, opening this setting might solve the problem, and it also brings some performance optimization.
Conclusion
The operation of AnimateDiff in A1111 is not significantly different from ComfyUI. The only difference is that A1111 has packaged the intermediate connections, saving some time.
For friends with tight VRAM, it's still better to use ComfyUI. Otherwise, you can reduce the length of the video (total frames) each time and then use video editing software to concatenate the files at the end.

![[LoRA Guide] Z Image Turbo Training with AI-Toolkit and Merging It!](/content/images/size/w960/2025/12/LN_845764713767329_00001_.jpg)
![[Lora] Z Image Turbo 與 AI-Toolkit](/content/images/size/w960/2025/12/hina_zImageTurbo_caline_v3-dream-1.jpg)
![[AI] 與 AI Agent 一起開發優化器](/content/images/size/w960/2025/07/00059-293292005.jpg)