
![[Lora] 切臉訓練設定誤區](/content/images/size/w960/2024/04/00037-2695236673.webp)
這是一個我一直忘記也沒有拿出來講的事情,在 Kohya 訓練參數當中,所使用的 face_crop_aug_range 一直都有一個誤會。
其實單純設定他是沒有效果的。
face_crop_aug_range
這個參數在 Kohya-ss/sd-script 當中,其實是需要針對檔案名稱作特殊處理,這個參數才會生效。然後我之前的文章好像都沒特別提到這件事情。
根據原始碼 train_util.py#L1095,
face_cx = face_cy = face_w = face_h = 0
if subset.face_crop_aug_range is not None:
    tokens = os.path.splitext(os.path.basename(image_path))[0].split("_")
    if len(tokens) >= 5:
        face_cx = int(tokens[-4])
        face_cy = int(tokens[-3])
        face_w = int(tokens[-2])
        face_h = int(tokens[-1])

return img, face_cx, face_cy, face_w, face_h
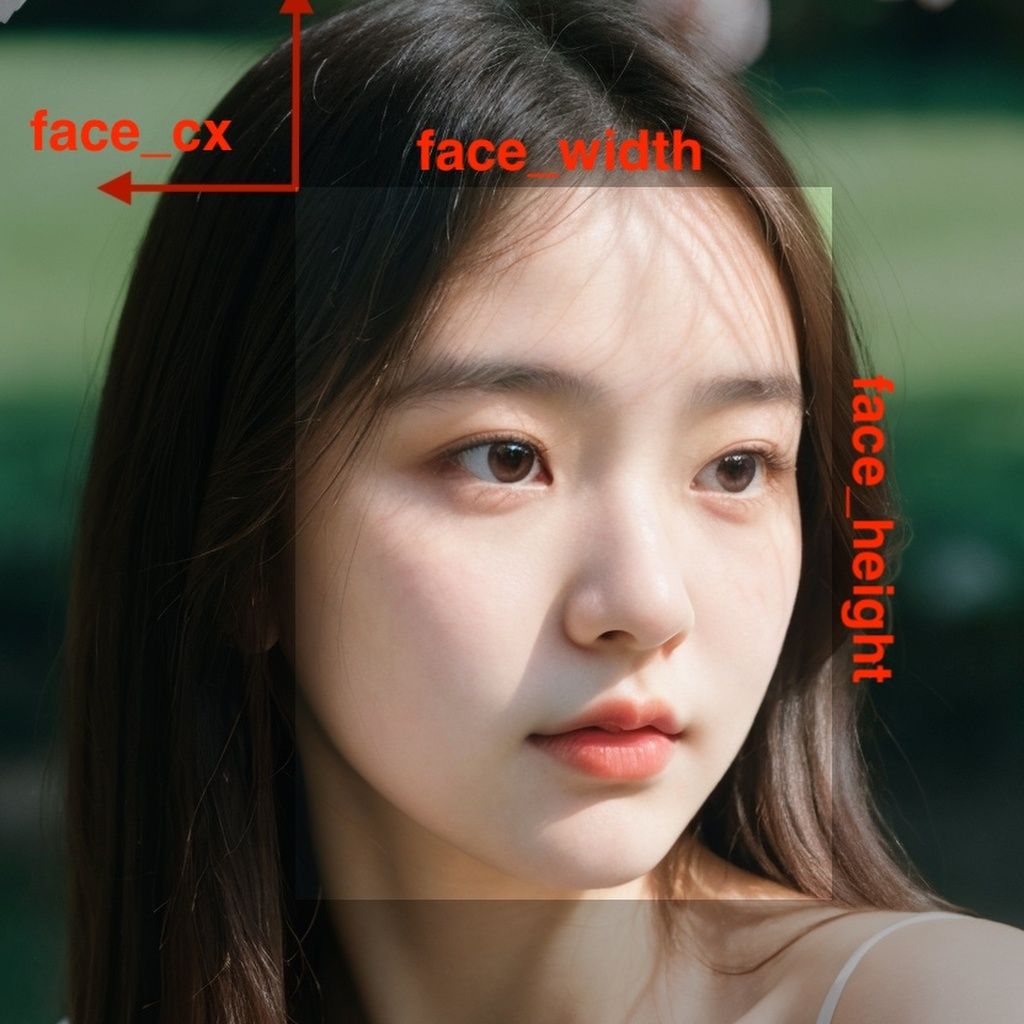
所以說,當你的圖片名稱不符合這個規則時,--face_crop_aug_range 基本上是不會生效的,他的特殊命名方式是,
img_XXX_100_200_400_600.jpg

img_XXX_{臉部 x 軸起點座標}_{臉部 y 軸起點座標}_{臉部寬度}_{臉部高度}.jpg
換句話說,你必需要在檔案命名上,告訴他這張照片的臉的位置在哪裡,這樣這個訓練參數才會生效。舉例來說就是這樣,

懶人工具
我以前有寫一個小工具在做這件事情,最近在 杰克艾米立 的 Discod 群中剛好聊到分桶的事情,所以就把之前的工具拿出來改一下。
usage: resize_image.py [-h] [--src_dir SRC_DIR] [--dest_dir DEST_DIR] [--disable_no_upscale] [--max_reso_width MAX_RESO_WIDTH] [--max_reso_height MAX_RESO_HEIGHT] [--min_size MIN_SIZE] [--max_size MAX_SIZE]
                       [--reso_steps RESO_STEPS] [--face_detect] [--face_detect_model FACE_DETECT_MODEL] [--device DEVICE] [--dry_run] [--debug] [--override]

options:
  -h, --help            show this help message and exit
  --src_dir SRC_DIR     Path to source directory
  --dest_dir DEST_DIR   Path to destination directory
  --disable_no_upscale  Turn off no upscale, no_upscale default is True
  --max_reso_width MAX_RESO_WIDTH
                        Max resolution width, default: 512
  --max_reso_height MAX_RESO_HEIGHT
                        Max resolution height, default: 512
  --min_size MIN_SIZE   Minimum size, default: 256
  --max_size MAX_SIZE   Maximum size, default: 1024
  --reso_steps RESO_STEPS
                        Resolution steps, default: 64
  --face_detect         Detect faces in the image and crop to the face
  --face_detect_model FACE_DETECT_MODEL
                        Path to the face detection model file, download from: https://github.com/akanametov/yolov8-face/releases/download/v0.0.0/yolov8n-face.pt
  --device DEVICE       YOLO device, default: cuda
  --dry_run             Print out the image info without saving
  --debug               Print out the image info
  --override            Override existing file in the destination directory
總之你可以用他自動幫你以臉部為主將圖片裁切成訓練需要的分桶大小,同時,你可以使用 --debug 或是 --dry_run 先觀察一下你的圖片可能會被分桶的數量。
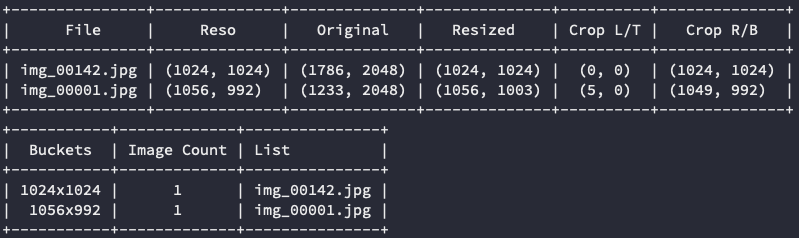
要留意的是,這邊的 Image Count 必需要乘上你訓練時的 Repeats 數量,才會是真實分桶下的執行次數。
另外,如果使用 --face_detect 臉部預先裁切的話,分桶的數量可能跟訓練上會略有差異。雖然兩邊的作法都一樣,不過我的臉部切分的計算方式略為不同。
我是以偵測的臉部中心為主,然後向外擴張 --reso_steps 的整數量級,並且依照訓練尺寸的比例來對外擴張,所以他被裁切出來的會依照你的 --max_reso_width 與 --max_reso_height 的比例去裁切。一般來說都會被切成正方形,如果你的圖片夠大的話。
以剛剛上面那張照片為例子,他執行後會裁切成這樣,
這個工具只會剪下臉部附近的範圍,如果沒有偵測到臉部,他就會返回原始圖片不做任何處理。如果你想要更大一點的範圍,你可以修改上面的程式,加入一點留白的效果,就能裁切到大概肩膀左右的區域了。
小結
--face_crop_aug_range 基本上可以棄用了其實。

![[LoRA Guide] Z Image Turbo Training with AI-Toolkit and Merging It!](/content/images/size/w960/2025/12/LN_845764713767329_00001_.jpg)
![[Lora] Z Image Turbo 與 AI-Toolkit](/content/images/size/w960/2025/12/hina_zImageTurbo_caline_v3-dream-1.jpg)
![[AI] 與 AI Agent 一起開發優化器](/content/images/size/w960/2025/07/00059-293292005.jpg)