![[ComfyUI] ControlNet, IPAdapter, AnimateDiff Objectives and Background Processing](/content/images/size/w960/2024/01/00052-3562496567.png)
The main theme of this article originates from the struggle between ControlNets. Speaking specifically about ControlNets, in certain combinations, it can be challenging to replace targets in the image, such as clothing, background, etc. Here, I present several discussion directions in the hope that they will be helpful.
Prompt & ControlNet
As mentioned in my previous article [ComfyUI] AnimateDiff Image Process, using the ControlNets in this context, we will focus on the control of these three ControlNets:
- OpenPose
- Lineart
- Depth
We use ControlNet to extract image data, and when it comes to description, theoretically, through ControlNet processing, the results should align with our expectations. However, in practice, when each ControlNet is used individually, the situation may not be as ideal.
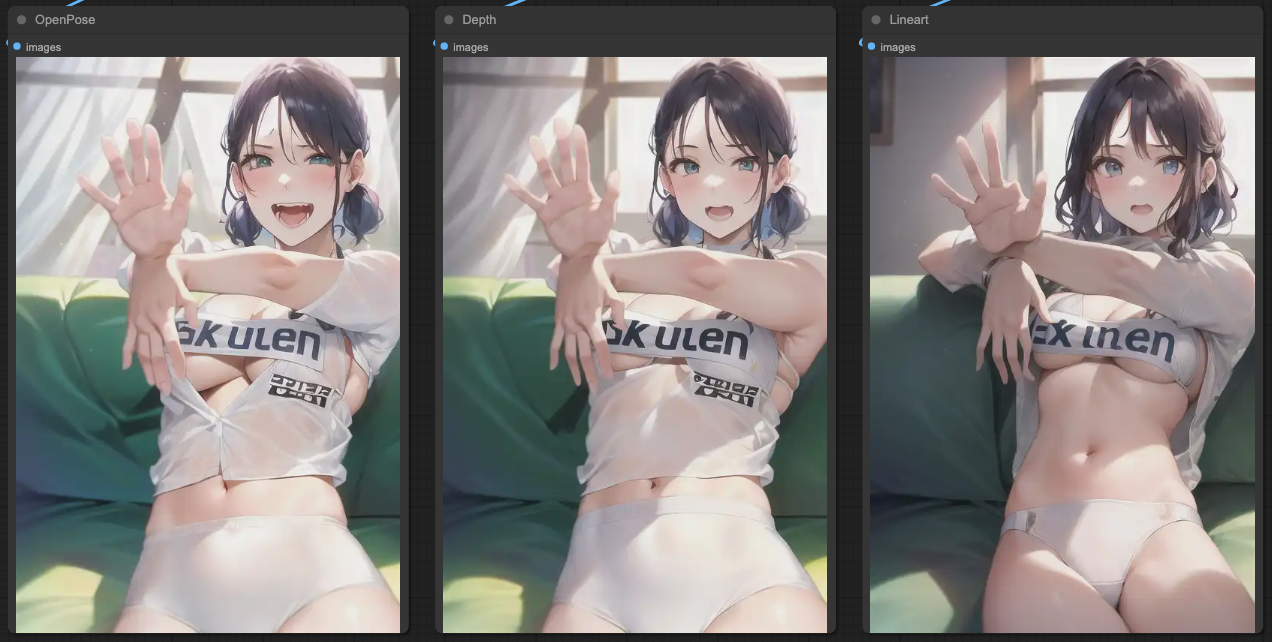
This situation is not limited to AnimateDiff; in general, or when combined with IP-Adapter, the issues may become more apparent. Let's illustrate with a practical example. Below is the prompt I am currently using:
adult girl, (extreme detail face),
(white bikini), bikini, short top,
indoor, in front of sofa, bed, window, (bedroom),
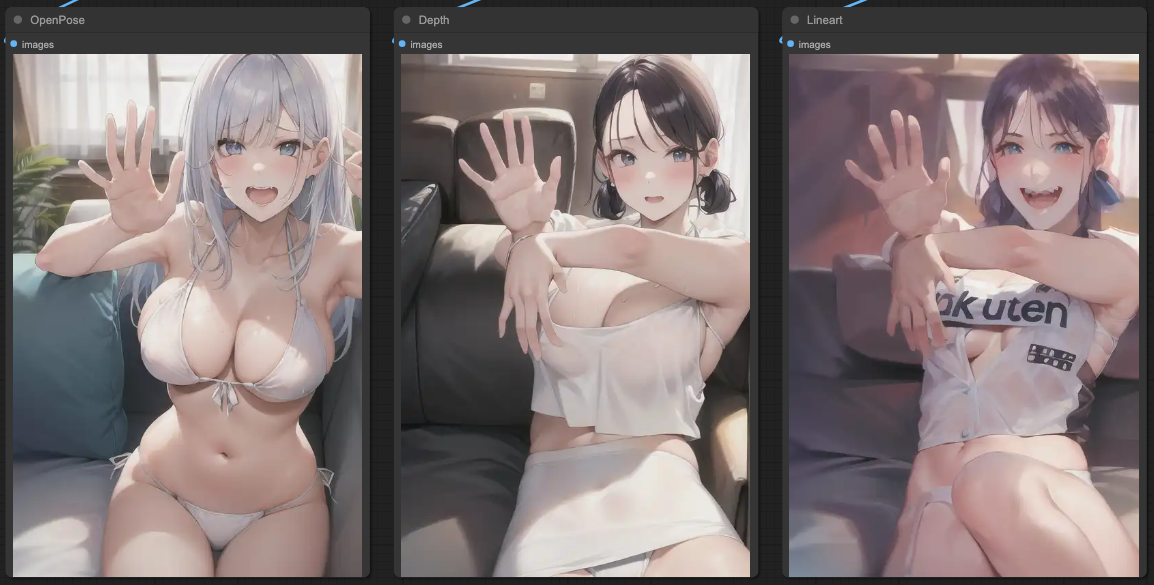
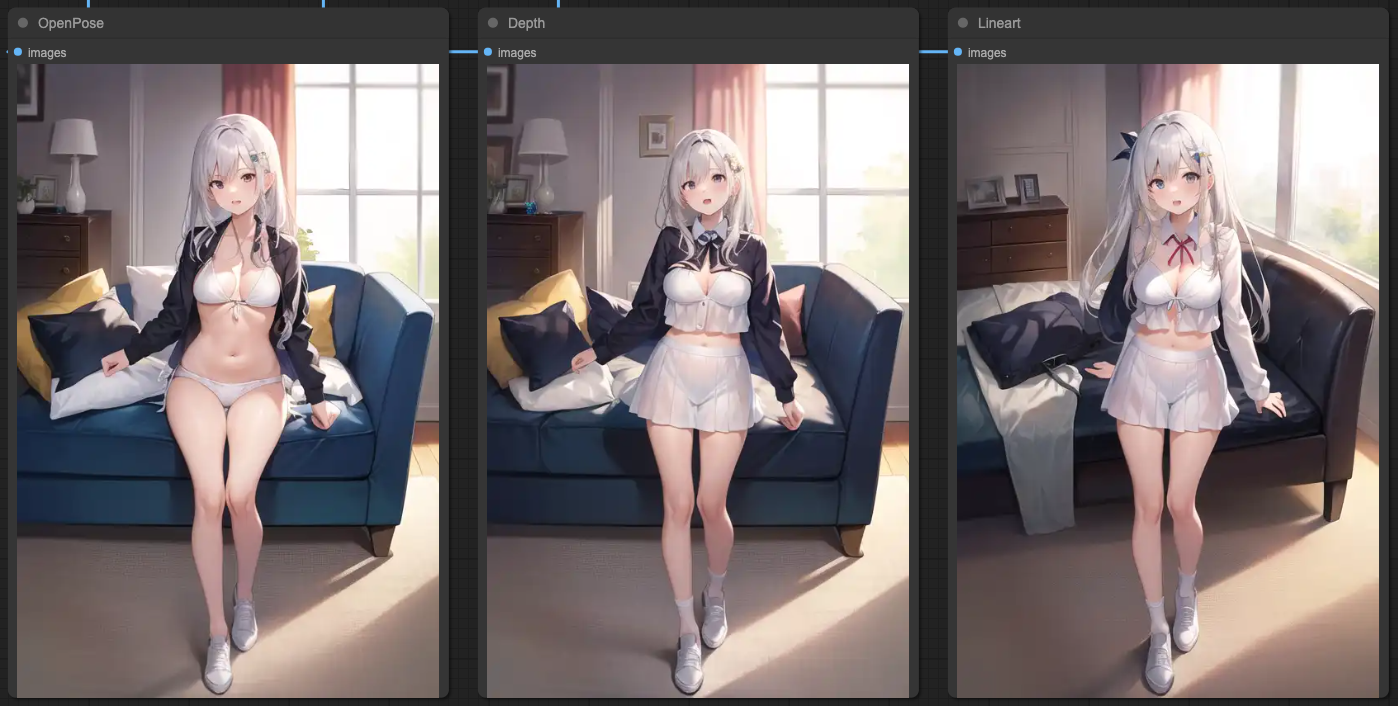
Now, let's take a look at the outputs of the three ControlNets.
OpenPose
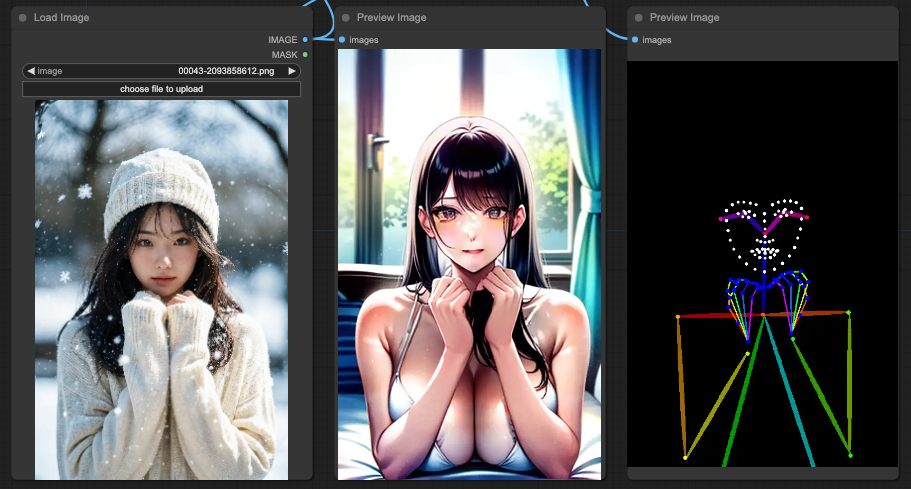
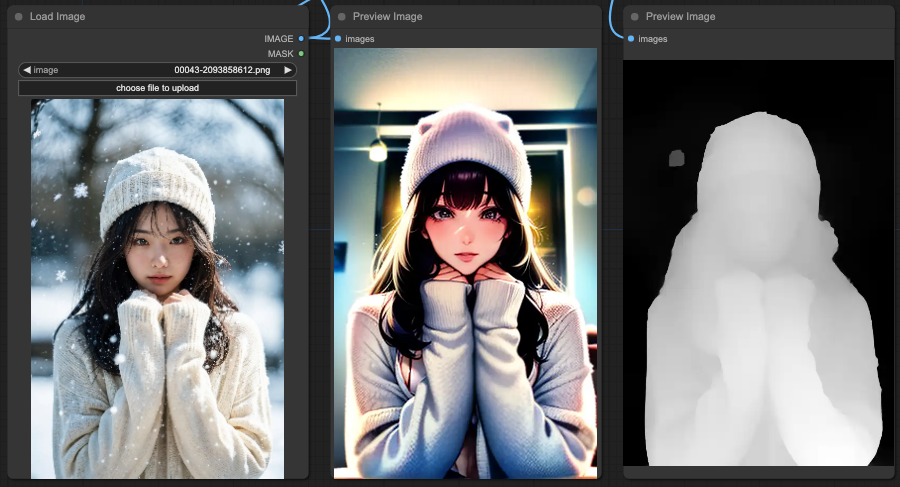
Depth
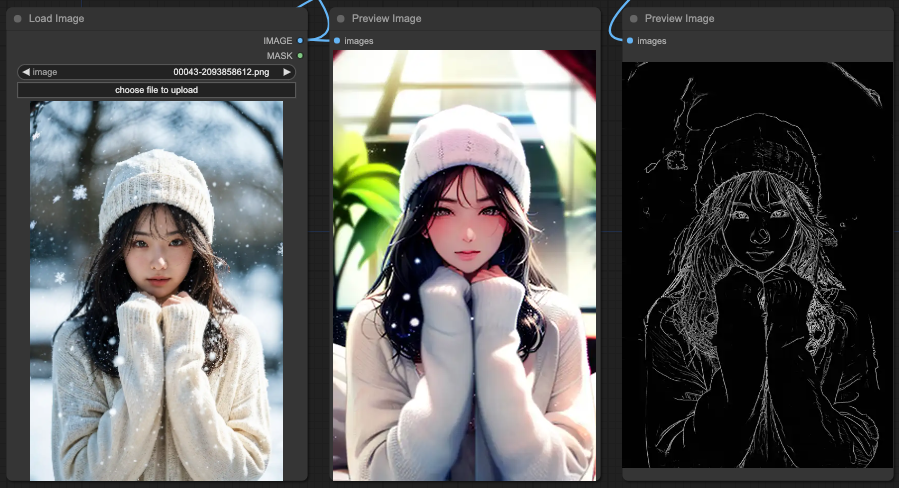
Lineart
You will notice that OpenPose performs the most reasonably overall in interpreting the prompt. Next is Depth, which retains a reasonable portion of the background. Finally, Lineart also retains a reasonable portion of the background.
What happens if we combine these ControlNets?
OpenPose + Depth + Lineart
The result of combining all ControlNets is almost completely deviated from the content of the prompts.
OpenPose + Depth
In the case of combining only OpenPose and Depth, you will notice that the background window is relatively in line with the prompts.
OpenPose + Lineart
In the above combination, you'll find a strange result where both the swimsuit and the sweater appear simultaneously, but the background becomes unclear.
Depth + Lineart
And finally, Depth + Lineart completely disregards all concepts of the prompts and just redraws the scene.
Why focus on these three sets of ControlNets
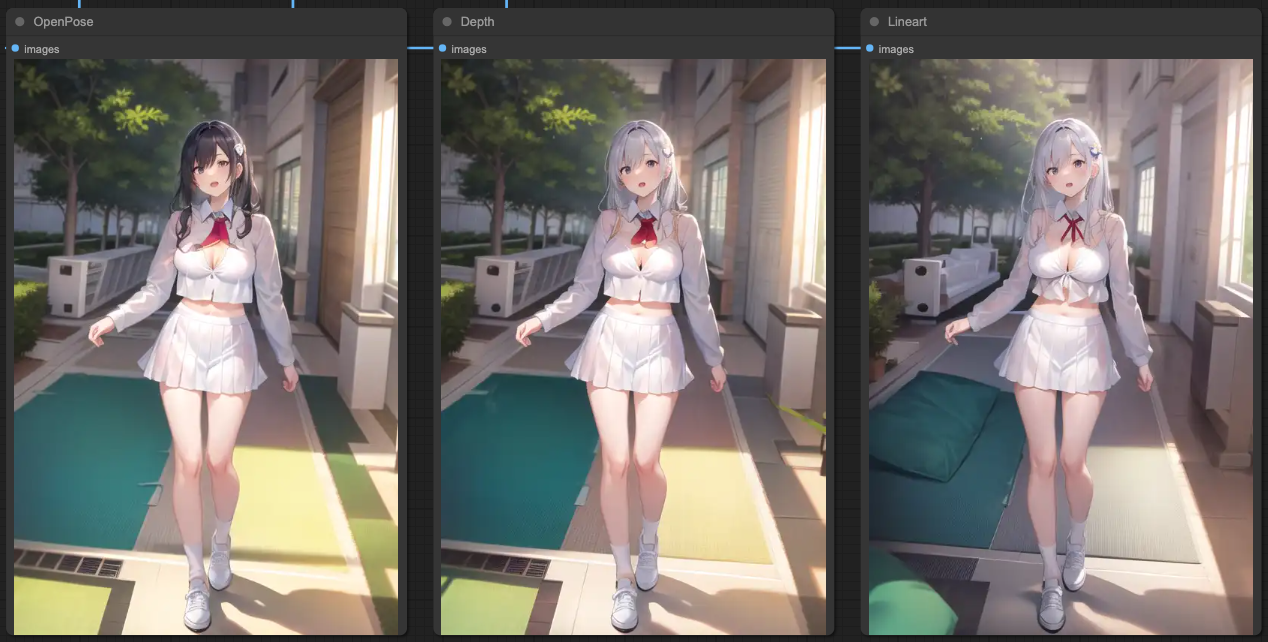
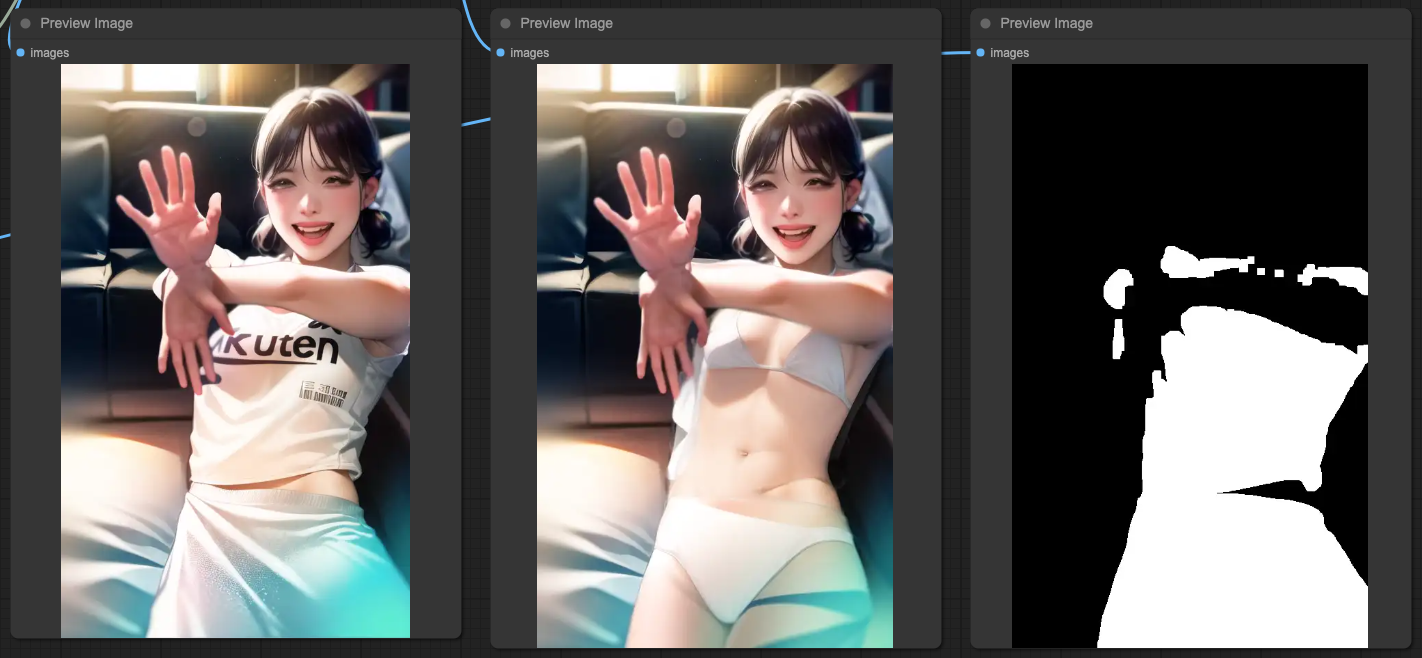
Let me switch to another source of reference to show you why combining ControlNets is necessary.
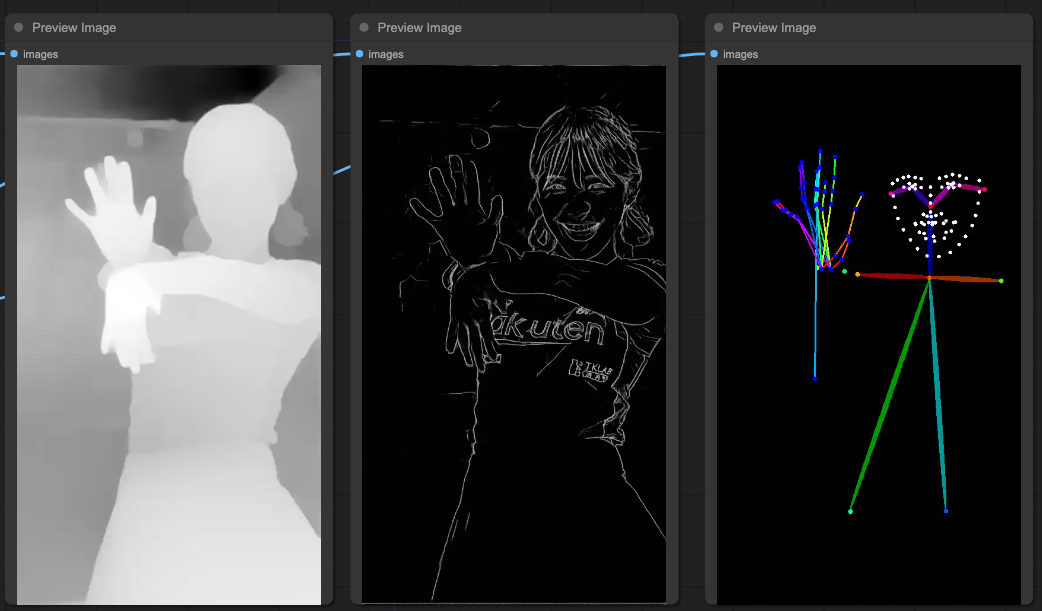
You can see that the OpenPose on the far right is not as accurate as it seems. Although it clearly defines the face, the hand movements are practically unusable. Therefore, we still need to use other ControlNets to clearly determine limb movements and the relationship between limbs.
If we directly sample images based on the three sets of ControlNets mentioned above, the result would be like this:
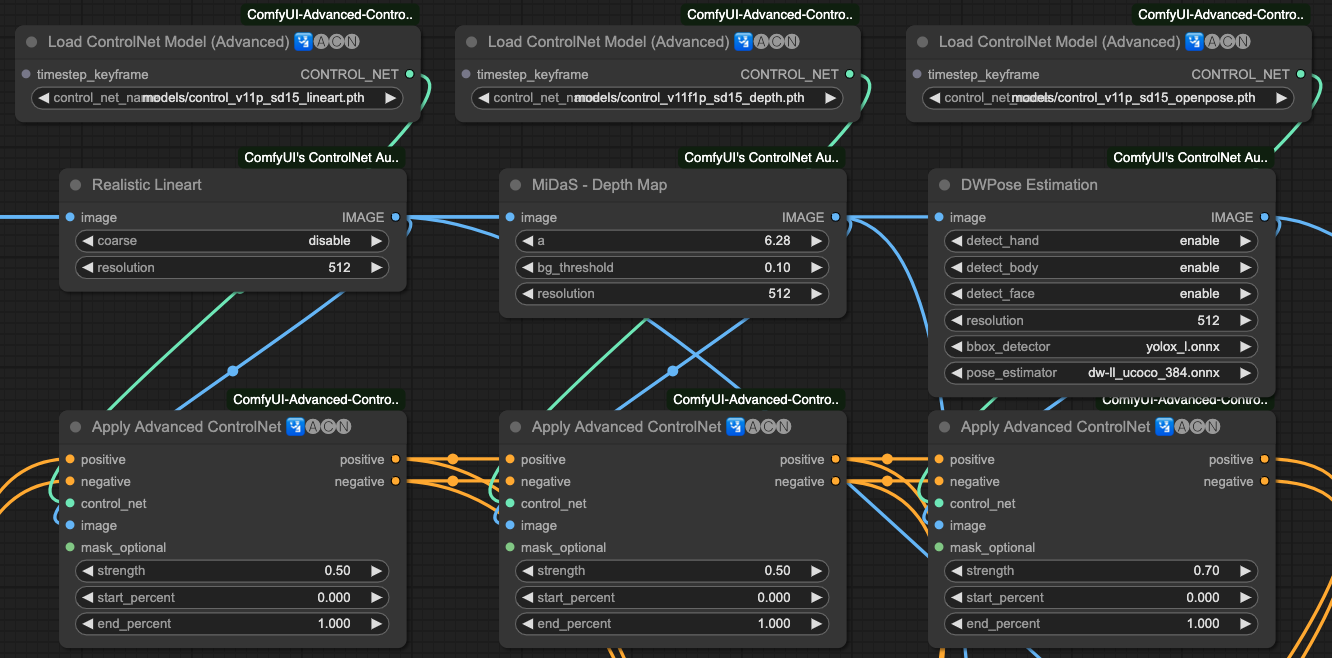
In the case of individual sampling, it's the same as explained at the beginning of the article. Next, we need to connect the ControlNets to achieve a result that aligns with our prompts. The sequence of connections here is:
Lineart x 0.5 > Depth x 0.5 > OpenPost x 0.7
If we output each connection step separately, we will get the following results:
If we output the KSampler according to the sequence of our ControlNets, we will get the following results:
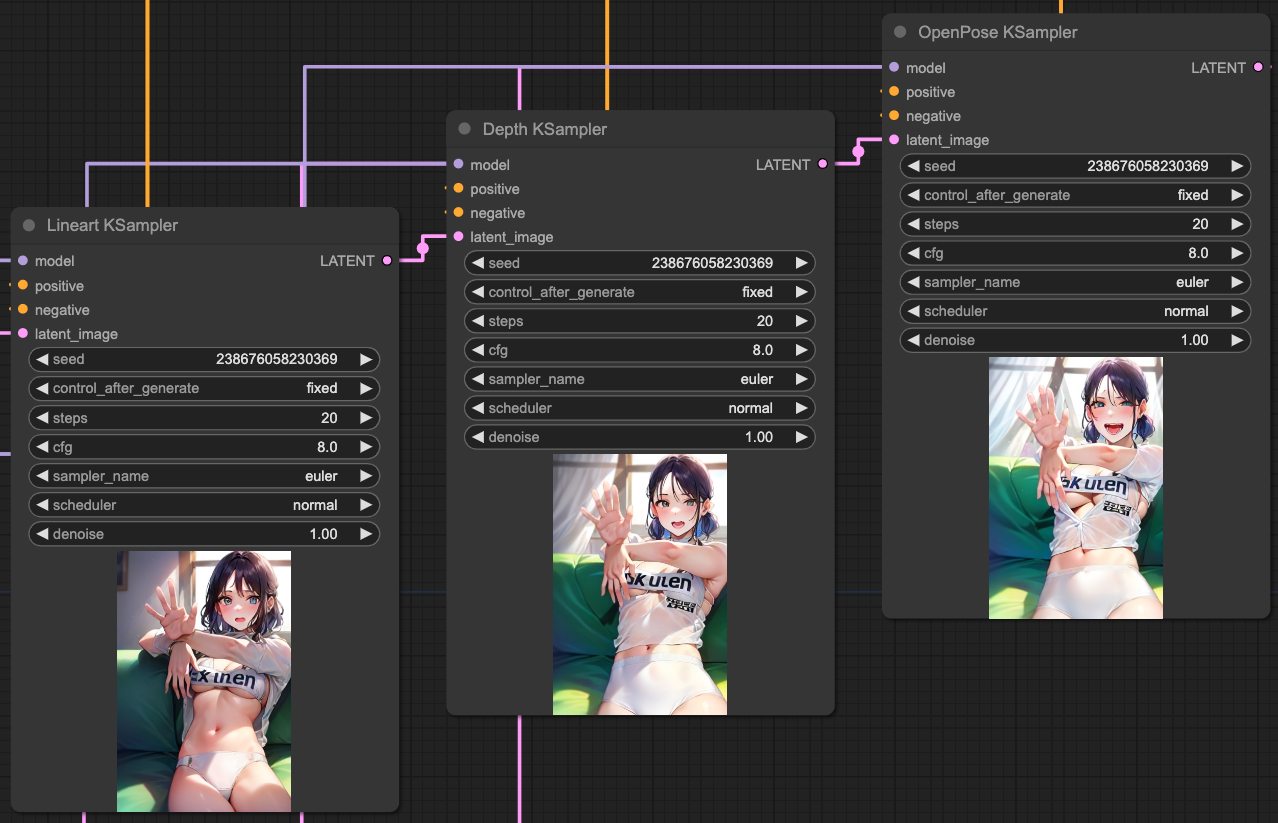
So, based on these results, you can connect ControlNets and, according to the KSampler's outcome, connect KSampler again to obtain a more accurate output.
Mask & ControlNet
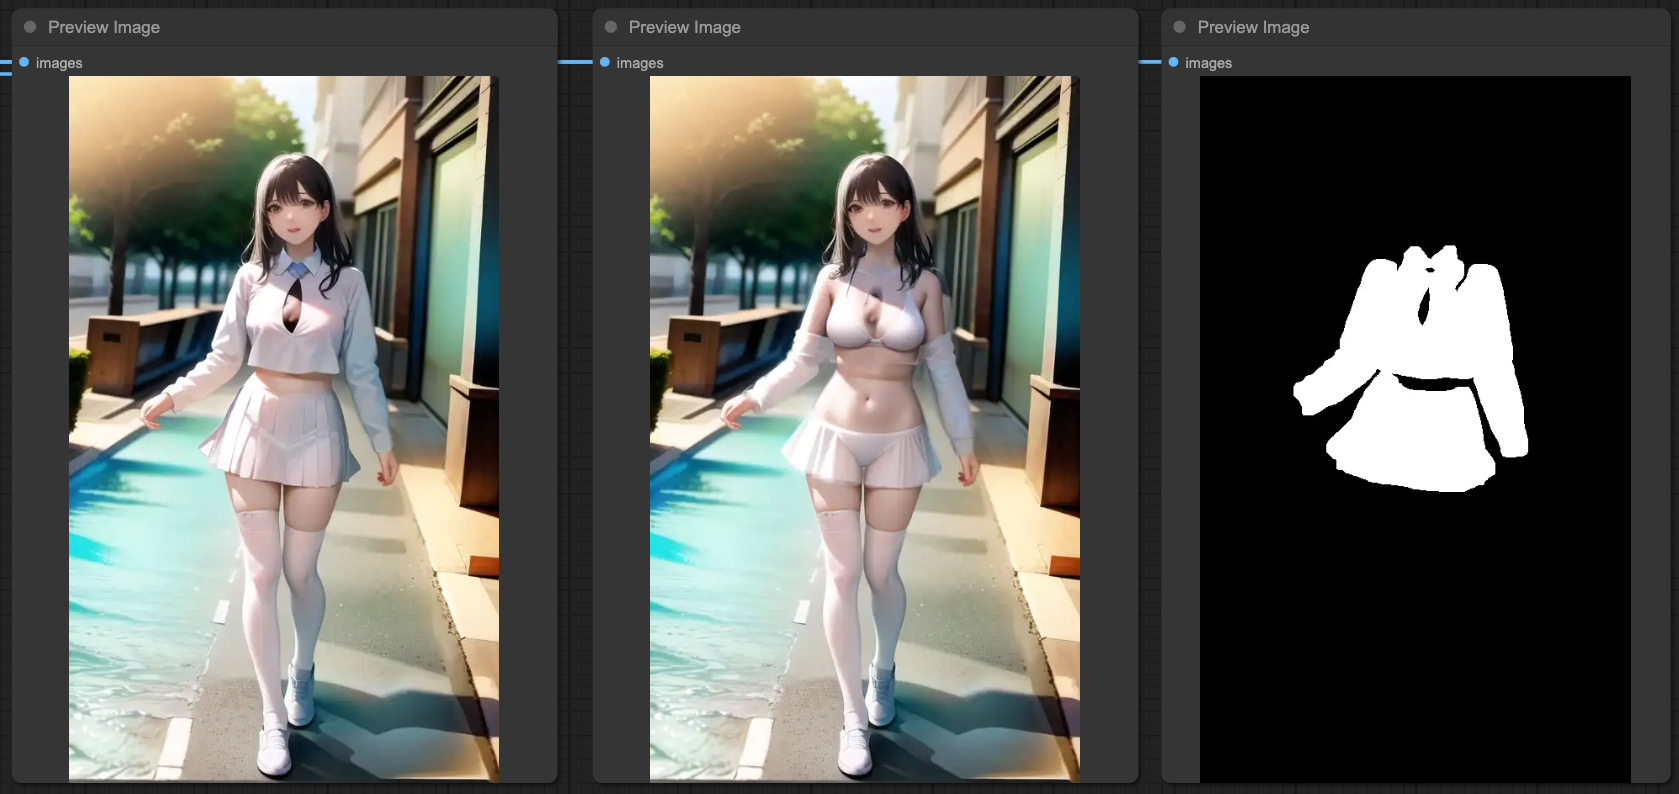
Based on the above results, when we test other input sources, you will find that it is not as beautiful as expected. Let's try another source, and you will still encounter the situation where features are not clear.
You will notice that with the same steps, in the final output of OpenPose, it still basically refers to the source content, and the entire background and clothing are not the desired output. At this point, we need to manipulate the ControlNet's MASK. In other words, we let the ControlNet read the MASK of the person for processing and separate the CONDITIONING between the original ControlNets.
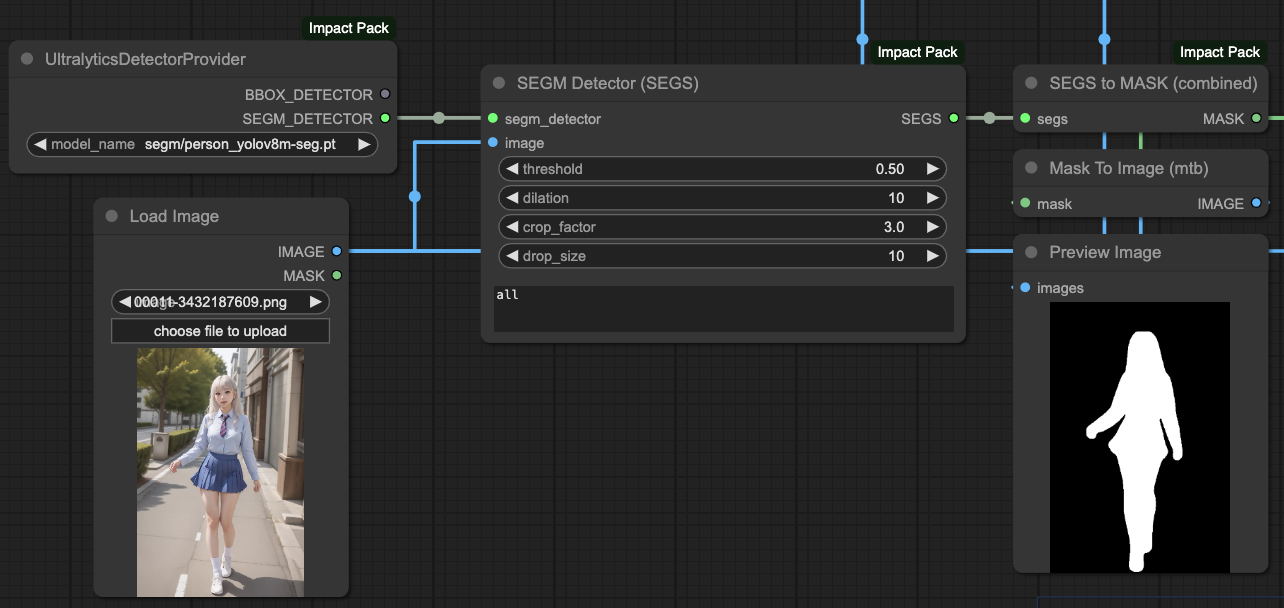
Our approach here is:
- First, obtain the MASK for the target object.
- Put the MASK into ControlNets.
- Separate the CONDITIONING of OpenPose.
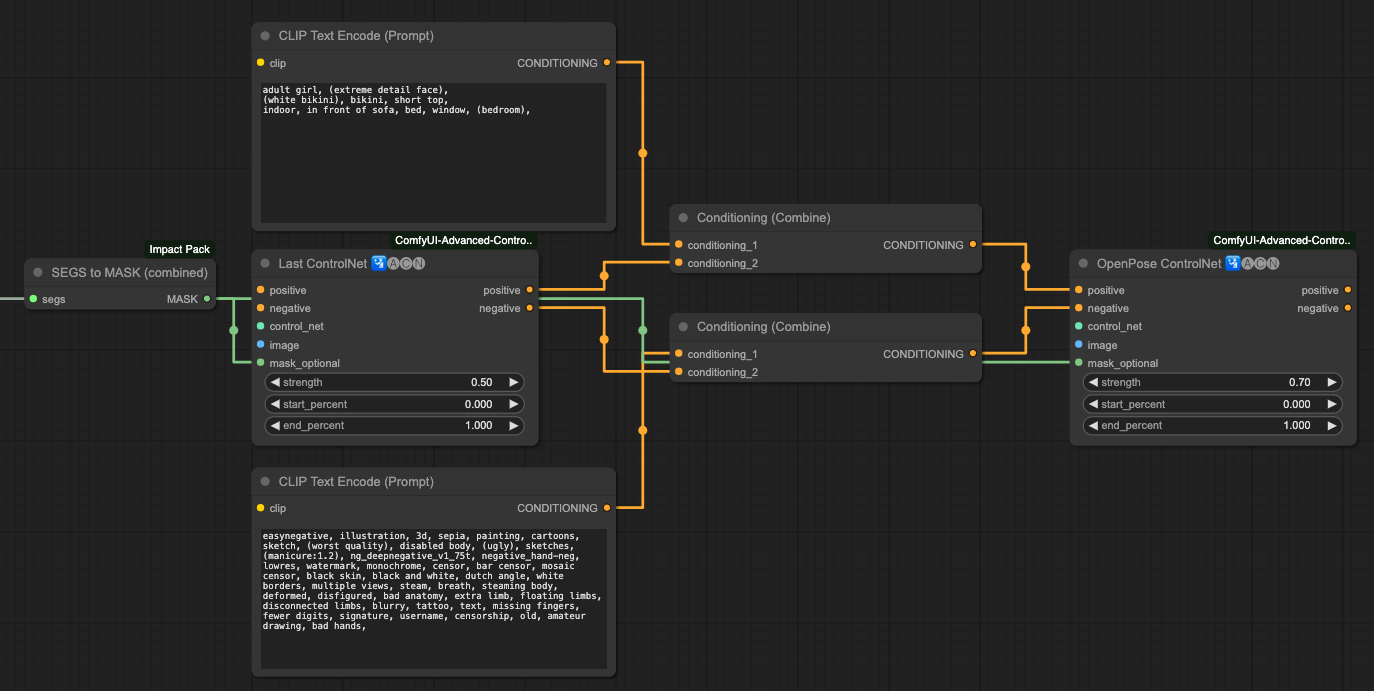
After this separation process, you will get an output result that aligns well with your prompt.
Every type of image source, when paired with ControlNets and the masks generated from their content, may not have the optimal solution as I've presented. You can experiment with different combinations to achieve the best output result. Here, I'm providing one way of using masks to make the output results closer to the scenes described in our prompts.
Please note that not all source images are suitable for using MASK or combining CONDITIONING in this way. You need to test different combinations to achieve better output.
SEGs Detailer & ControlNets
Similar to the use of MASK as mentioned above, this approach is more towards post-processing. In other words, we perform post-processing on all ControlNets after they have processed the images.
The advantage is that it doesn't require much consideration of the correspondence between ControlNets and MASK, and you don't need to adjust the order of ControlNets or the separation processing of prompts. However, the results of this approach may not necessarily be better. You need to compare the differences between these two approaches and choose the one you find more suitable.
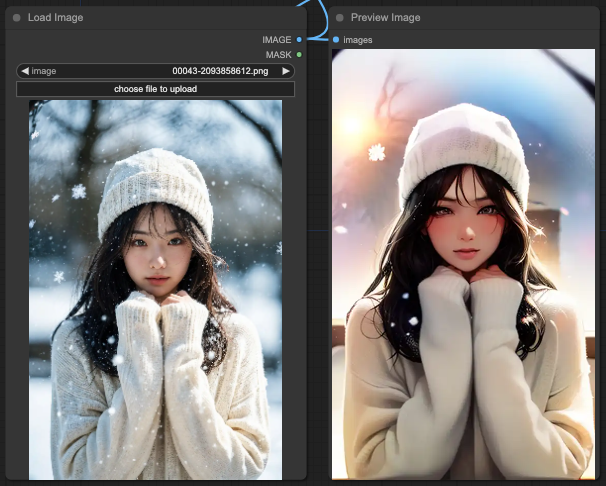
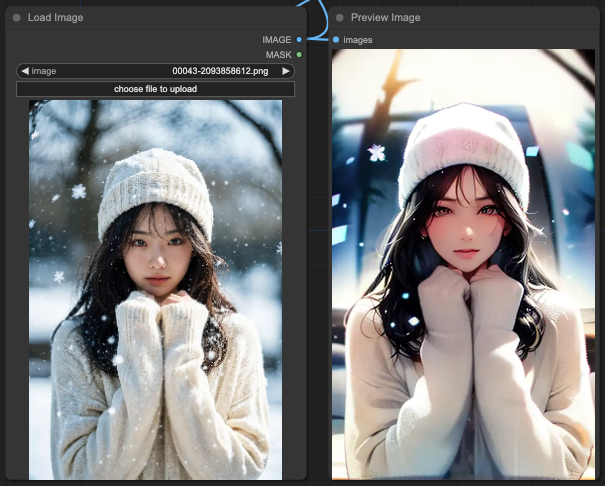
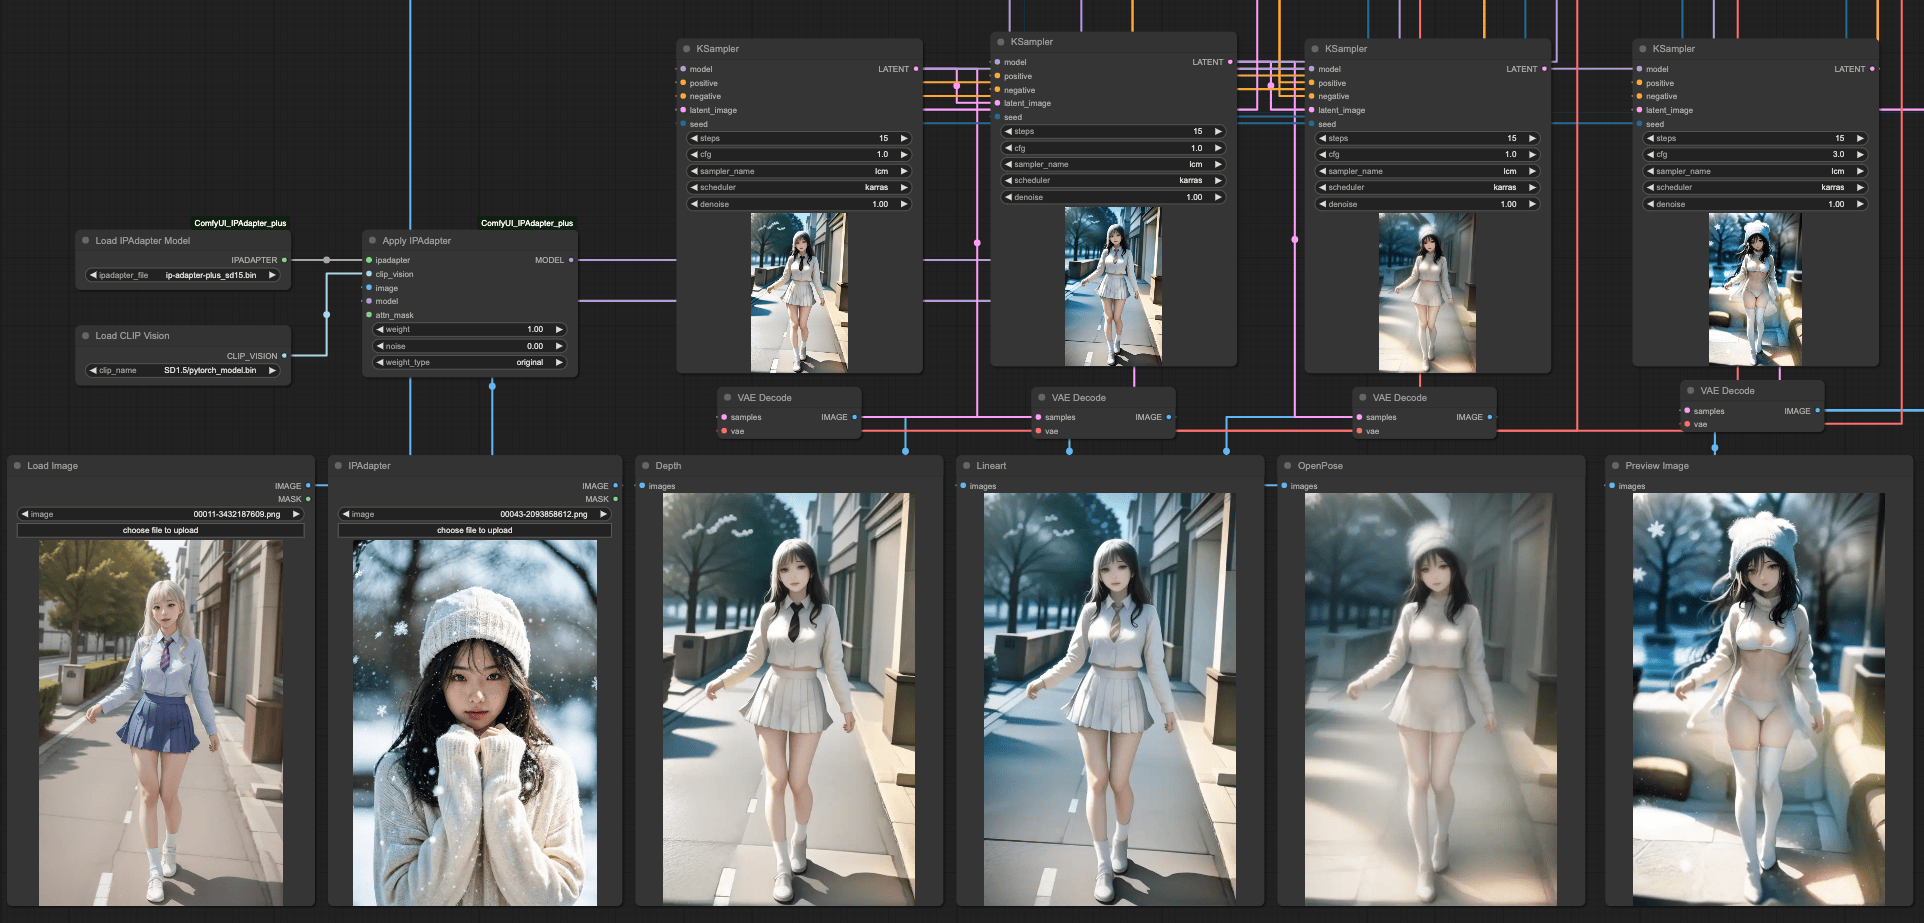
IPAdapter & ControlNets
Firstly, we need to clarify what effect you want to achieve when using IPAdapter in the entire workflow. Generally, IPAdapter can reference the entire input image or just focus on the face. Here, we'll use the entire image for explanation, and this part will have more complex situations and interference with the design of ControlNets.
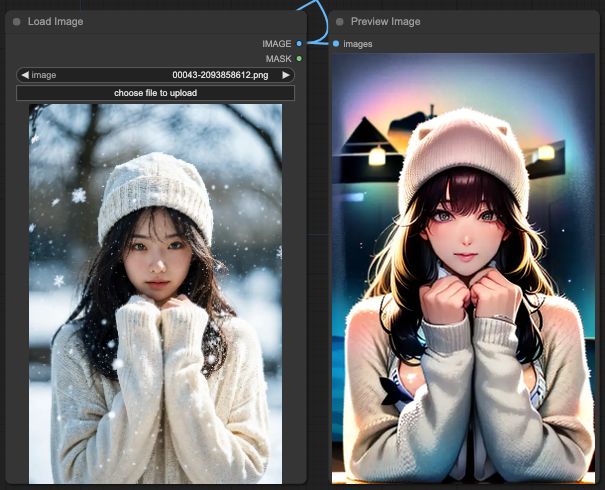
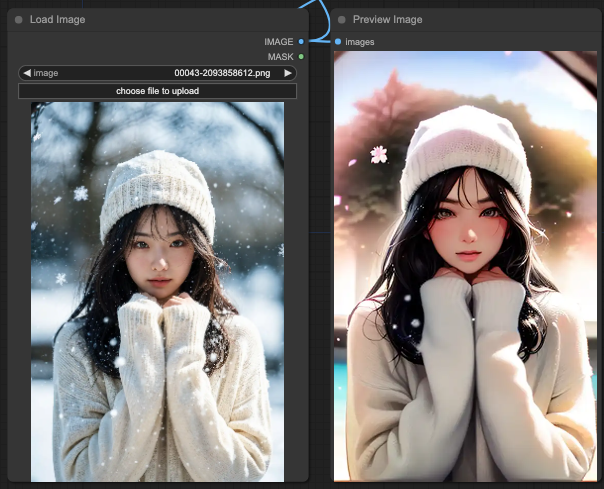
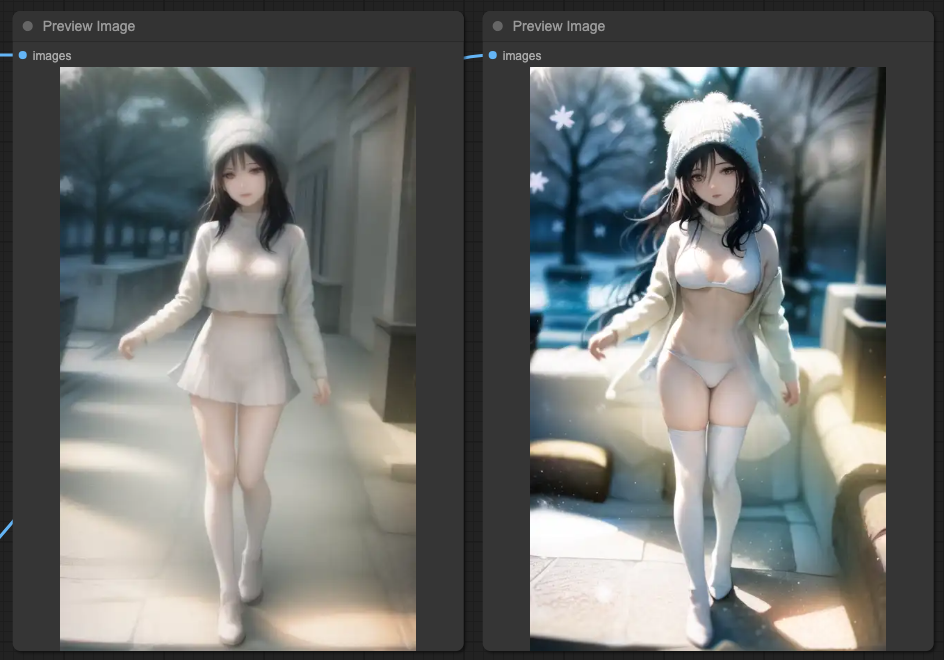
If you want to interfere with the results of IPAdapter using MASK and ControlNets, the actual operation will be very complicated. Here, let's first look at the effects of IPAdapter combined with three ControlNets separately.
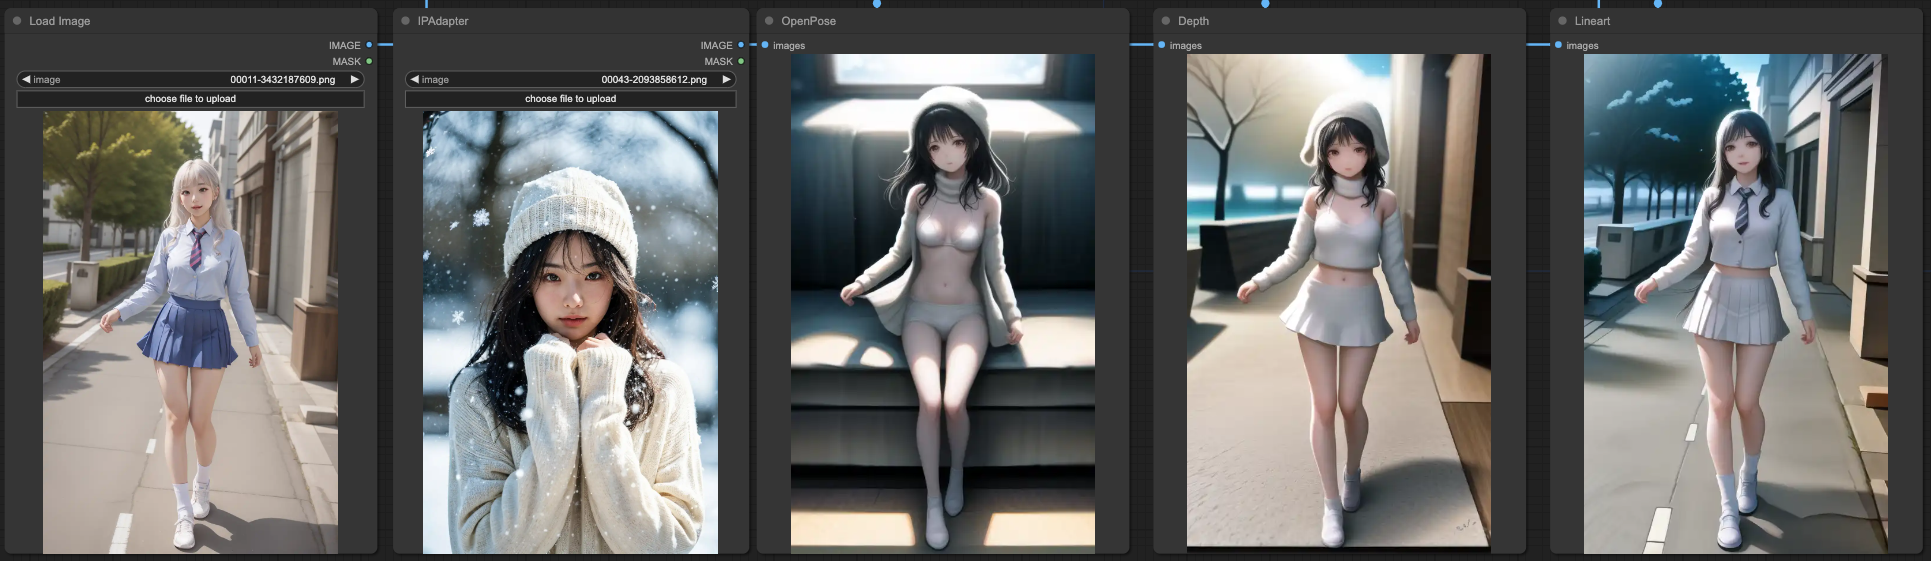
Our basic prompt remains the same, and the result is still that OpenPose is closest to the prompt, while the other two are closer to the original input image. In this case, no matter how you combine these ControlNets, you will ultimately get a result that blends IPAdapter with the original image. After all, this is the intended purpose of IPAdapter, and its strength will far exceed the content described by your prompt, resulting in a blended image.
Therefore, based on the final output of KSampler, we can do it again, similar to the individual KSampler connections of ControlNets, just doing it again before the final output.
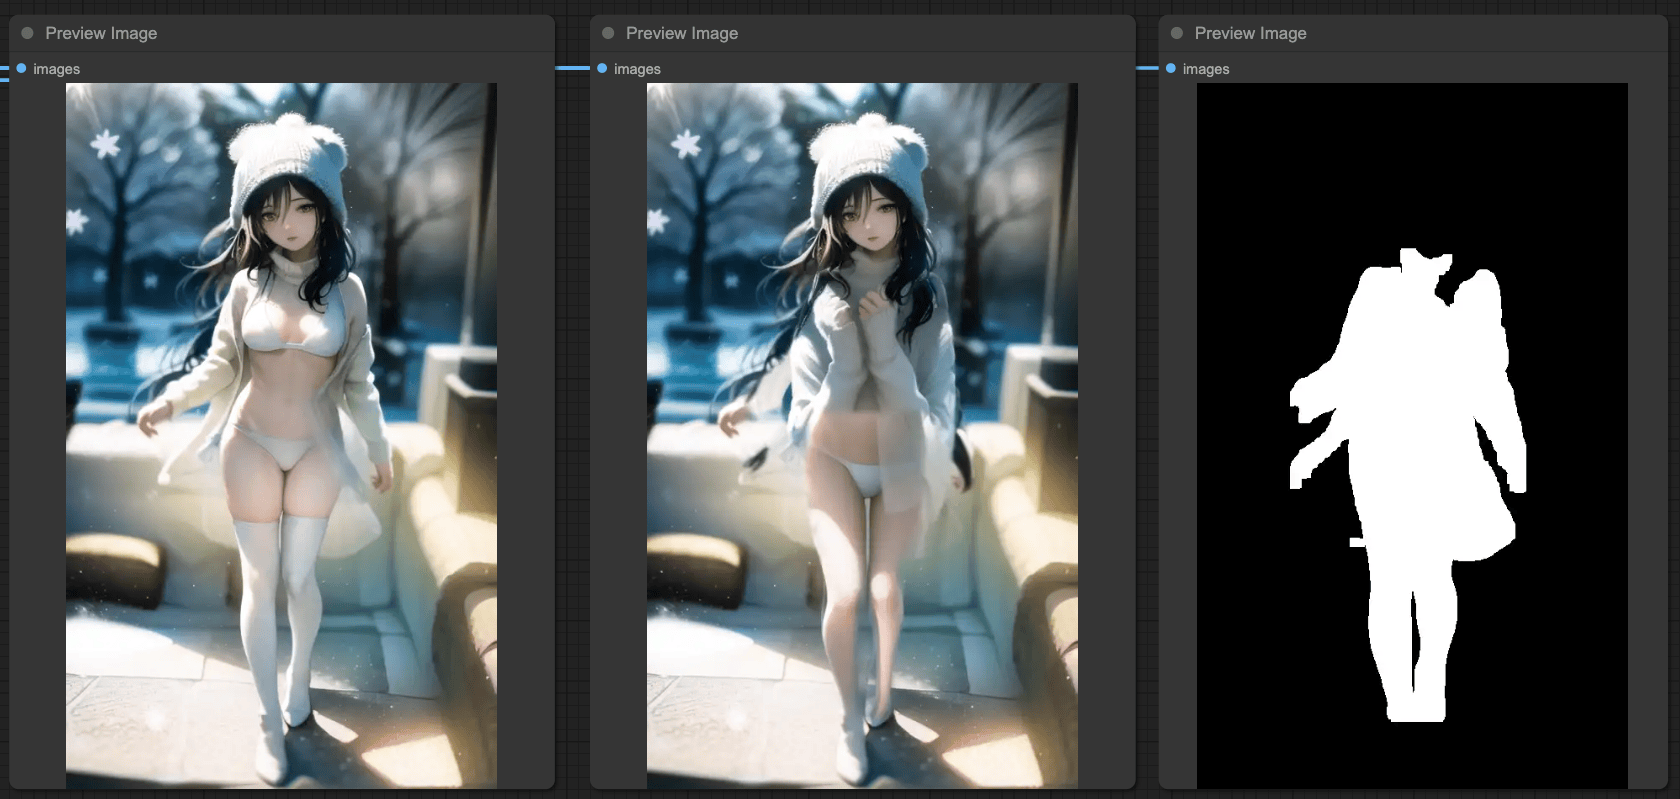
SEGs and IPAdapter
There is actually an issue between IPAdapter and Simple Detector. Since IPAdapter connects to the entire model for processing, when you use SEGM DETECTOR, you will detect two sets of data—one is the original input image, and the other is the reference image from IPAdapter.
So, when you want to use SEGSDetailer, make sure that the model source in your BasicPipe is the original model source. If you use the output MODEL from IPAdapter as the source, the final processing result may not be what you want.
AnimateDiff & ControlNets
Finally, integrating all the operations with ControlNets, we can expect the following effects in AnimateDiff processing:
- Stability in clothing and background.
- Reasonable and continuous body movements.
- Optimization of facial expressions.
Before starting this part, please make sure that your ComfyUI's ComfyUI Impact Pack is updated to the latest version, as we need two new features inside.
I mentioned the stabilization of video using AnimateDiff in a previous article, [ComfyUI] IPAdapter + OpenPose + AnimateDiff Stabilize Video](https://blog.hinablue.me/comfyui-ipadapter-openpose-animatediff-stabilize-video/). Interested individuals can refer to that for more details.
With the update of ComfyUI Impact Pack, new methods for facial repair, clothing control, and other actions have become available. These methods are more effective and can improve the output speed compared to what I discussed in my previous article.
You can refer to the workflow provided by the author to understand the entire process:
The author has also provided a video for reference; note that the author's videos do not have sound, which adds an interesting element.
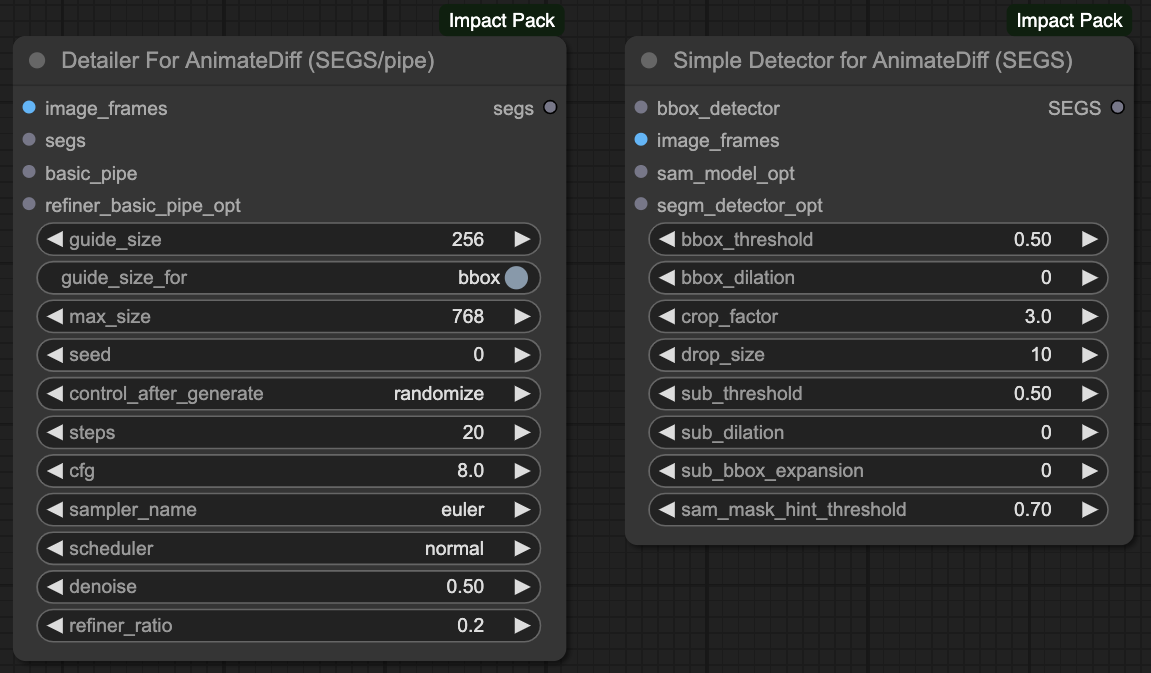
Detailer for animateDiff
Next, we will follow the original author's production method to adjust our output.
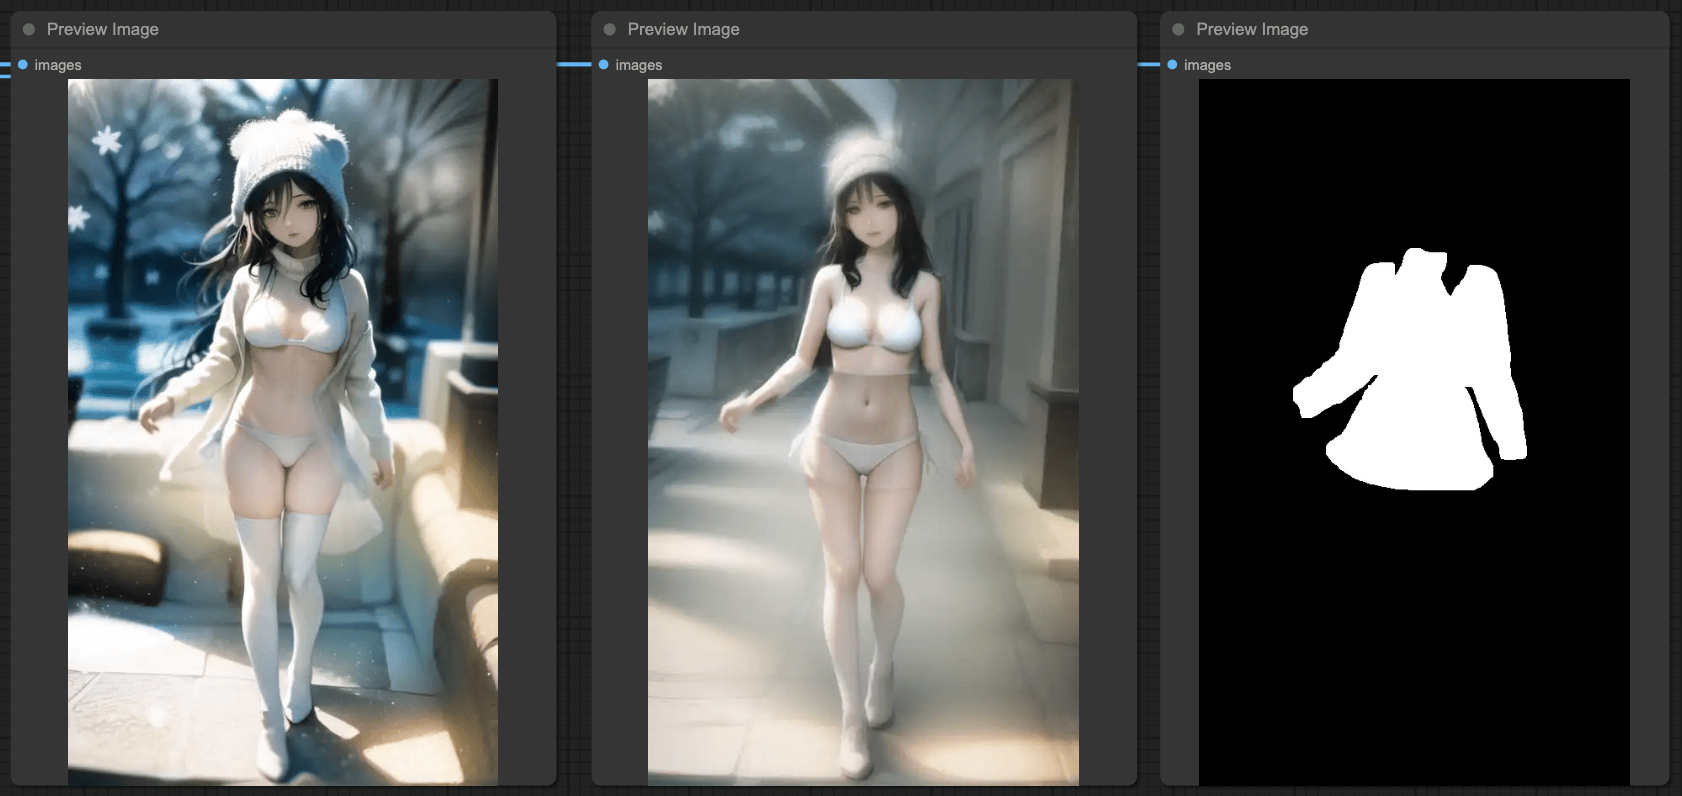
Here we will only explain the part about clothing. The author also has good results in facial repair, and those interested can refer to the workflow provided by the author above to create a process for adjusting the face.
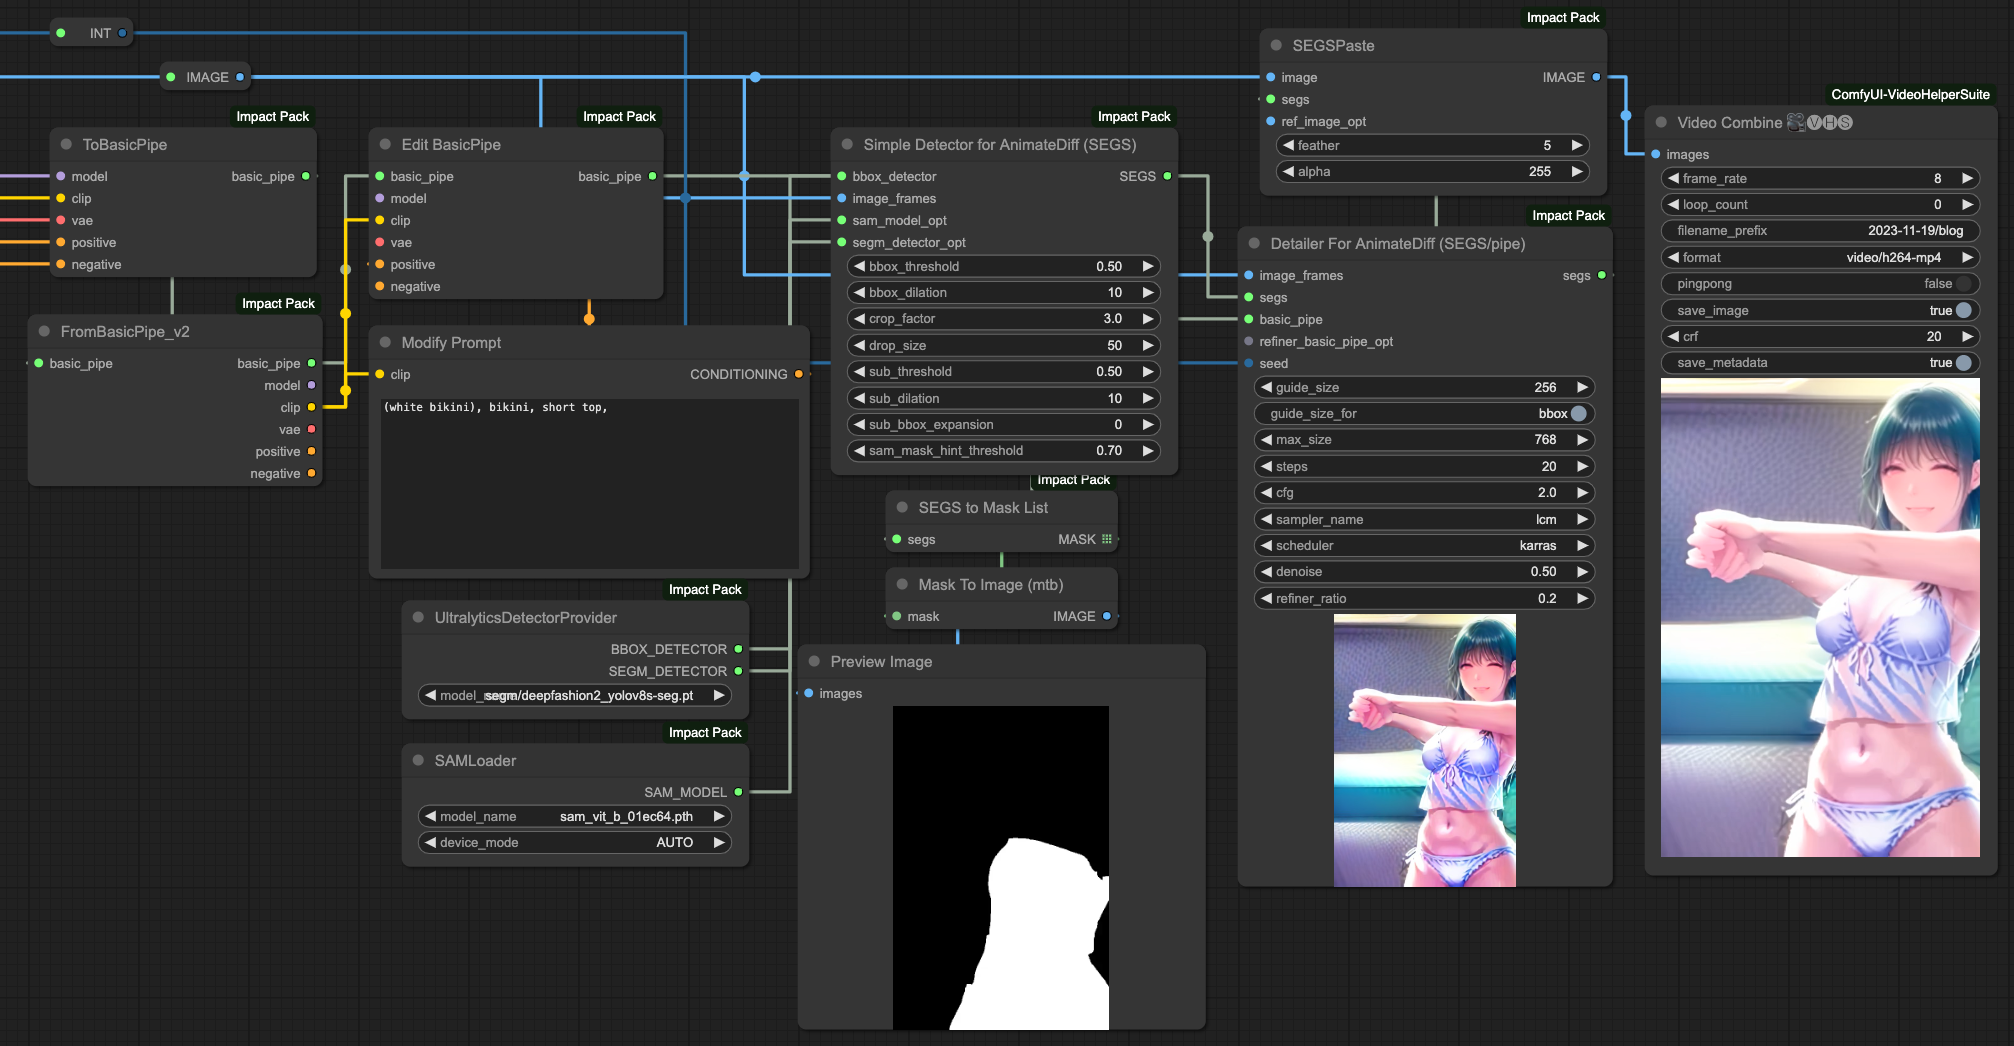
Of course, our goal is to modify the clothing, meaning we do not want to modify other parts. According to the original author's approach, he uses the MASK to redraw and change the clothing in a certain area. However, since we are processing frames by reading the number of frames, it is not possible to manually do this. Therefore, based on the SEGs method mentioned in the first half of our article, we use the deepfashion2_volov8s-seg.pt model for clothing detection and rewrite the prompt of the BasicPipe.
This operation process is very similar to facial repair, but we use the concept of facial repair to control clothing.
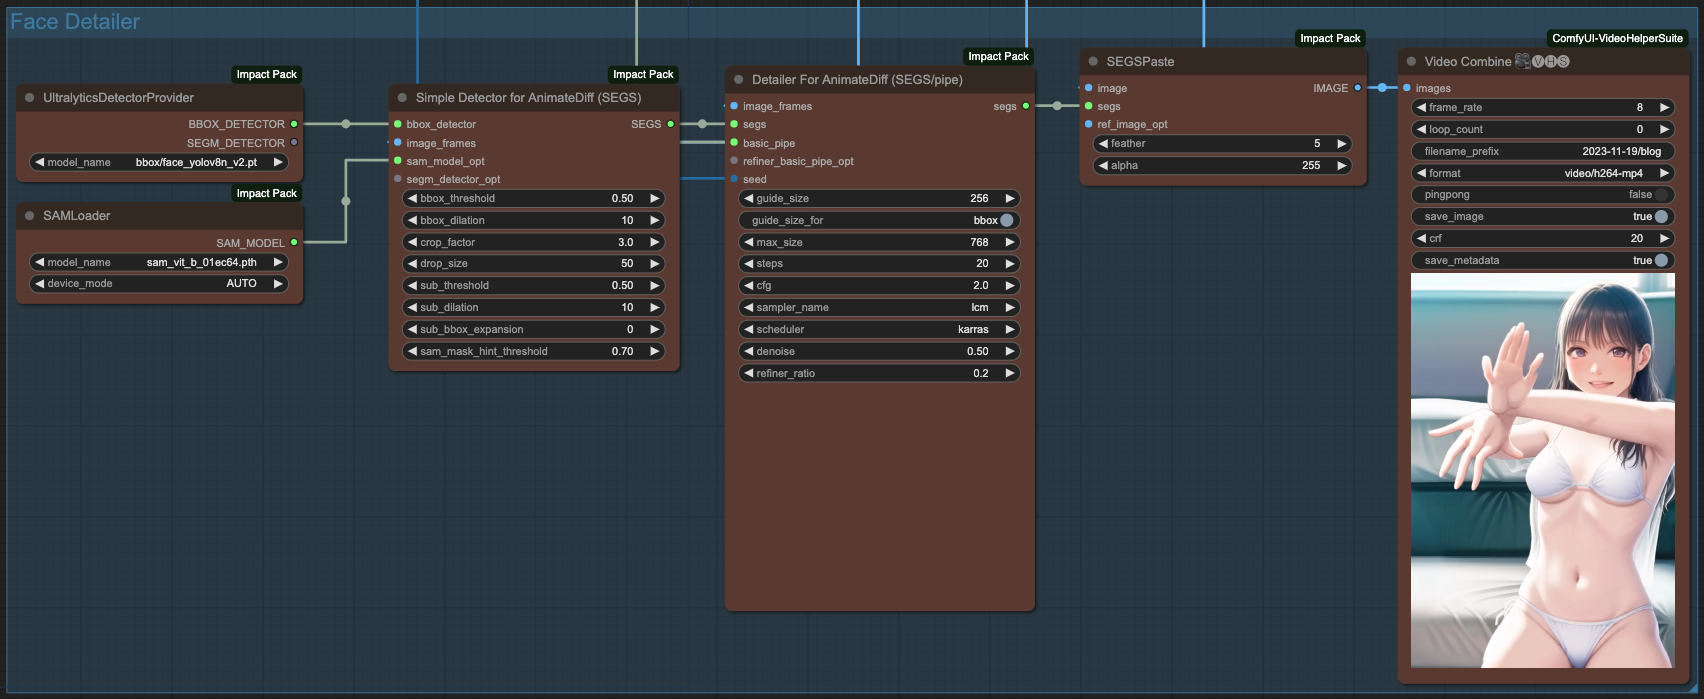
Face Detailer with AnimateDiff
Regarding facial repair, we can perform facial repair after clothing is done, following a similar process. The only difference is that for facial repair, we only need to use the BBOX DETECTOR and select the facial repair model. The following example uses the bbox/face_yolov8n_v2.pt model for facial repair.
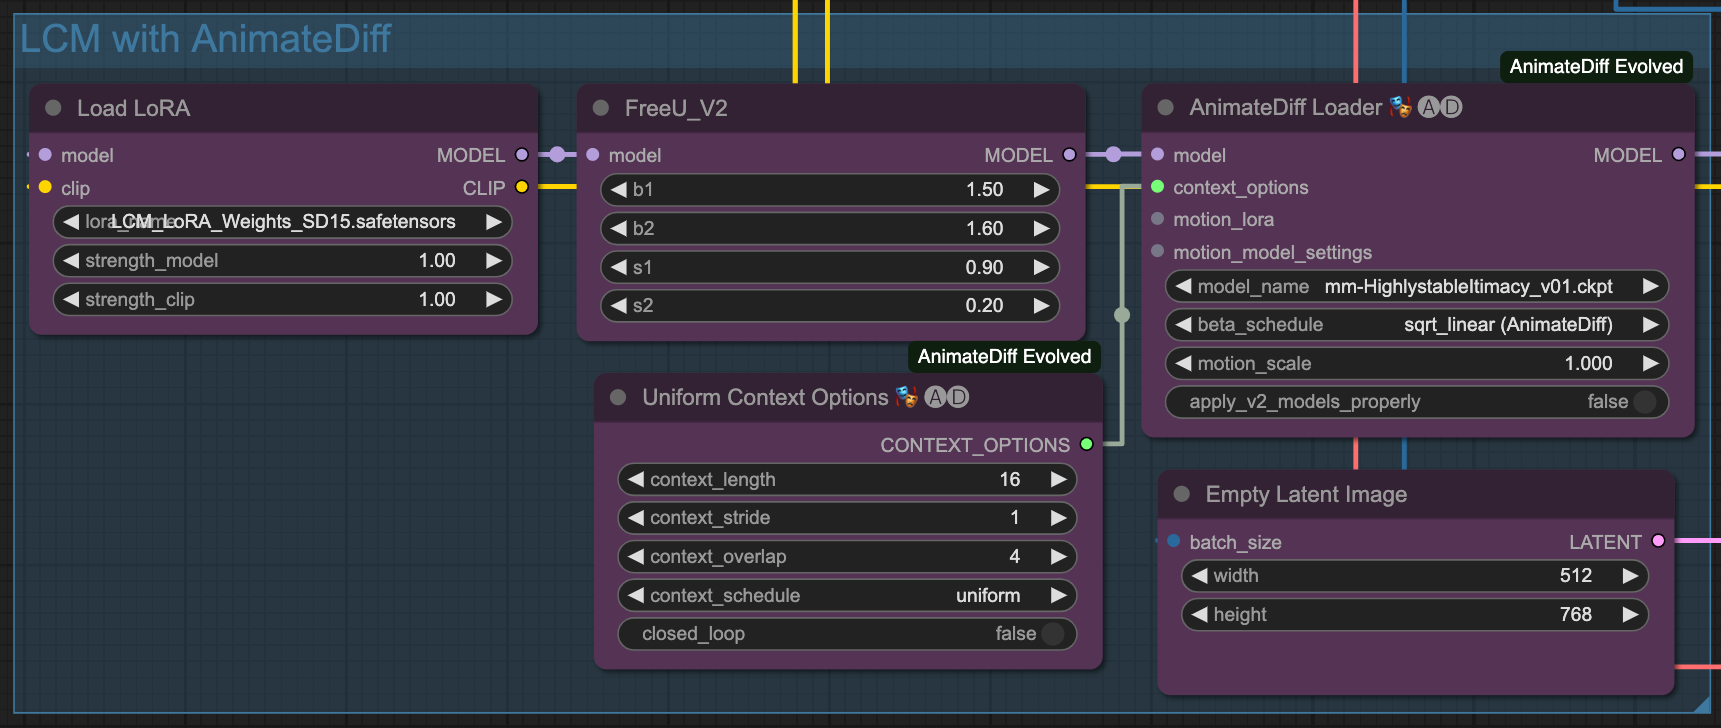
LCM & ComfyUI
All KSampler and Detailer in this article are produced using LCM.
Recently, LCM has become popular, and ComfyUI started supporting native LCM functionality after this commit. Therefore, using LCM on ComfyUI is not too difficult.
Currently, ComfyUI also supports the functionality of LCM Sampler,
In ComfyUI, we can use LCM Lora and LCM Sampler to quickly generate images.
Conclusion
ComfyUI offers high flexibility, and there are numerous possibilities for experimentation. Here, I provided a few examples for reference, but everyone should adjust the workflow according to their specific needs.
Finally, I present the animation generated by the process described in this article.
1pass and 2pass Video Sample with LCM
Final Note
Last but not least, here is the complete workflow file used in this article. Interested individuals can explore it further:

![[LoRA Guide] Z Image Turbo Training with AI-Toolkit and Merging It!](/content/images/size/w960/2025/12/LN_845764713767329_00001_.jpg)
![[Lora] Z Image Turbo 與 AI-Toolkit](/content/images/size/w960/2025/12/hina_zImageTurbo_caline_v3-dream-1.jpg)
![[AI] 與 AI Agent 一起開發優化器](/content/images/size/w960/2025/07/00059-293292005.jpg)