
![[ComfyUI] AnimateDiff + ControlNet Keyframe + Prompt Travel (English ver.)](/content/images/size/w960/2024/01/00053-3562496567.png)
While Prompt Travel is effective for creating animations, it can be challenging to control precisely. To address this, I've gathered information on operating ControlNet KeyFrames.
Prompt Travel Overview
Prompt Travel has gained popularity, especially with the rise of AnimateDiff. Here, I'll provide a brief introduction to what Prompt Travel is. In AnimateDiff, using this method for animation allows us to utilize a specific format for our prompts.
It primarily consists of three parts:
- Head Prompt
- Frames Prompt
- Tail Prompt
When writing it, it looks something like this:
(best quality:1.2), ultra highres, 8k, vibrant, adult girl,
"0": "(close mouth:1.4), looking aside",
"12": "smile:1.3, looking at viewer",
"24": "smile:1.3, looking aside"
sitting, coffeeshop
The head prompt is,
(best quality:1.2), ultra highres, 8k, vibrant, adult girl,
Note that there is no comma (,) after the last prompt in the Frames Prompt section.
"0": "(close mouth:1.4), looking aside",
"12": "smile:1.3, looking at viewer",
"24": "smile:1.3, looking aside"
And the tail prompt is,
sitting, coffeeshop
When using AnimateDiff, it combines the Head Prompt with each frame's prompt and finally adds the Tail Prompt to create your specified frame's complete prompt. In other words, each frame's prompt will look like this,
Nth Frame Prompt = Head Prompt + Nth Frame's Prompt + Tail Prompt
This should help you understand the Prompt Travel writing style.
ComfyUI & Prompt Travel
To use Prompt Travel in ComfyUI, it is recommended to install the following plugin:
It provides a convenient feature called Batch Prompt Schedule.
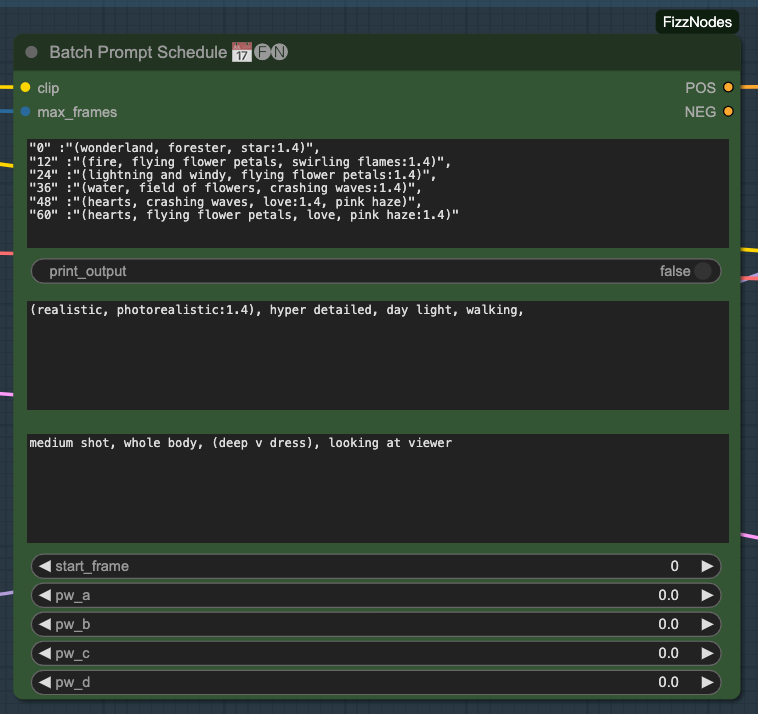
If you solely use Prompt Travel for creation, the visuals are essentially generated freely by the model based on your prompts. Afterward, you rely on the capabilities of the AnimateDiff model to connect the produced images.
Of course, such a connecting method may result in some unnatural or jittery transitions.
Prompt Travel Failed
So, to avoid this situation, we need to intervene with ControlNet to try to achieve the desired results.
CLI Enthusiast's Paradise
This project allows for generating good results via the command line,
If you are an engineer or not averse to the command line and modifying JSON files, you can give it a try. Since it takes care of many things for you, you don't need to spend effort adjusting ComfyUI. Additionally, you can quickly get test results. However, it has a relatively high VRAM requirement, so if it doesn't run, you may need to reduce the usage of ControlNets in its configuration file.
This tool offers a wide range of features, and in some aspects, it currently surpasses what can be done in ComfyUI. Trying to replicate it in ComfyUI would probably result in over a hundred nodes.
ControlNet & KeyFrames
Someone in the bird nest group mentioned controlling keyframes, so I looked for ways to do it. Coincidentally, there is a similar article on C Station,
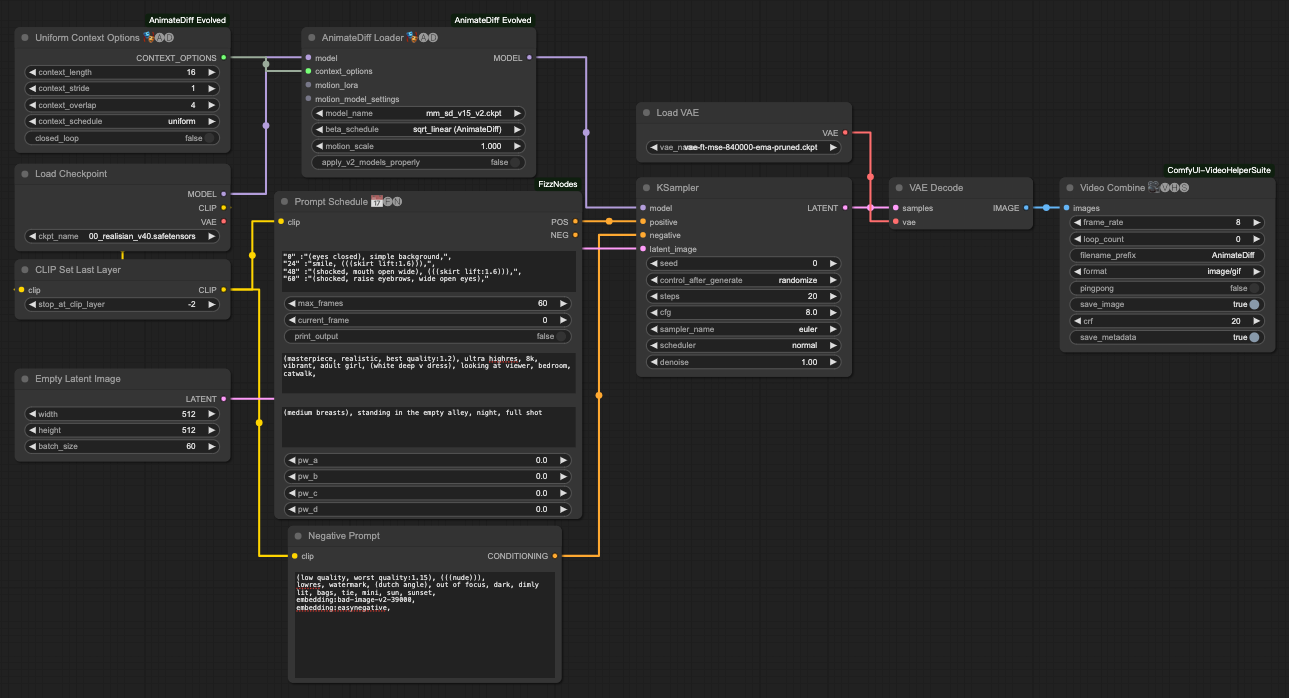
After a quick look, I summarized some key points. First, the placement of ControlNet remains the same. However, we use this tool to control keyframes,
We will use the following two tools,
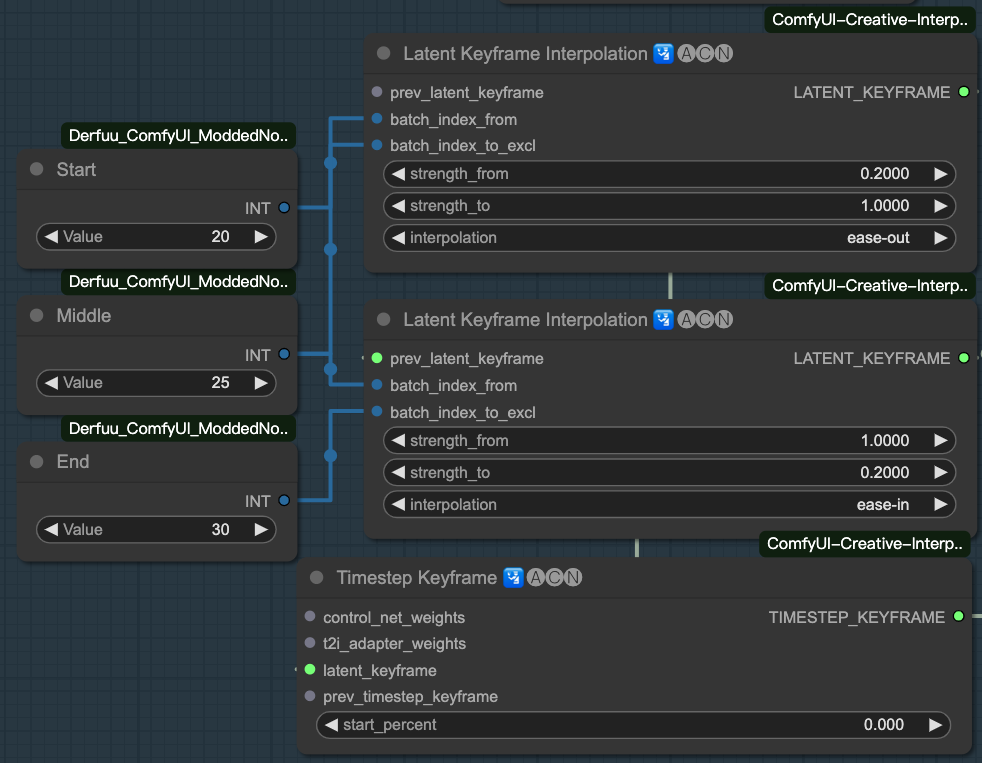
- Timestamp Keyframe used to control the interface of keyframes and returns
TIMESTEP_KEYFRAMEto ControlNet.latent_keyframeInput latent keyframe, the only input we currently need.
- Latent Keyframe Interpolation interpolates keyframes in latent space and returns them to Timestamp Keyframe.
prev_latent_keyframePrevious latent keyframe.batch_index_fromStarting batch index.batch_index_to_exclEnding batch index (exclusive).strength_fromStarting strength.strength_toEnding strength.interpolationInterpolation function to use from start to end, with four options:linear,ease-in,ease-out,ease-in-out.
After understanding the basic input and output, let's revisit this configuration. You will notice that I performed Latent Keyframe Interpolation twice and made it have a relationship between the previous and the next. This operation is also referenced from the C Station article. The main purpose is to avoid producing abrupt changes during keyframe processing, allowing adjustments to the entering and exiting interpolations.
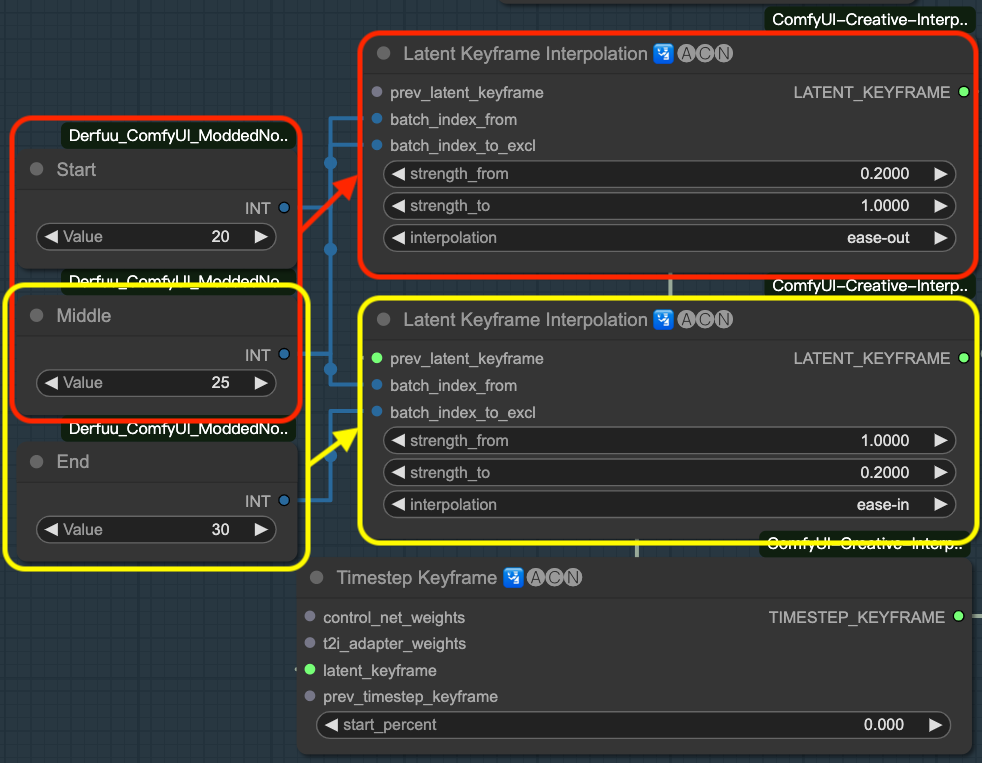
The part inside the red box represents the interpolation operation done for "entering" this keyframe region, while the yellow box indicates the interpolation operation to be performed when "leaving" this keyframe region.
So we have three numbers:
- Start ~ Middle represents the frames during which the red interpolation operation takes place.
- Middle ~ End represents the frames during which the yellow interpolation operation takes place.
In this way, a ControlNet can be controlled for this keyframe.
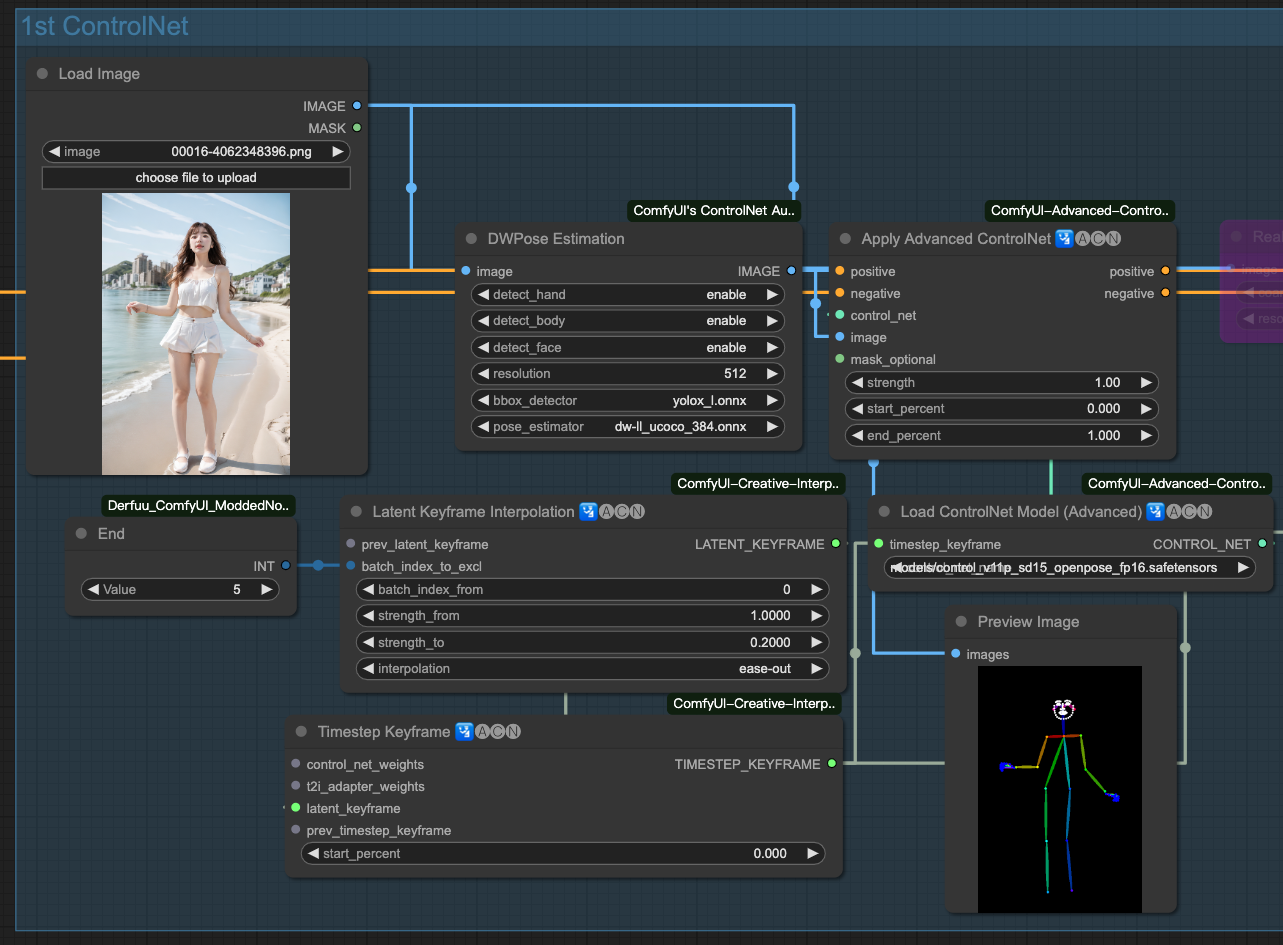
The ControlNet above represents the following:
- Inject the OpenPose from frames
0 ~ 5into my Prompt Travel. - The strength of this keyframe undergoes an
ease-outinterpolation. - The strength decreases from
1.0to0.2and then ends. - The subsequent frames are left for Prompt Travel to continue its operation.
This way, we can control a part of the keyframes to make them fit the specifications of the ControlNet. In the example mentioned above, it is for the skeletal frame. Within these frames, our Prompt Travel will generate the specified results for the OpenPose.
So, what if we have many keyframes to control?
It would look like this:
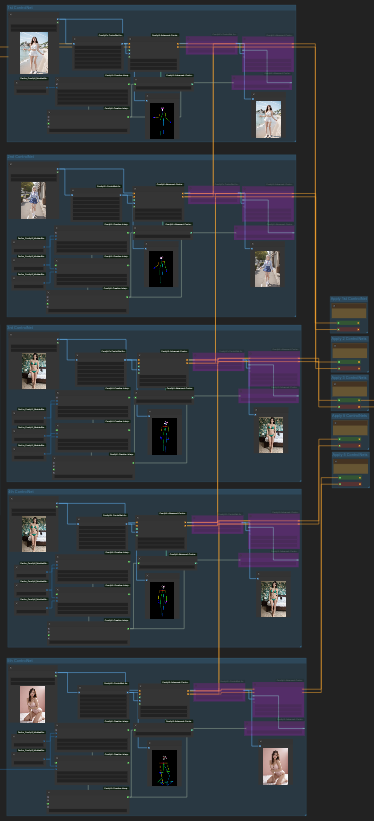
The above ControlNets use two sets of ControlNets for each keyframe, where one set is bypassed (ByPass), indicated by the purple color. In other words, all the ControlNets shown above add up to 10, and these 10 ControlNets are solely for controlling 5 keyframe sections.
Feeling the VRAM shiver?
Enabling all of them would require 15GB VRAM.
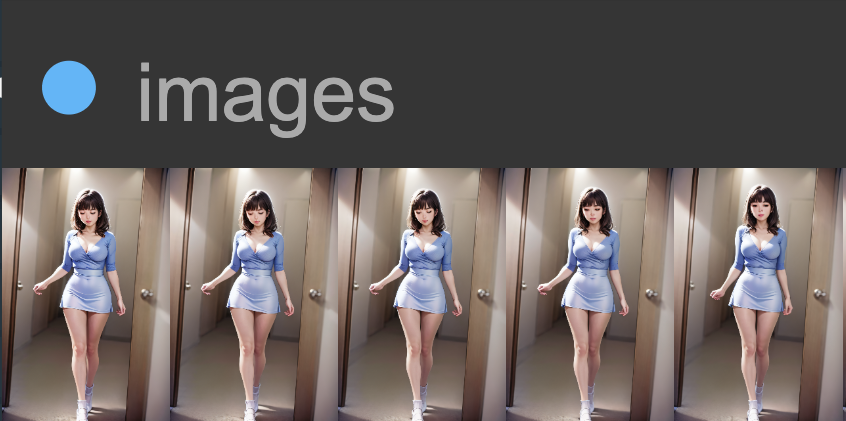
Here's an example output video for reference,
Prompt Travel with ControlNet
Conclusion
This is a simple introduction, and the actual operation depends on your creativity. My entire workflow is available here for those interested in exploring it.
https://github.com/hinablue/comfyUI-workflows/blob/main/Prompt_Travel_5Keyframes_10CN_5pass.png

Tips
If you want to use my workflow, pay attention to a few things,
- If the video magnification factor is not 2, when saving as
video/h264-mp4, you may encounter errors likewidth not divisible by 2. - The higher the
multipliernumber inside RIFE VFI, the slower the video speed.
If you find that the video cannot be saved due to issues like being not divisible by 2, you can modify the file custom_nodes/ComfyUI-AnimateDiff-Evolved/video_formats/h264-mp4.json,
{
    "main_pass":
    [
        "-n", "-c:v", "libx264",
        "-pix_fmt", "yuv420p",
        "-crf", "19",
        "-vf", "\"pad=ceil(iw/2)*2:ceil(ih/2)*2\""
    ],
     "extension": "mp4"
}
change it to the following, adding "-vf", "\"pad=ceil(iw/2)*2:ceil(ih/2)*2\"" will help. It will run ffmpeg and add white padding ( padding ) to your video to make its width or height divisible by 2, allowing your video to be saved normally.

![[LoRA Guide] Z Image Turbo Training with AI-Toolkit and Merging It!](/content/images/size/w960/2025/12/LN_845764713767329_00001_.jpg)
![[Lora] Z Image Turbo 與 AI-Toolkit](/content/images/size/w960/2025/12/hina_zImageTurbo_caline_v3-dream-1.jpg)
![[AI] 與 AI Agent 一起開發優化器](/content/images/size/w960/2025/07/00059-293292005.jpg)