![[ComfyUI] AnimateDiff Image Workflow](/content/images/size/w960/2024/01/00049-3562496567.png)
Mainly notes on operating ComfyUI and an introduction to the AnimateDiff tool. Although the capabilities of this tool have certain limitations, it's still quite interesting to see images come to life.
AnimateDiff Introduction
AnimateDiff is a tool used for generating AI videos. The source code for this tool is open source and can be found on Github, AnimateDiff. Those interested in the paper can also refer to it.
In the pipeline design of AnimateDiff, the main goal is to enhance creativity through two steps:
- Preload a motion model to provide motion verification for the video.
- Load the main T2I model (Base model) and retain the feature space of this T2I model.
Next, the pre-trained motion model will transform the original T2I model features into an animation generator. This animation generator will create diverse animated images based on the provided textual description (Prompt).
Finally, AnimateDiff undergoes an iterative denoising process to improve the quality of the animation. The denoising process gradually reduces noise and artifacts (mainly incorrect images generated during the drawing process) with each iteration.
Basic System Requirements
For t2vid, a minimum of 8GB VRAM is required. This is the minimum requirement for using a resolution of 512x512 and 2 ControlNets. In some cases, with this configuration, VRAM usage may go up to a maximum of 10GB.
For vid2vid, a minimum of 12GB VRAM or above is needed. In my notes, I used 3 ControlNets, so the VRAM usage may go up to a maximum of 14GB. If this is not feasible, you can reduce the number of ControlNets or lower the resolution.
Required Packages for ComfyUI Installation
Firstly, you need to have ComfyUI. If you are a Windows user, there is also a completely portable version available as a compressed file that you can download and use directly.
ComfyUI Standalone Portable Windows Build (For NVIDIA or CPU only), 1.44GB
If you are a Linux user, you will need to install ComfyUI yourself, and I won't go into details here.
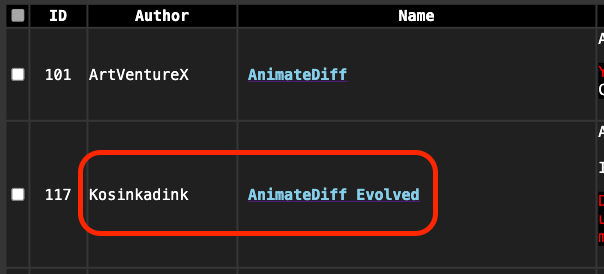
You can install the remaining packages after installing ComfyUI-Manager. Use ComfyUI-Manager to install the following two necessary packages. Note that I installed the ComfyUI-AnimateDiff-Evolved package here, which is different from what ArtVentureX provides. Please make sure not to install the wrong one.
The following two packages are essential for installation; otherwise, AnimateDiff will not function correctly:
- https://github.com/Kosinkadink/ComfyUI-AnimateDiff-Evolved
- https://github.com/Kosinkadink/ComfyUI-Advanced-ControlNet
Additionally, here are some commonly used packages with AnimateDiff. If you have downloaded the Workflow I provided, you may not need to install these again.
- https://github.com/FizzleDorf/ComfyUI_FizzNodes
- https://github.com/Kosinkadink/ComfyUI-VideoHelperSuite
- https://github.com/Fannovel16/comfyui_controlnet_aux
Finally, some personally favored ones:
- https://github.com/ltdrdata/ComfyUI-Impact-Pack
- https://github.com/ltdrdata/ComfyUI-Inspire-Pack
- https://github.com/WASasquatch/was-node-suite-comfyui
- https://github.com/RockOfFire/ComfyUI_Comfyroll_CustomNodes
- https://github.com/ssitu/ComfyUI_UltimateSDUpscale
- https://github.com/TinyTerra/ComfyUI_tinyterraNodes
AnimateDiff Models
Action models and Action Lora can be downloaded here:
Additionally, here are some recommended action models for generating animations:
These model files need to be placed in this folder:
ComfyUI/custom_nodes/ComfyUI-AnimateDiff-Evolved/models
For downloaded motion Lora, place it here:
ComfyUI/custom_nodes/ComfyUI-AnimateDiff-Evolved/motion_lora
Once downloaded, if you need to use ControlNet, please put the necessary files here:
ComfyUI/models/controlnet
Of course, your main model needs to be placed in ComfyUI/models/checkpoints. If you have a VAE, it needs to be in ComfyUI/models/vae.
AnimateDiff Node Introduction
To begin, loading images or videos requires the Video Helper Suite module to create the video source.
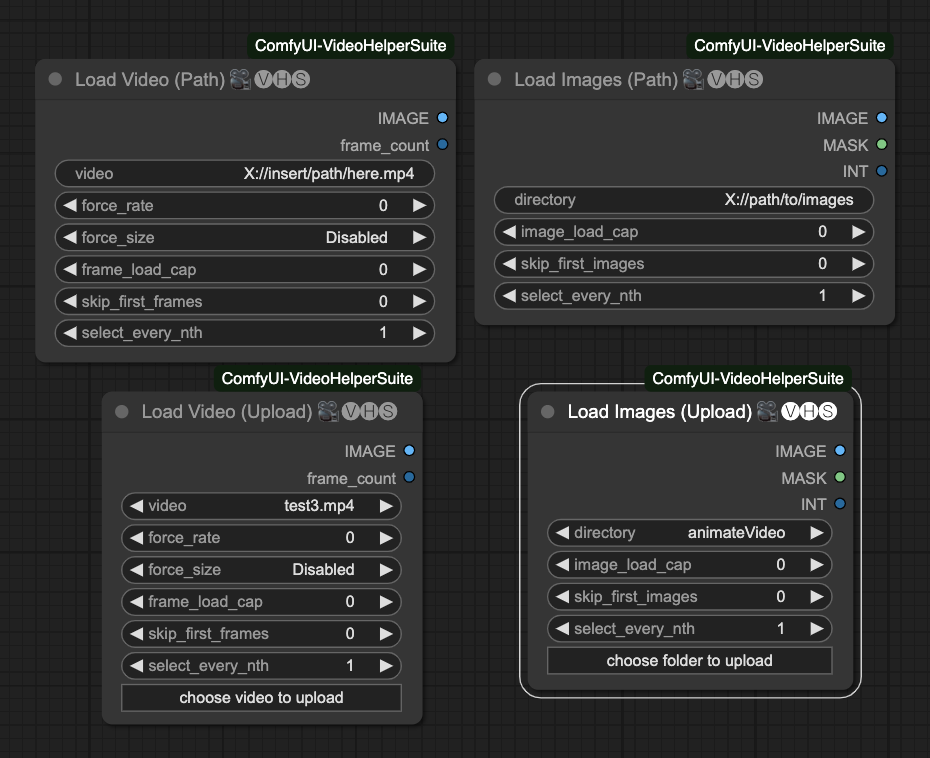
There are four loading methods in total:
- Load Video (Path): Load video by path.
- Load Video (Upload): Upload a video.
- Load Images (Path): Load images by path.
- Load Images (Upload): Upload a folder of images.
The parameters inside include:
image_load_capDefault is0, which means loading all images as frames. You can also specify a number to limit the number of loaded images, determining the length of your final animation.skip_first_imagesSet the number of images to skip at the beginning of each batch.force_rateWhen loading a video, force the extraction of images using this FPS.force_resizeForce resizing images to this resolution.frame_load_capDefault is0, which means loading all video frames. You can also specify a number to limit the number of loaded video frames, determining the length of your final animation.skip_first_framesSet the number of frames to skip at the beginning of each batch.select_every_nthSet how often to select an image as a frame, default is1, meaning every image is used.
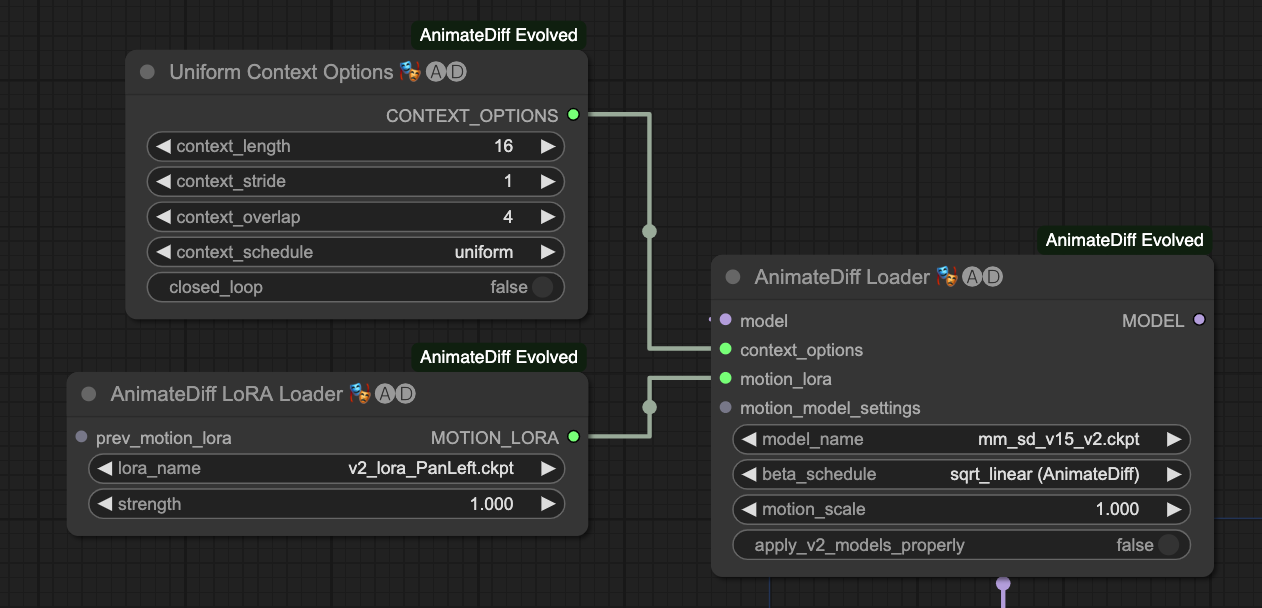
After setting up some necessary nodes, we also need to configure the AnimateDiff Loader and Uniform Context Options nodes.
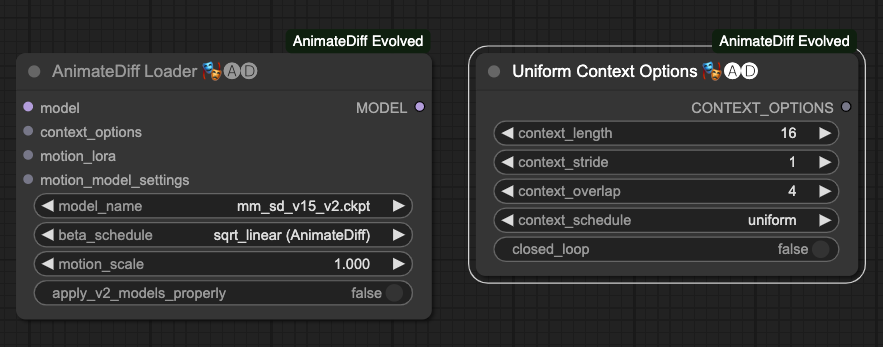
AnimateDiff Loader
The parameters for AnimateDiff Loader are as follows:
model: The model externally linked, primarily loading the T2I model.context_options: Its source is the output of the Uniform Context Options node.motion_lora: The externally linked motion Lora, mainly loading the motion Lora.motion_model_settings: Advanced settings for the motion model, not elaborating on here.model_name: Choose the motion model.beta_schedule: Choose the scheduler, default issqrt_linear (animateDiff). You can also uselinear (HostshotXL/default). The differences between the two are not discussed here for now.motion_scale: The application ratio of the motion model, default is1.000.apply_v2_models_properly: Apply the properties ofv2models, default isFalse.
Uniform Context Options
The parameters for Uniform Context Options are as follows:
context_length: How many images to process each time AnimateDiff operates, default is16. Given the current processing situation, this number works well. Note! Different motion models may limit the maximum value of this number.context_stride: Default is1. This is difficult to explain, but its main purpose is to ensure that AnimateDiff maintains time synchronization between frames as much as possible. For more details, refer to the original author's explanation (although it is for A111, it is similar) WebUI Parameters.contex_overlap: How many images to reserve for overlap as upper and lower content when processing images each time with AnimateDiff, default is4.context_schedule: Currently, onlyuniformcan be used.closed_loop: Attempt to create a looped animation, default isFalse, not applicable in the vid2vid case.
AnimateDiff LoRA Loader
This node is mainly used to load the motion Lora. Its parameters are as follows:
lora_name: Choose the motion Lora model.strength: The strength of the motion Lora, default is1.000.
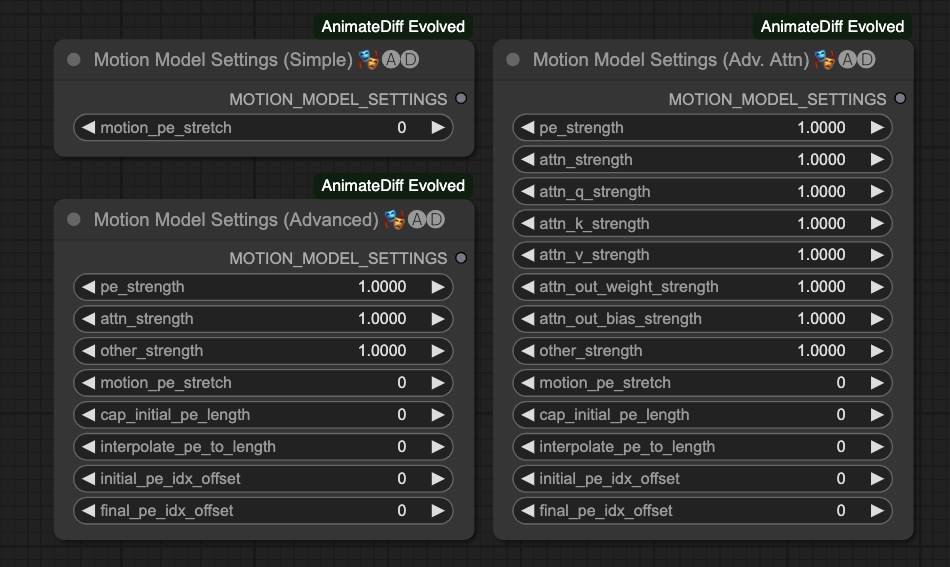
Motion Model Settings
This node has three types, each for more detailed settings for the motion model. However, since the author has not provided a more detailed description for this section, I won't introduce it for now.
Video Combine
Finally, we will use Video Combine from Video Helper Suite to output our animation.
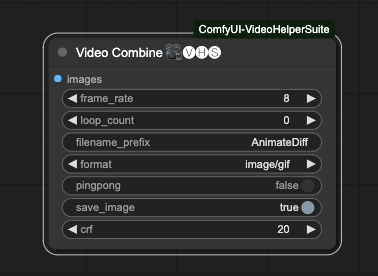
He has the following parameters,
frame_rateAnimation frame rate. If you usedforce_rateduring input, please set it to the same number. If you are directly loading a video, set it to the same FPS as the video. This number will determine the final animation output duration.loop_countOnly effective when saving as images. After image output, your ComfyUI will repeat playing this video for the specified number of times.filename_prefixPrefix for saving files. If generated continuously, the subsequent files will be automatically numbered.formatOutput format. Currently, the following formats are supported. Please note that if you need to output a video, make sure your computer has FFmpeg installed and supports the relevant compression and decoding libraries.image/gifimage/webpvideo/av1-webmvideo/h264-mp4video/h265-mp4video/webm
pingpongDefaultFalse, combines data from frames 1, 2, and the reversed frames back to the original frames before merging all frames. This gives an echo-like effect. The main operation isframes = frames + frames[-2:0:-1]. Don't open it if you are dealing with videos.save_imageDefaultTrue, saves the final output data.crfDefault20, a parameter for videos, stands for Constant Rate Factor. Interested users can research it themselves.
Integration of AnimateDiff and ControlNet
Since we are not just aiming to create Text-To-Video, for more precise control, we use ControlNet to stabilize the entire output process. I have chosen 4 ControlNets for cross-combination operations, and you can also try others.
- Depth Used to extract the main depth map.
- SoftEdge Used to extract rough edges.
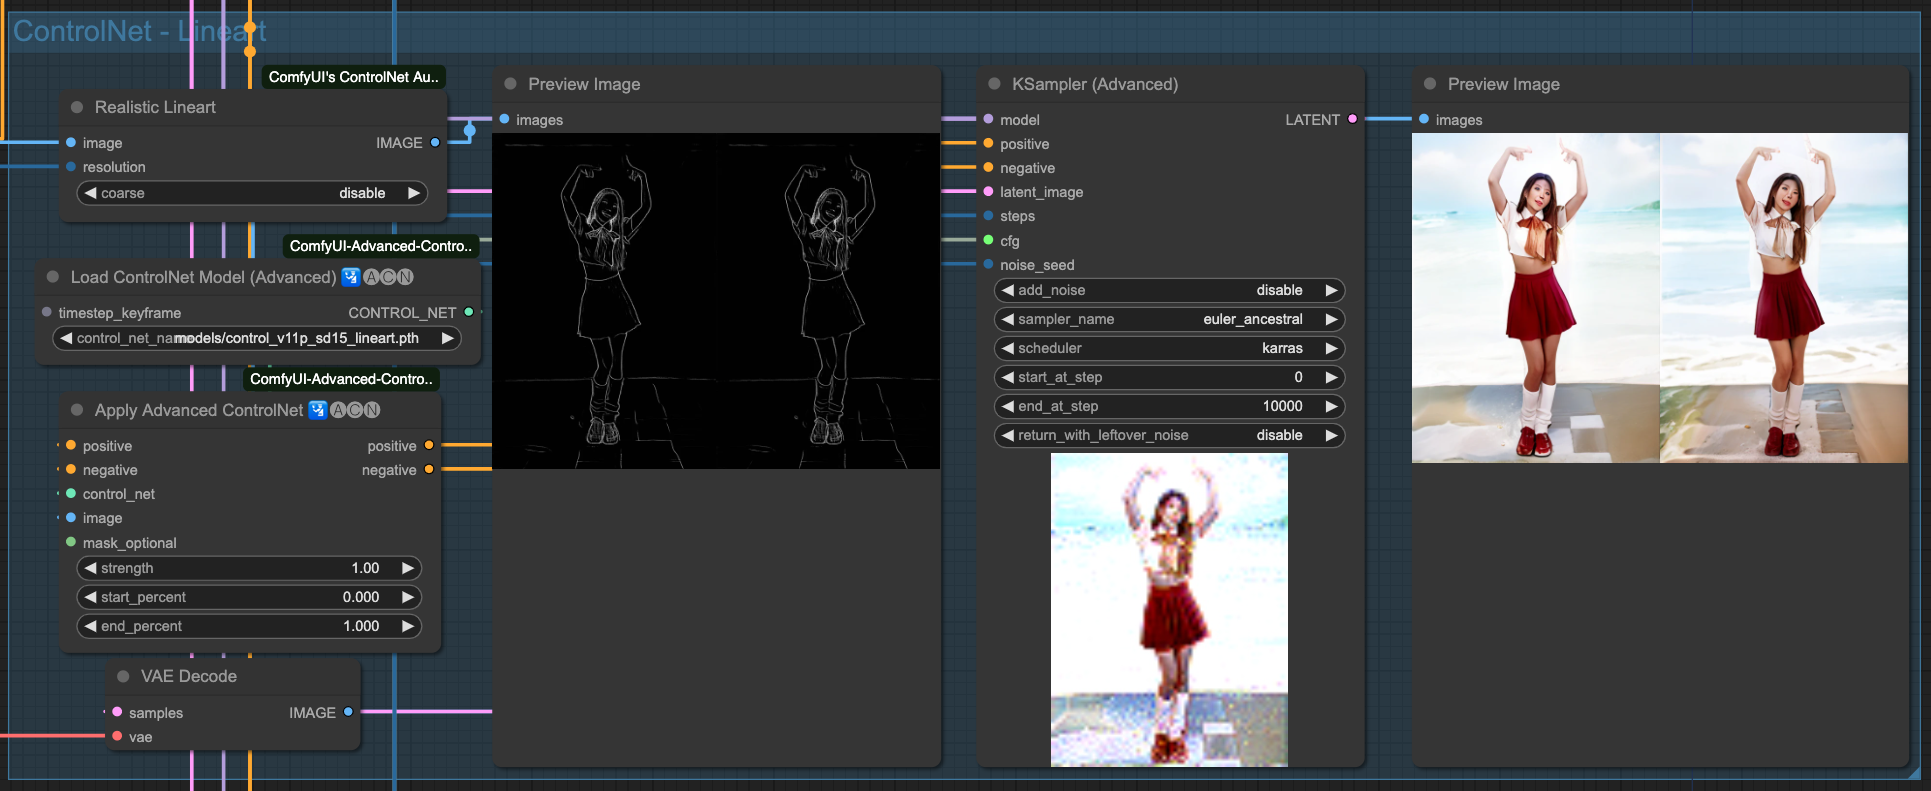
- Lineart Used to extract fine lines.
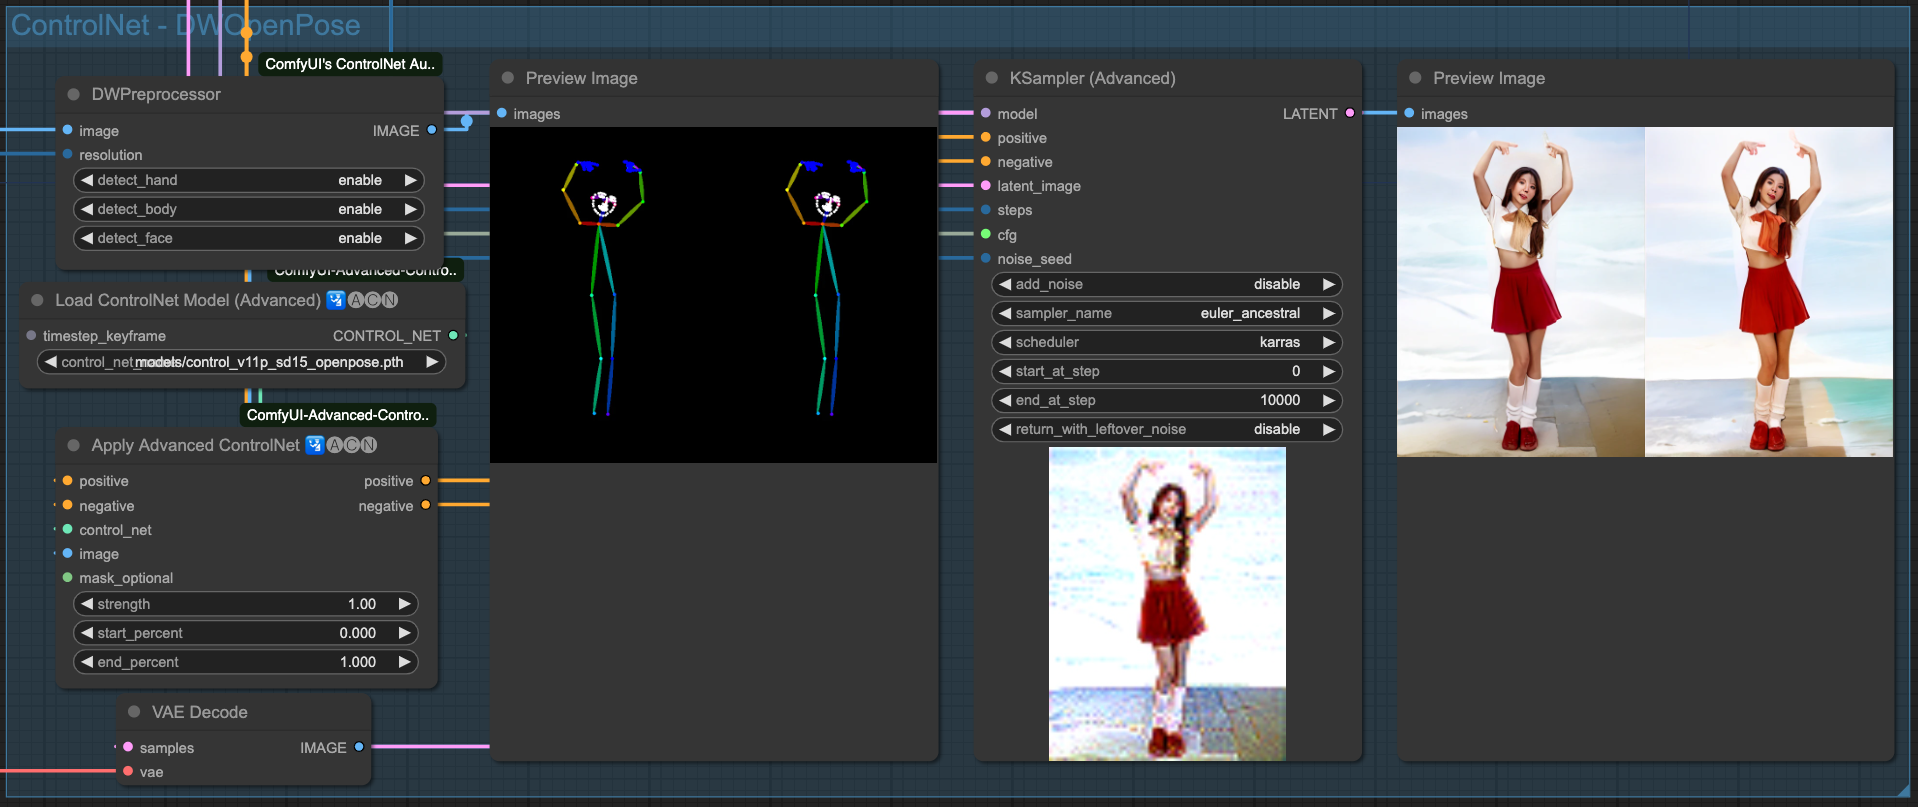
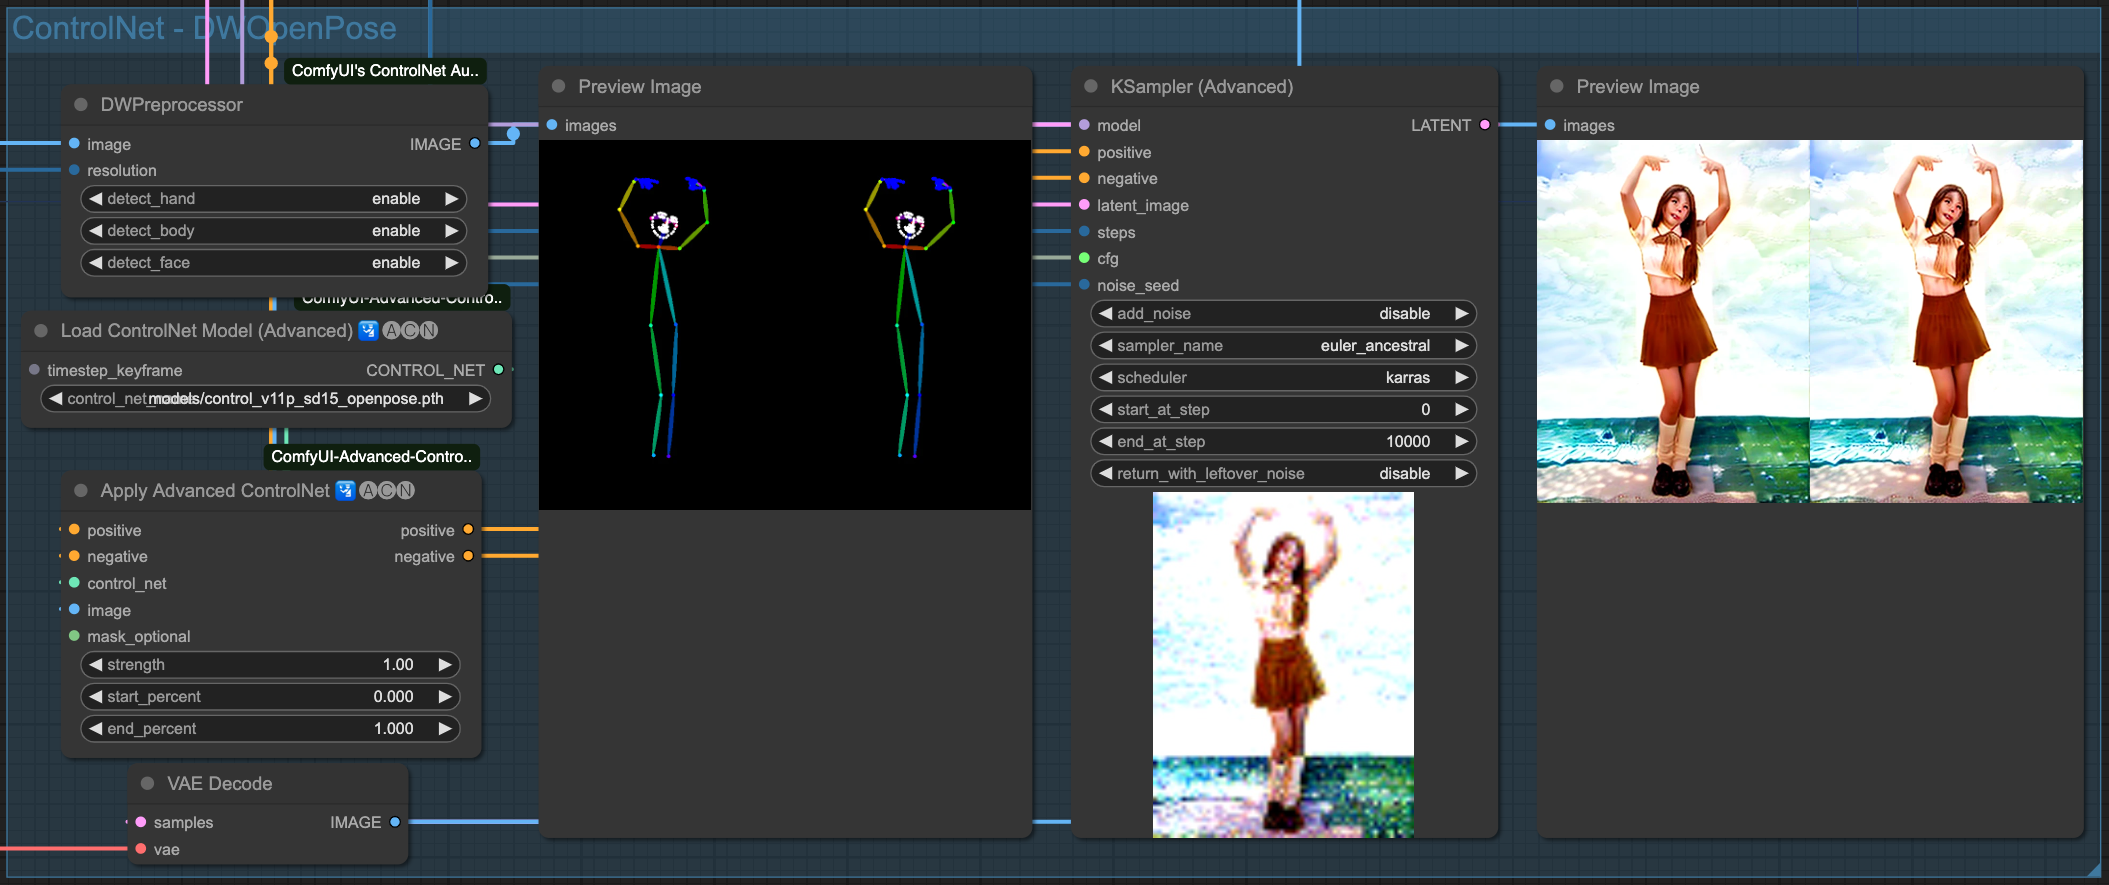
- OpenPose Used to extract the main body movements, including hand, face, and limb movements.
All of these require the use of the following two packages. If you have installed everything mentioned at the beginning of the article, there is no need to install them again.
Here, I'll briefly demonstrate the results of each type of ControlNet.
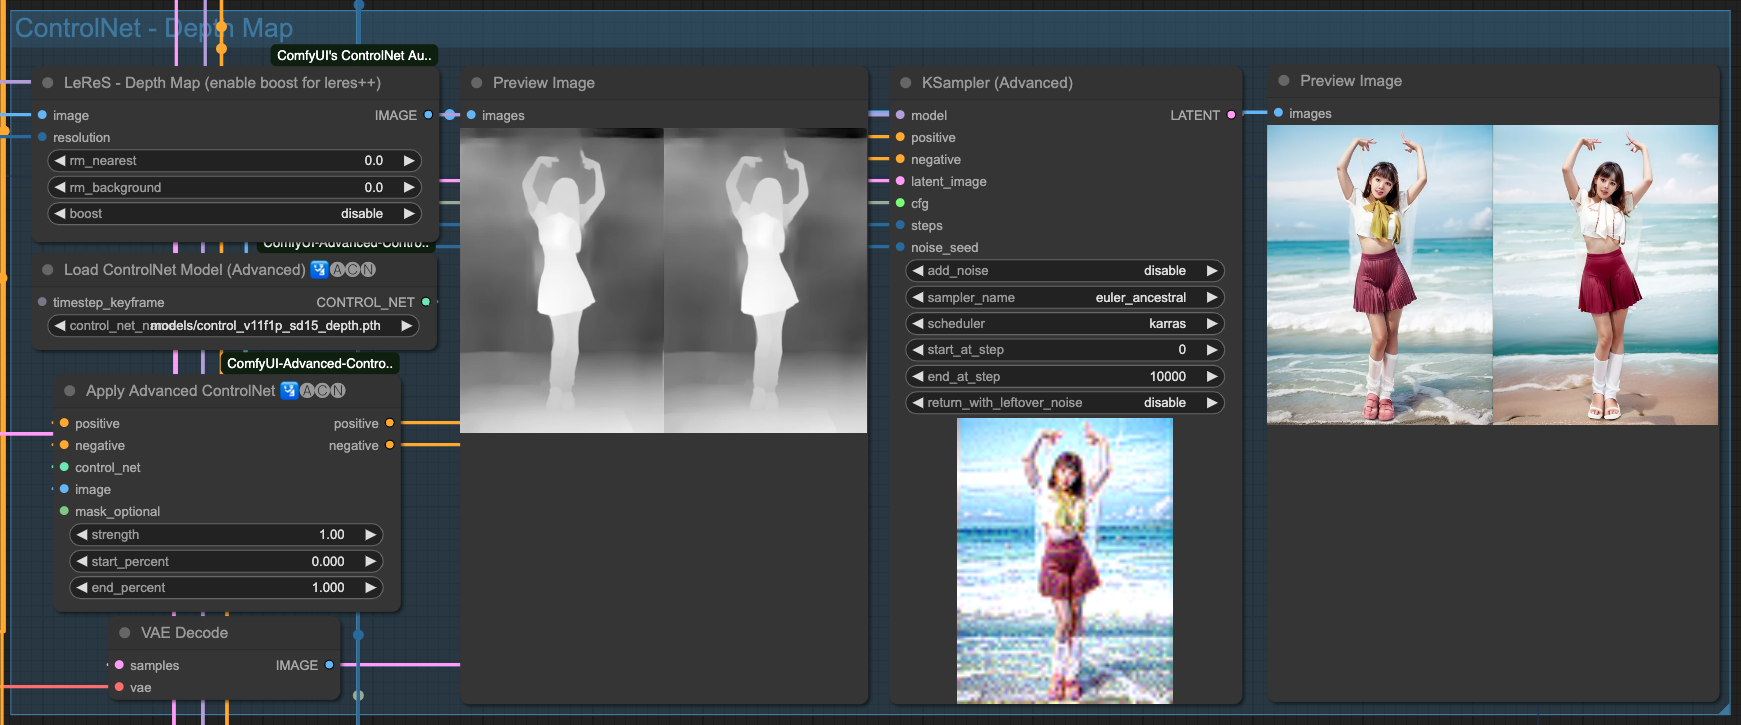
Depth
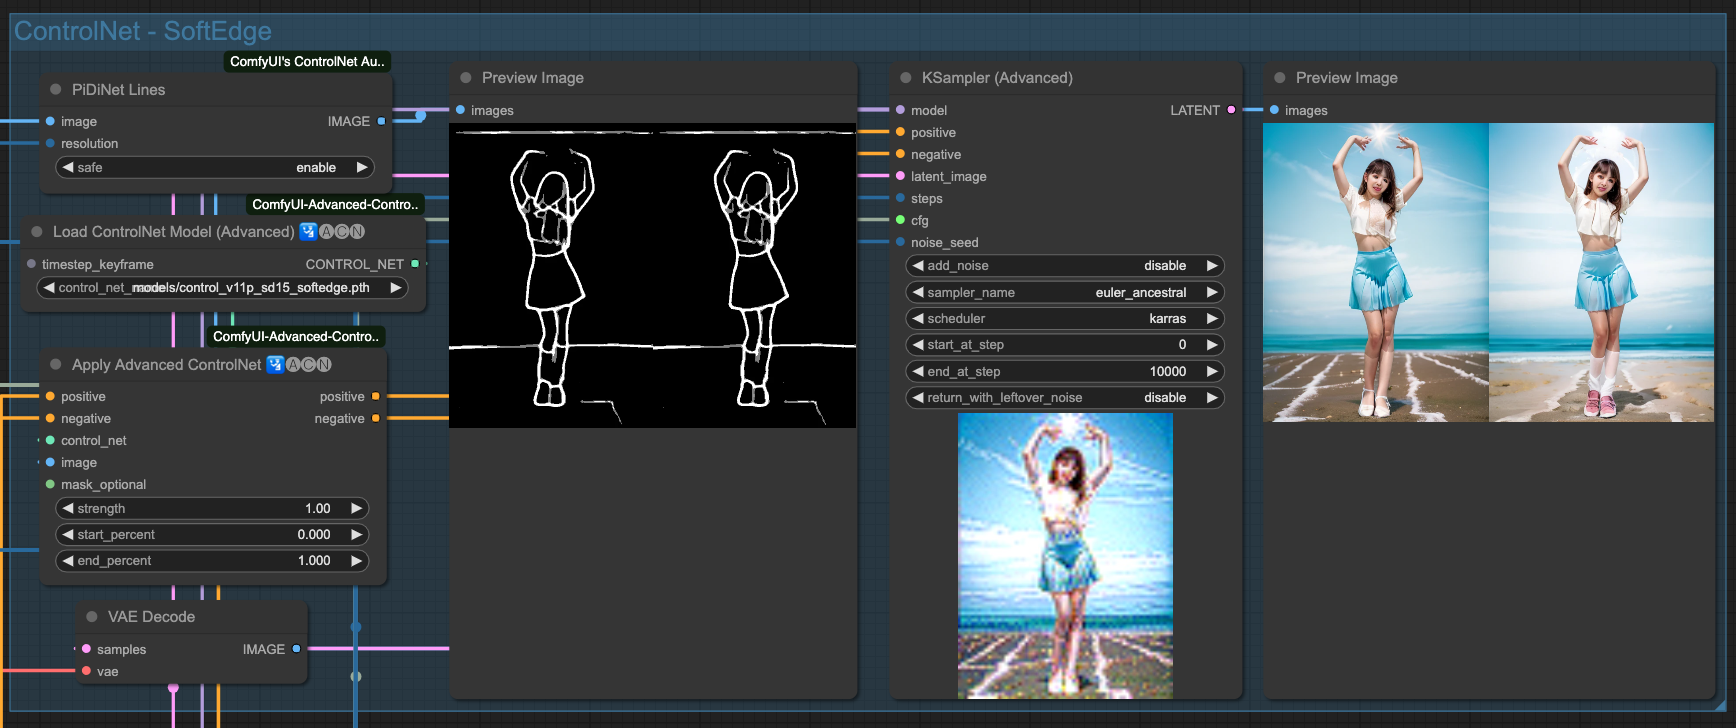
SofeEdge
Lineart
OpenPose
Above are the individual effects of the 4 ControlNets. Of course, we need to chain these ControlNets together. There is no specific rule for choosing which ones to connect; as long as the final output is good, the combination used should be fine.
Basic Preparation
Now it's time to unleash your creativity with ComfyUI. Here, I'll list some basic combinations for reference. First, for lazy engineers like me, if you can avoid entering too much, then do so. Utilize some ComfyUI tools to automatically calculate certain
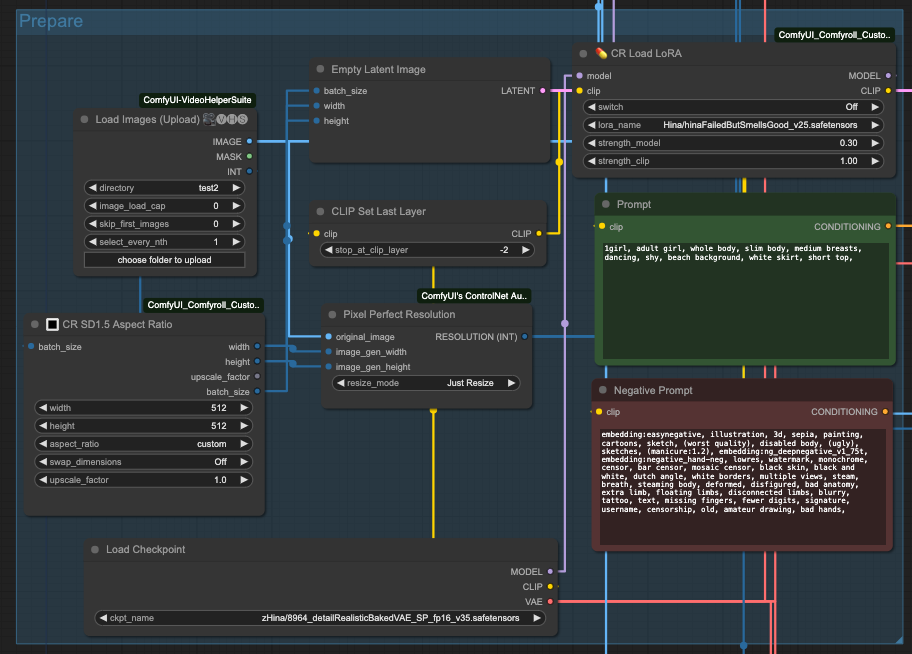
So, I used CR SD1.5 Aspect Ratio to retrieve the image dimensions and passed them to Empty Latent Image to prepare an empty input size. Additionally, I obtained the batch_size from the INT output of Load Images.
Moreover, since the ControlNet preprocessor requires an input resolution, I used Pixel Perfect Resolution and connected it with the original image (original_image) and the dimensions from CR SD1.5 Aspect Ratio, connecting them to image_gen_width and image_gen_height respectively. This allows it to calculate a RESOLUTION (INT) as input for the preprocessor.
Next, you need to prepare the base model, positive and negative prompts, CLIP settings, and so on. If you need Lora, you have to prepare it in advance. Note that loading Lora may drastically affect the output. Currently, it is speculated to be related to the AnimateDiff model, requiring more testing and experimentation. So, if not necessary, avoid using Lora for now, or try it in a different context. You can experiment on your own; I won't go into detail.
You need AnimateDiff Loader and then connect it to the Uniform Context Options node. If you are using motion control Lora, connect motion_lora to AnimateDiff LoRA Loader to use it. If not, you can ignore it.
Command Combination
After the basic preparations, let's put everything together. The sequence is as follows:
- Load the source (video or sequence of images).
- Prepare the base model, Lora, prompts, dimensions, and resolution preprocessing.
- Prepare AnimateDiff Loader.
- Connect the required ControlNets.
- Output to the Sampler for processing.
- Finally, output VAE Decodes to Video Combine for storage.
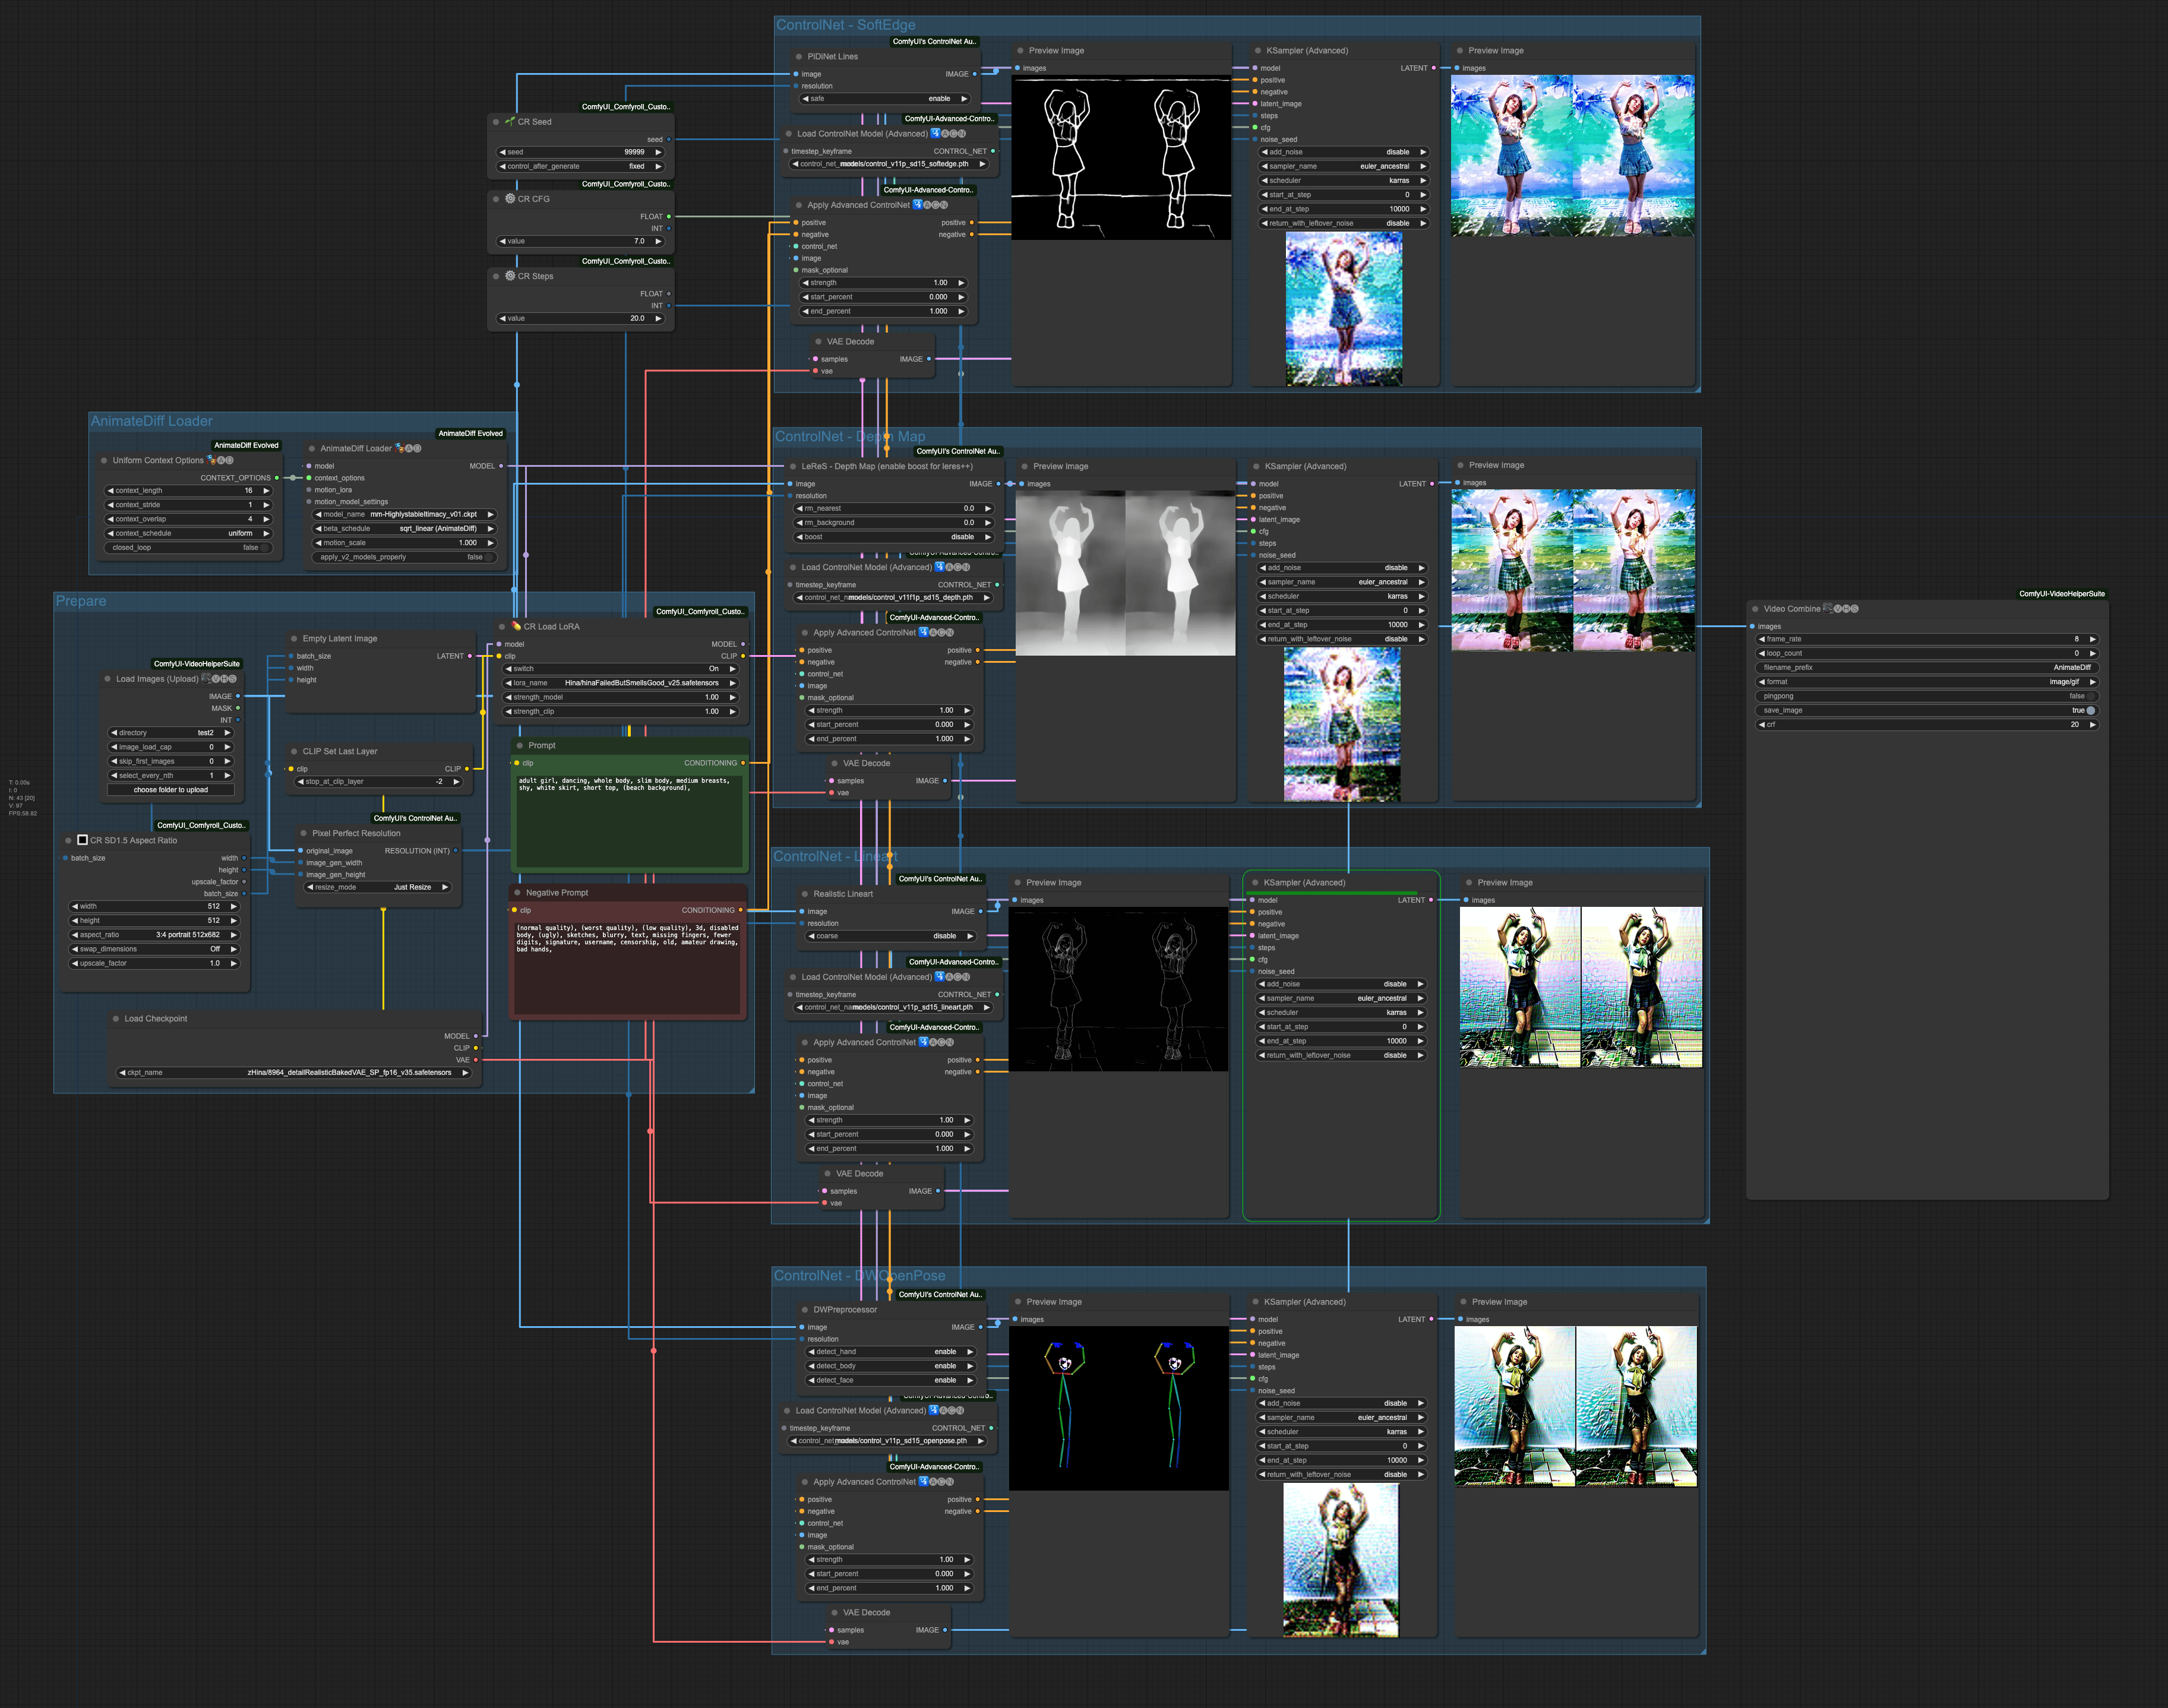
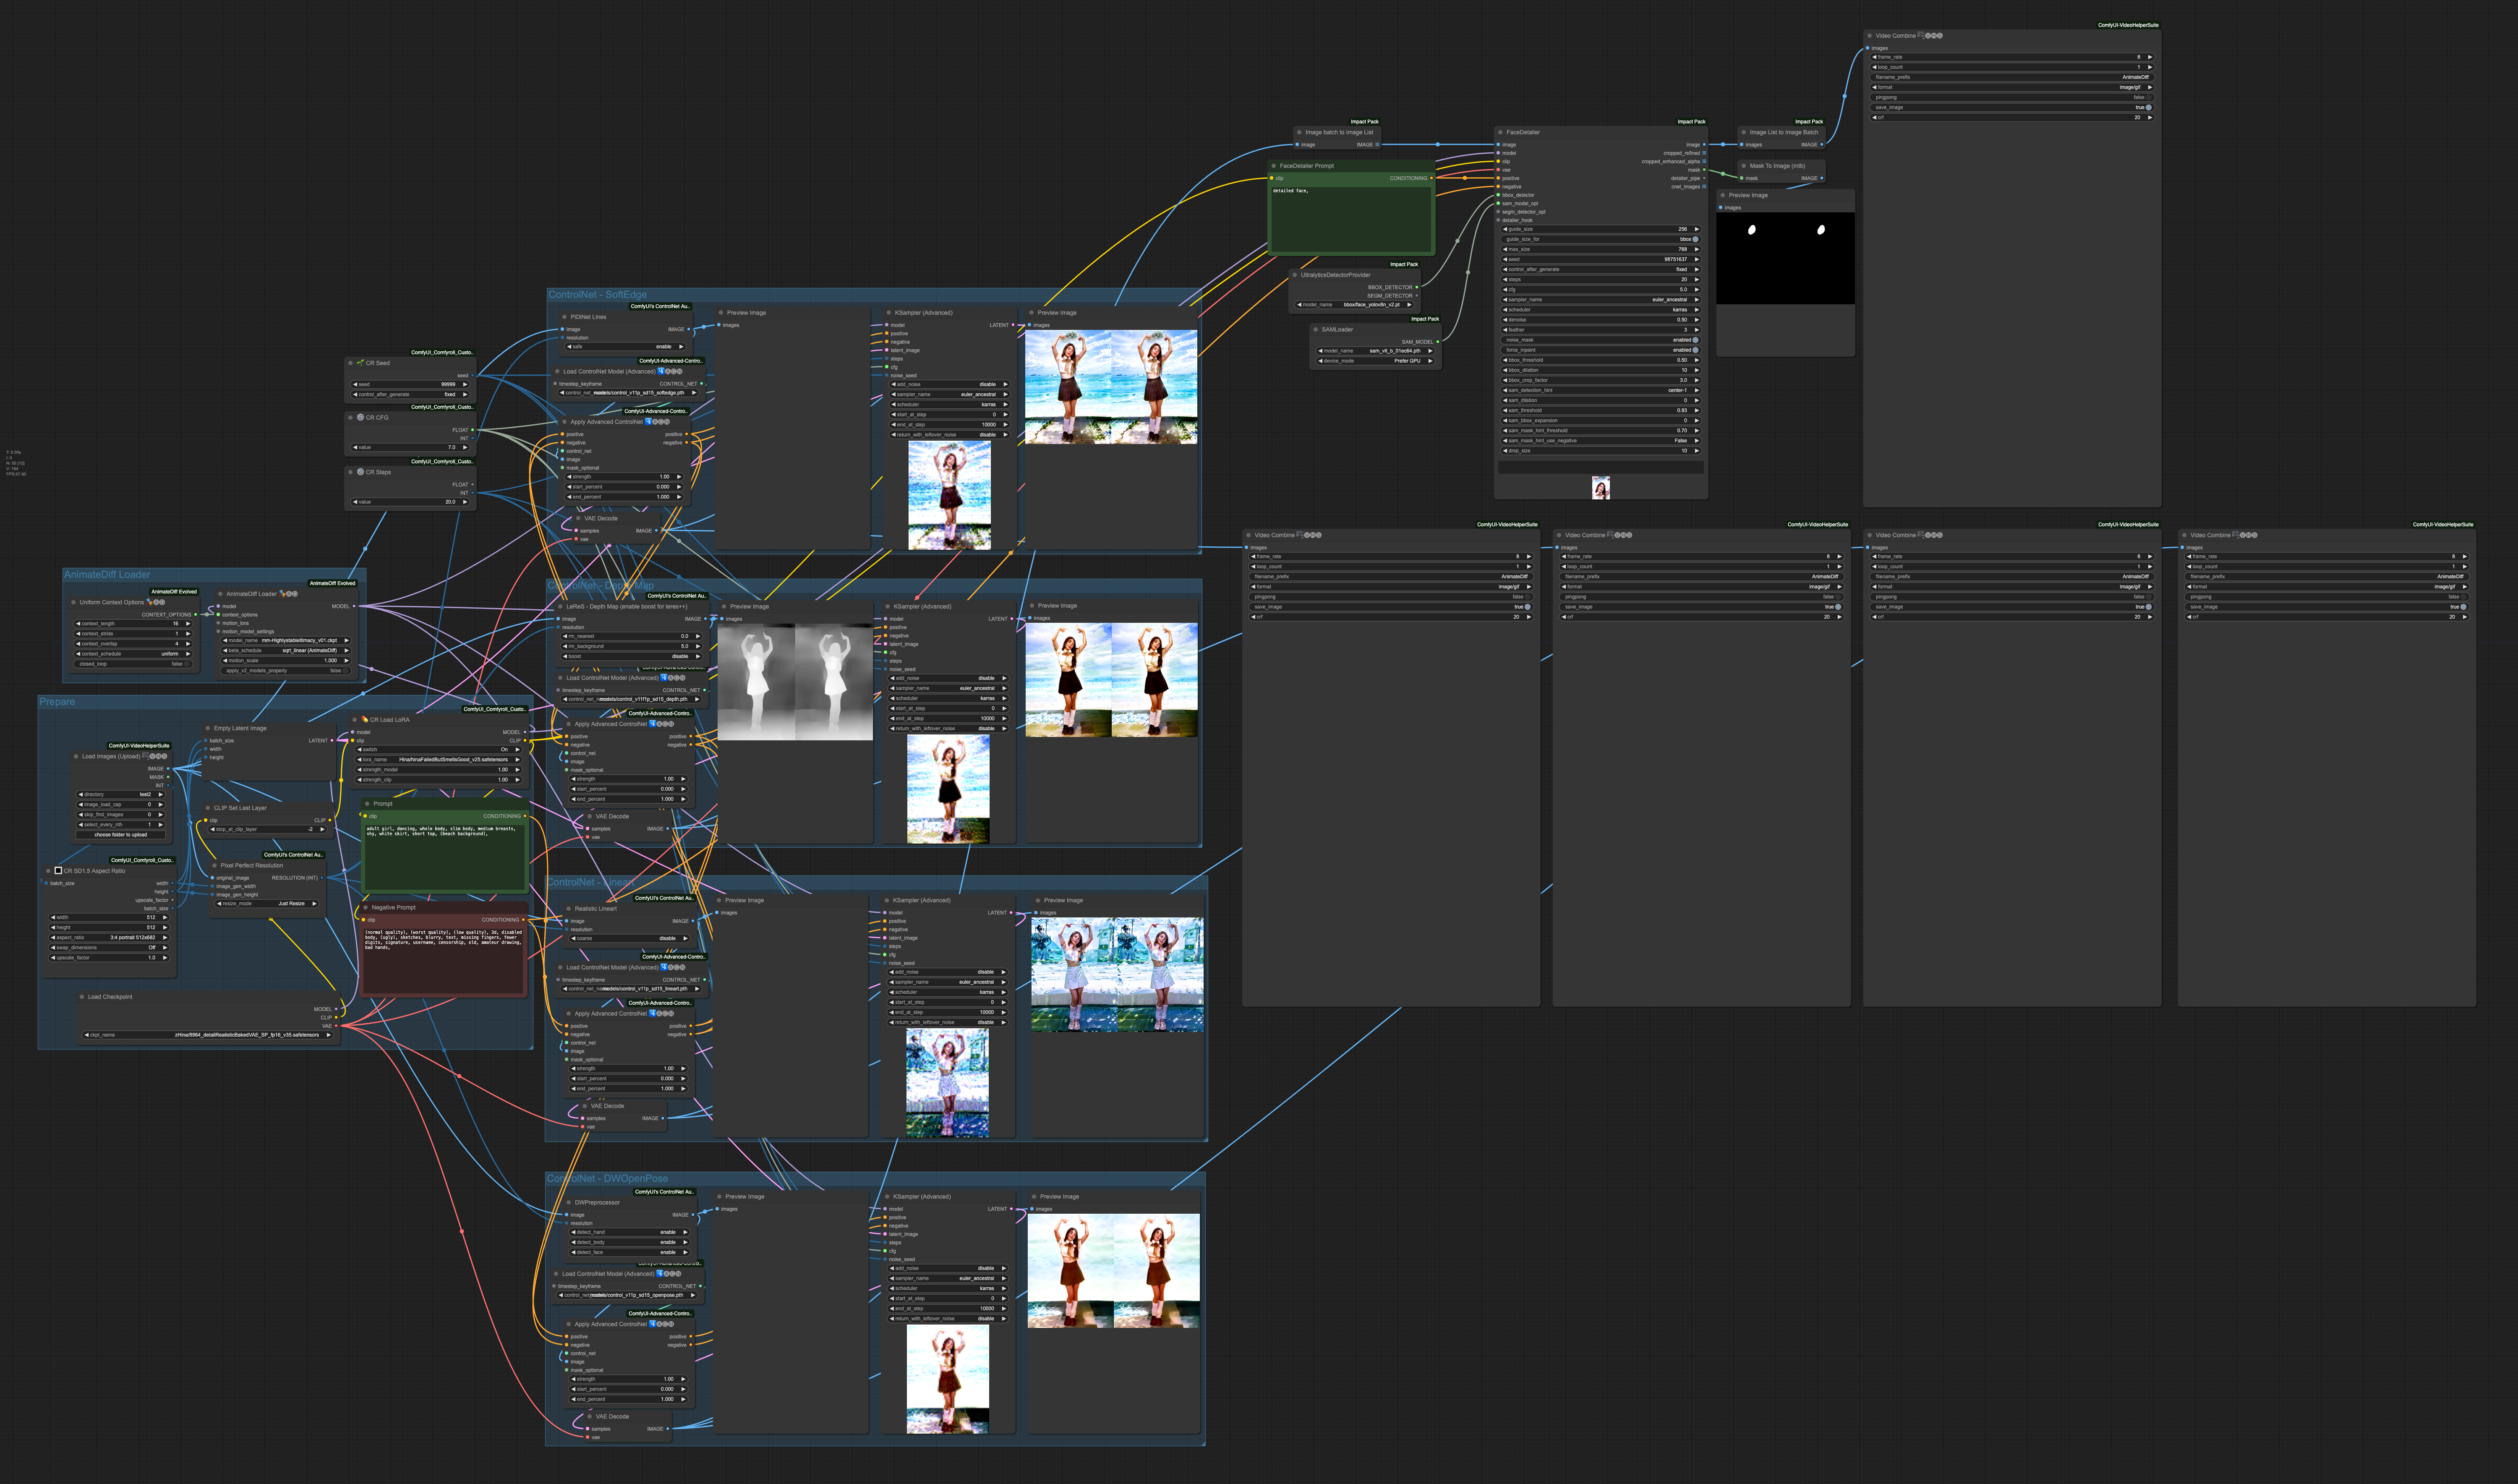
First, let's take a look at the overall composition,
This time, the positive prompt we used is:
adult girl, dancing, whole body, slim body, medium breasts, shy, white skirt, short top, (beach background),
And the negative prompt is:
(normal quality), (worst quality), (low quality), 3d, disabled body, (ugly), sketches, blurry, text, missing fingers, fewer digits, signature, username, censorship, old, amateur drawing, bad hands,
The order of ControlNets in operation is:
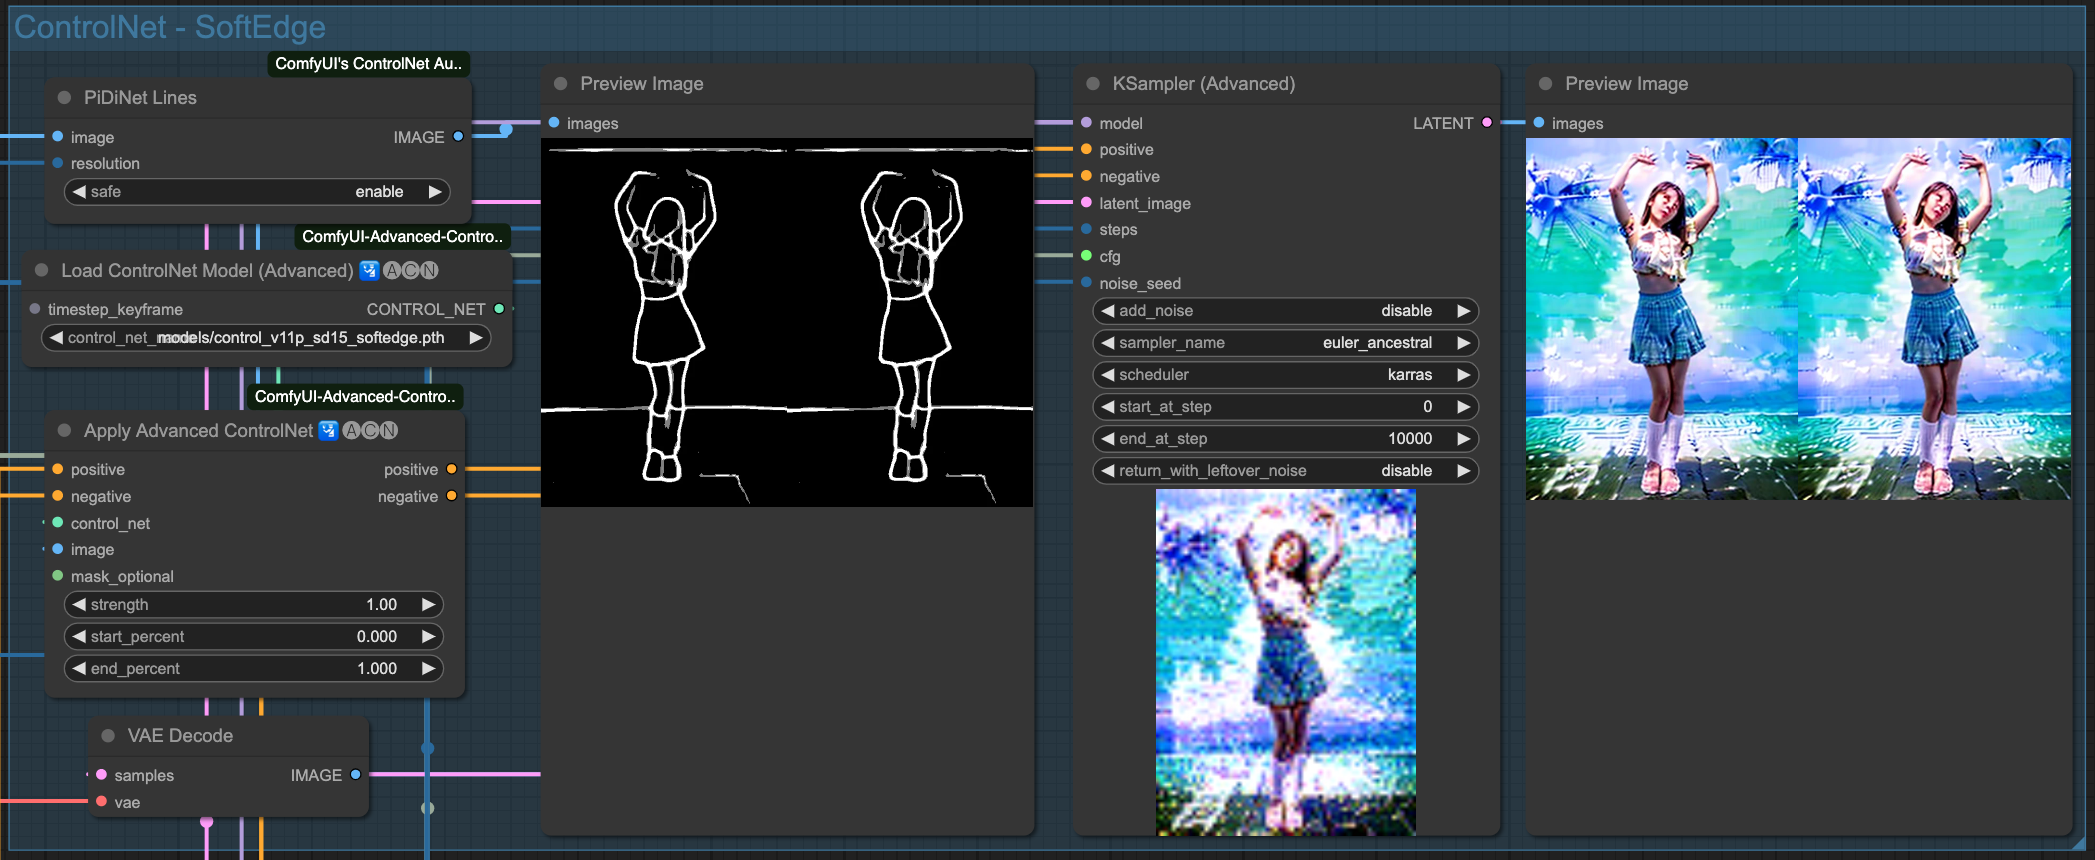
- SoftEdge
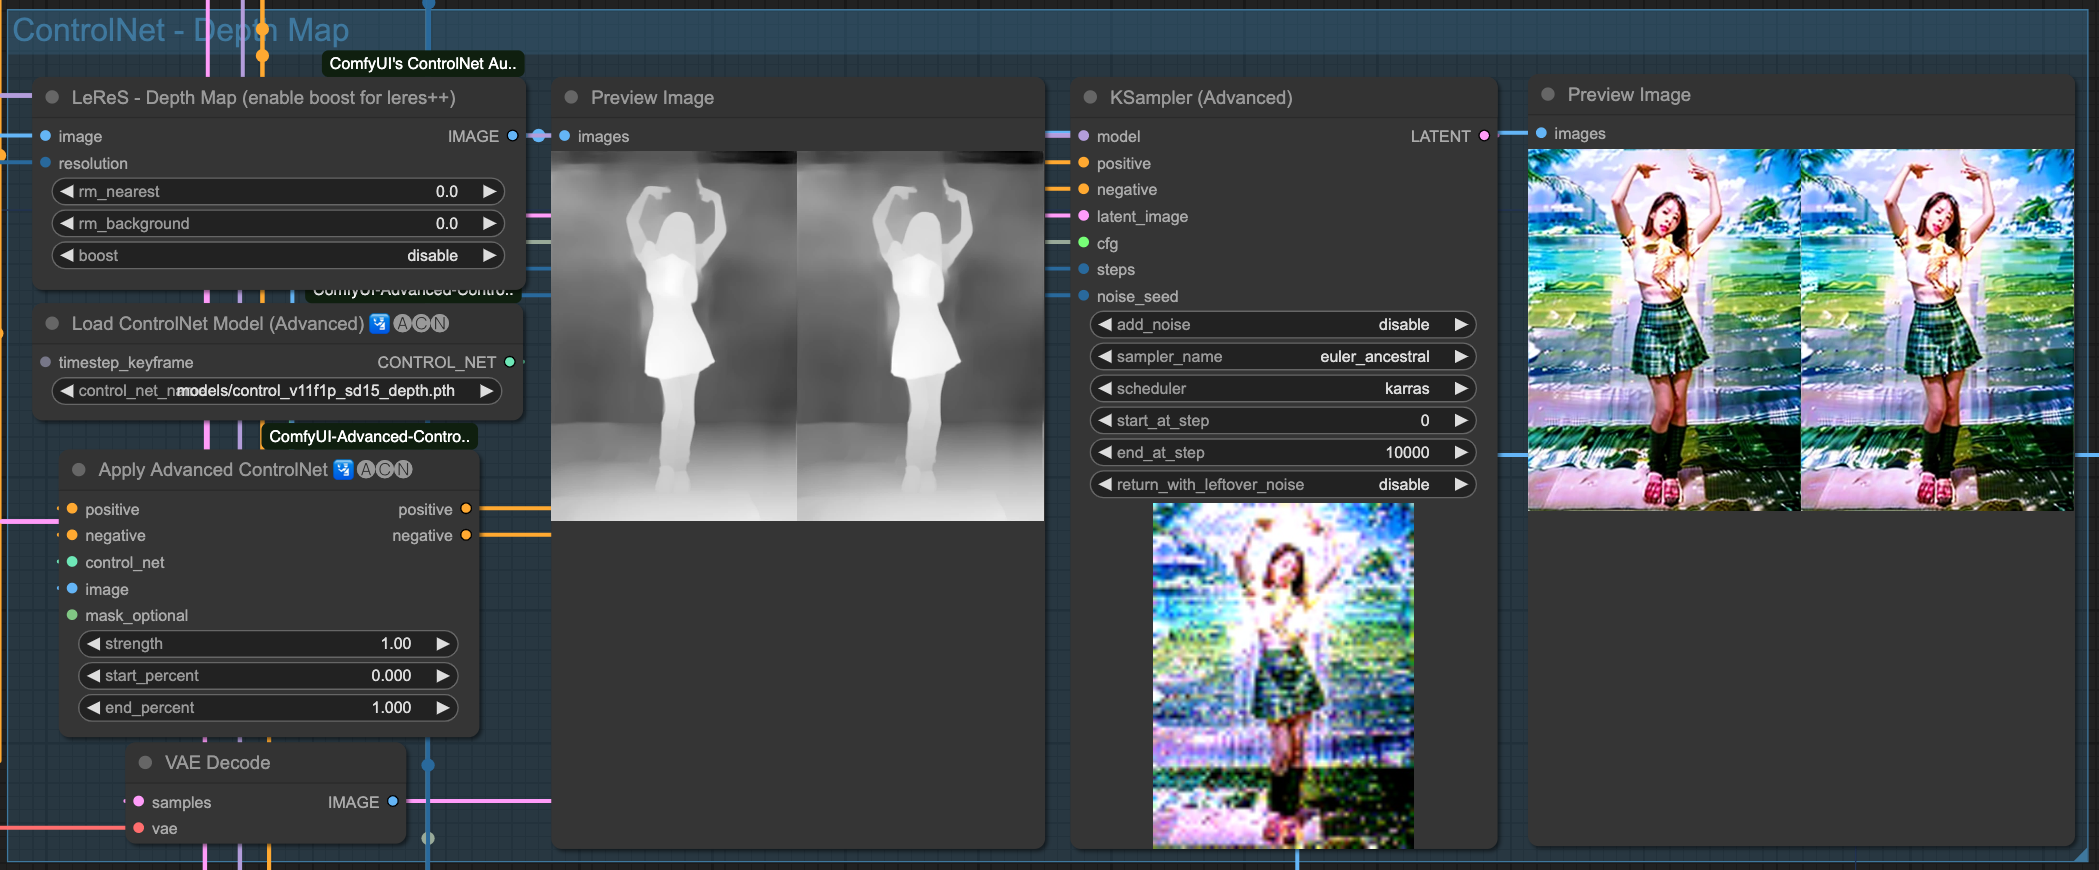
- Depth
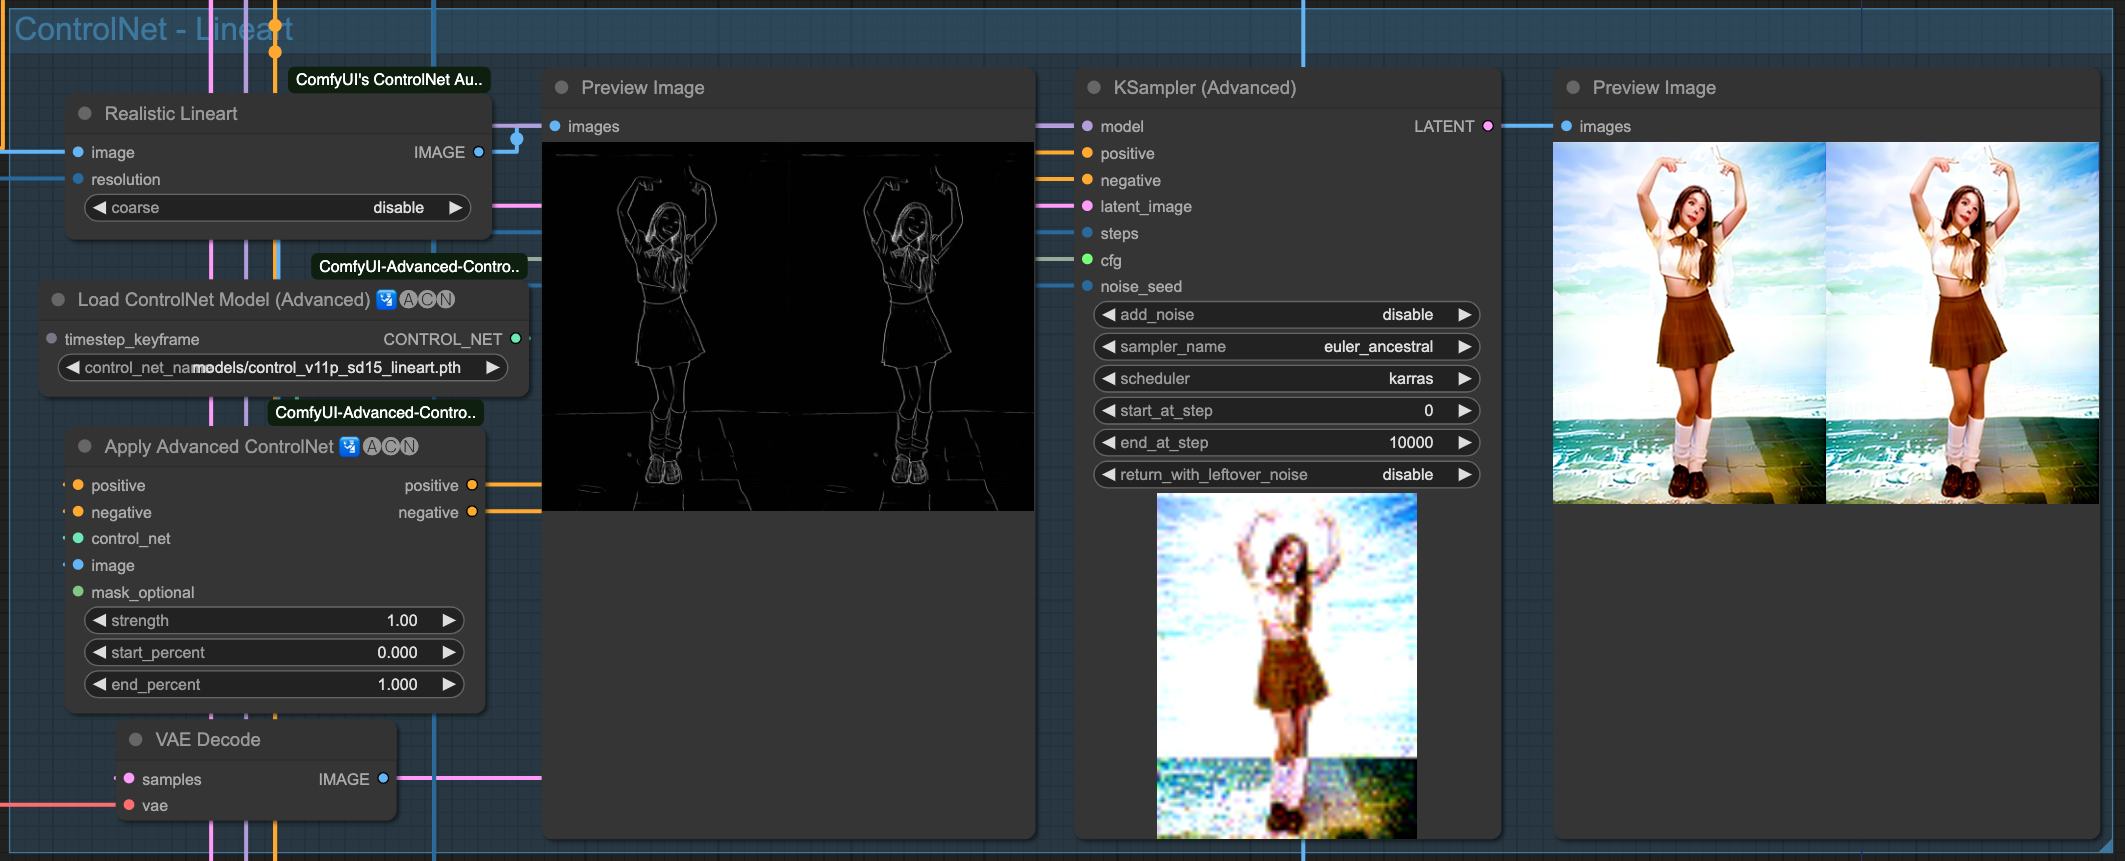
- Lineart
- OpenPose
The result of each ControlNet's processing is passed down to the next stage, ultimately output by OpenPose as the final result. Let's take a look at the effect of each ControlNet independently.
SoftEdge
Depth
Lineart
OpenPose
You may notice that, even though we emphasized (beach background), due to the nature of the source image, its rendering is not particularly pronounced. You can go back up and compare it to the output of ControlNets before applying the AndimateDiff motion model. In the entire process, the control of the visuals is entirely described by the original input images, processed through ControlNets, and finally handed over to the Sampler to draw the images. So, if you change the order of the ControlNets, the output results will be different.
For example, the four images below are processed in reverse order, and at each step, the output of ControlNet is fed to the Video Combine component to produce an animation.
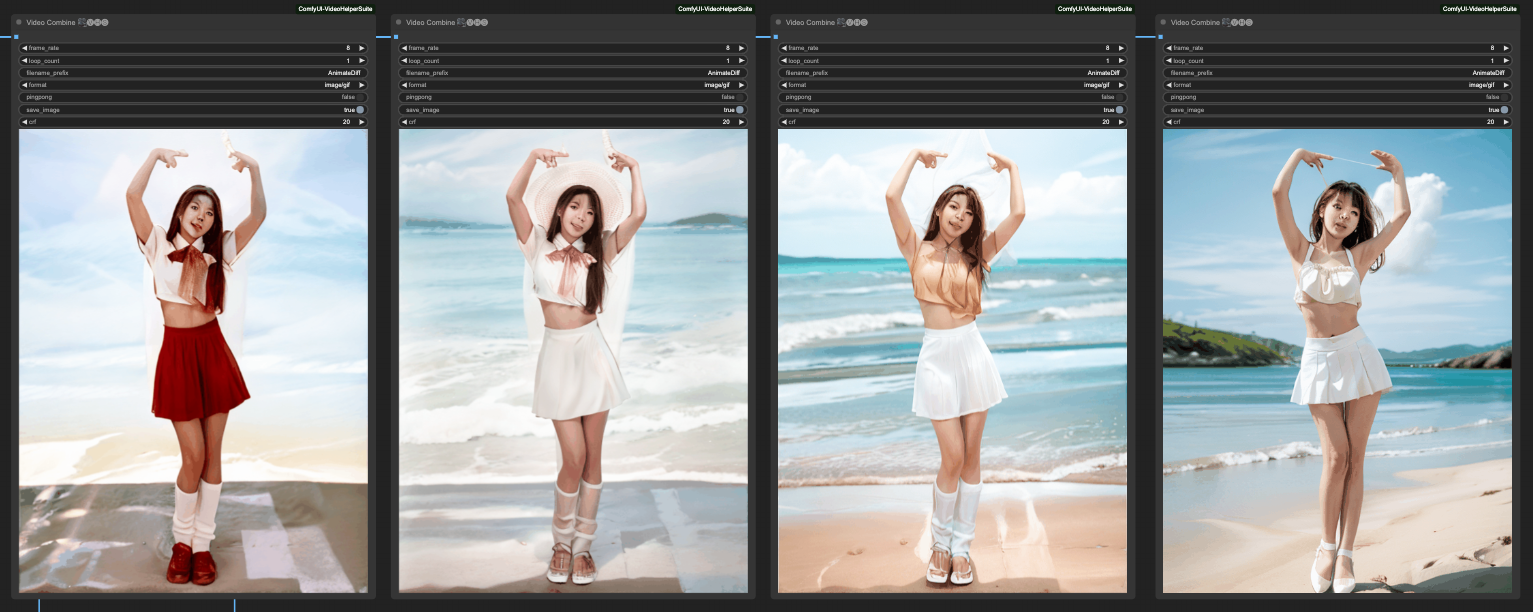
From left to right, they are:
- OpenPose -> Lineart -> Depth -> SoftEdge -> Video Combine
- OpenPose -> Lineart -> Depth -> Video Combine
- OpenPose -> Lineart -> Video Combine
- OpenPose -> Video Combine
At first glance, it seems like OpenPose alone can handle it well. However, this is just a case where OpenPose happens to perform better. In reality, you still need to combine ControlNets to achieve better results.
Post-processing
Usually, after completing one round of Samplier, we continue to handle a few things:
- Enlarging the video
- Facial restoration
- Second redraw
There is no fixed way to do this, and the combination depends on personal preference. I have a ready-made solution on my Github; interested individuals can refer to it.
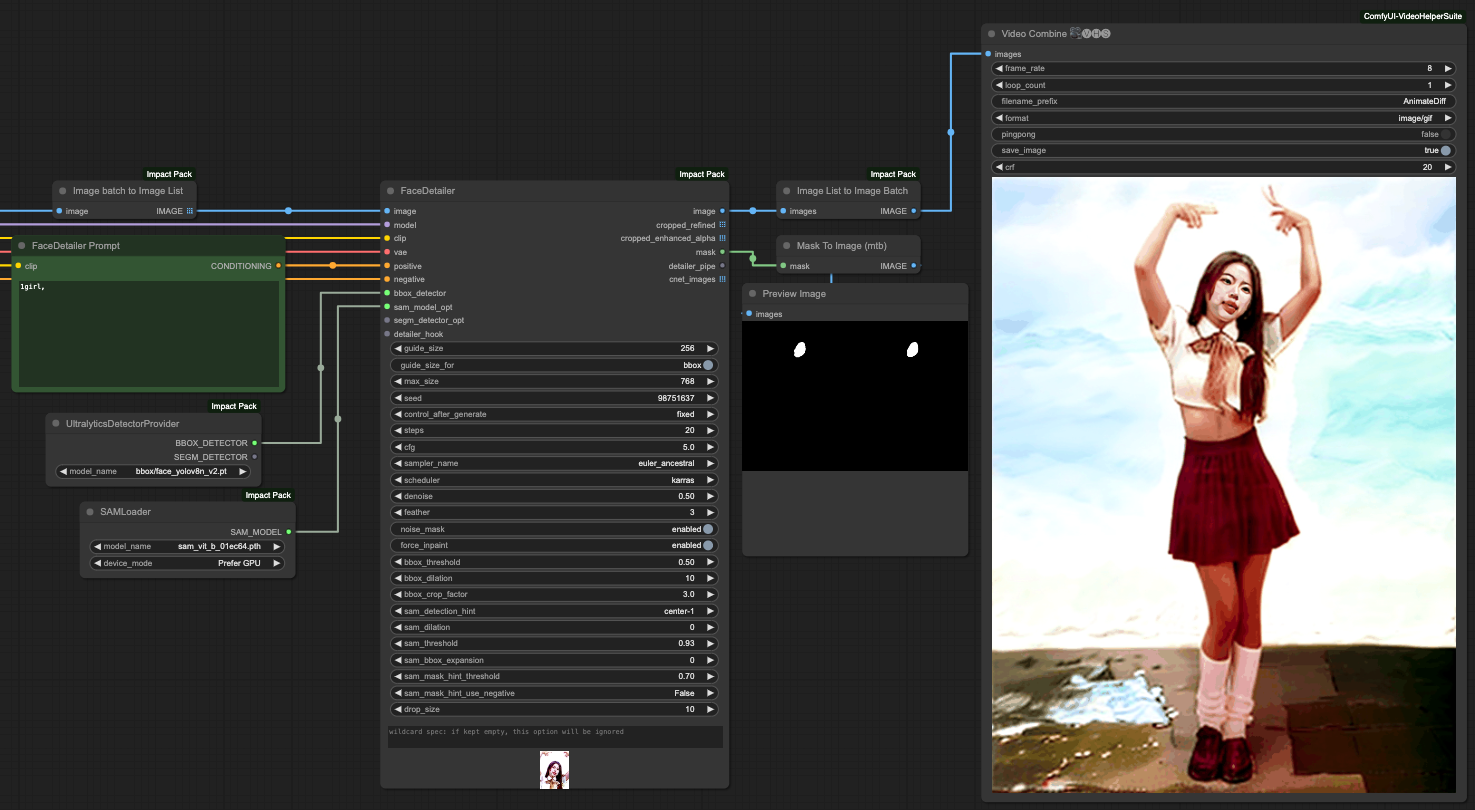
If you want to do facial restoration, here's something to remind everyone. The IMAGE output from VAE Decode will be in the form of an Image Batch, which needs to be converted into an Image List before it can be processed by the FaceDetailer tool. Similarly, it needs to be converted from Image List back to Image Batch before it can be passed to Video Combine for storage.
Conclusion
Although AnimateDiff has its limitations, through ComfyUI, you can combine various approaches. However, to be honest, if you want to process images in detail, a 24-second video might take around 2 hours to process, which might not be cost-effective. Finally, here is the workflow used in this article. Interested individuals can explore it further:
![[LoRA Guide] Z Image Turbo Training with AI-Toolkit and Merging It!](/content/images/size/w960/2025/12/LN_845764713767329_00001_.jpg)
![[Lora] Z Image Turbo 與 AI-Toolkit](/content/images/size/w960/2025/12/hina_zImageTurbo_caline_v3-dream-1.jpg)
![[AI] 與 AI Agent 一起開發優化器](/content/images/size/w960/2025/07/00059-293292005.jpg)