在我們要聊元件溝通之前,我們先來聊一下關於 Vuex 這個套件。他是官方推出的狀態管理的工具,官方中文翻譯叫做倉庫(?),也是啦,如果把 store 直接翻譯的話,好像叫倉庫也是挺合理的。
但我覺得好像狀態管理會比較符合事實。
Vuex
如果你是使用 Vue CLI 的話,那就是用 yarn 或 npm 裝一下就好,
yarn add vuex

# OR

npm i vuex
然後在你的 App 裡面,你會有幾件事情要做:
Vue.use(Vuex)。- 定義你的 Store。
- 把你的 Vue App 加入 Store 裡面。
import Vue from 'vue'
import Vuex from 'vuex'

Vue.use(Vuex)

let store = new Vuex.Store({
  modules: {
    // 這邊就放你要的 Modules
  }
})

export default store
我們先回過頭來講講 Vuex 的基本應用。
Vuex 在這邊所擔任的角色,是屬於共享狀態管理機制( Shared State Management ),主要的目的是讓你在各種不同的元件中溝通。溝通是個簡單的說法,主要的目的還是用於共享某些資訊,用以達到資訊同步的目的。
當然,這個並不是訊息溝通的必要手段。官方也說,如果不是大型結構的話,你可以自己製作一個狀態儲存機制,並不一定要使用 Vuex,畢竟這過於冗餘。
那麼這個狀態管理機制裡面有什麼東西呢?
- State 狀態儲存的物件,Vuex 使用 單一狀態樹 的方式來存放。
- Getters 取得狀態資料的方法。
- Mutations 更新狀態資料的方法。
- Actions 類似 Mutations,但是 Actions 是呼叫 Mutations,且可支援非同步呼叫。
- Modules 用於分割 Vuex 的區塊。
有了這寫核心結構概念後,我們來看看新增一個 Vuex 會有哪些屬性可以使用:
const store = new Vuex.Store({
  state: {
    age: 18
  },
  mutations: {
    incrementAge: function (state) {
      state.age++
    }
  },
  actions: {
    ohMyAge: function (commit) {
      commit('incrementAge')
    }
  },
  getters: {
    getAge: function (state) {
      return state.age
    }
  }
});
這是一個簡單的 Store 實例,如果在元件當中,你會有幾個方法,可以從 Vuex 裡面提出來使用。
import { mapState, mapMutations, mapActions, mapGetters } from 'vuex'
相對應的關係是這樣:
mapState可以取得state裡面的資料。mapMutations可以取得mutations裡面的方法。mapActions可以取得actions裡面的方法。mapGetters可以取得getters裡面的方法。
所以說,你們可能會看到這種寫法,
import { mapGetters, mapState } from 'vuex'

export default {
  name: 'MyComponent',
  computed: {
    ...mapGetters([
      'getAge'
    ]),
    ...mapState([
      'age'
    ])
  }
}
這麼你會在 template 當中可以直接使用 {{ getAge }},或是你在你的元件裡面,可以使用 this.getAge 來取得資料。
而如果是 mapActions 或是 mapMutations 則是放在 methods 裡面,
import { mapMutations, mapActions } from 'vuex'

export default {
  name: 'MyComponent',
  methods: {
    ...mapActions([
      'ohMyAge'
    ]),
    ...mapMutations([
      'incrementAge'
    ])
  }
}
這樣你應該知道這些東西相對應在元件或是 App 裡面可以怎麼使用了。接著,Vuex 還有一些其他的設定:
strict: true啟用嚴謹模式,當你開啟後,你只能透過 Mutations 來改 state 的數值,如果直接更改你的 state 數值,會被警告。- 支援 插件( Plugin ),你可以自己做想要的工具放進去。
- 在開發模式下,支援 熱重載( Hot reloading ),這個寫法可以參考官方文件,在開發模式下適用。
最後,剛剛所提到的 Modules 這個設計,倘若你的結構相當大,那麼為了區分不同的區塊,你可以使用 modules 來區隔,
const hello = {
  state: {
    // 狀態資料
  },
  mutations: {
    // 操作方法
  }
}

const kitty = {
  state: {
    // 狀態資料
  },
  mutations: {
    // 操作方法
  }
}

const store = new Vuex.Store({
  modules: {
    hello: hello,
    kitty: kitty
  }
});
這樣你的 Vuex 在元件當中,就利用 store.state.hello 來取得 hello 的 Module 當中的資要。
new Vue({
  computed: {
    getHello: function () {
      return store.state.hello
    },
    getKitty: function () {
      return store.state.kitty
    }
  }
}).$mount('#app')
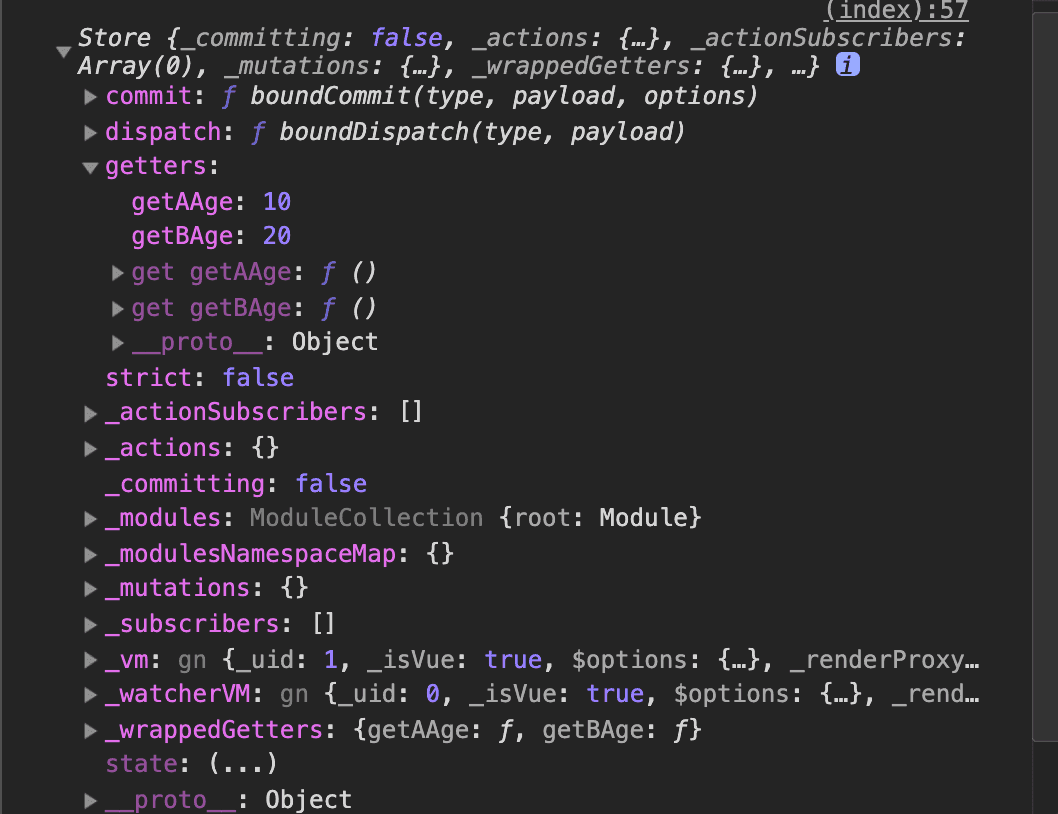
這裡還有另外一個設定,叫做 namespaced。一般來說,無論是你是否使用 Modules,裡面的元件在沒有設定 namespaced: true 的情況下,mutations, actions, commit, dispatch 與 getters,大家都是綁訂在 全域 的料結構內,所以,如果依照剛剛的例子來看:

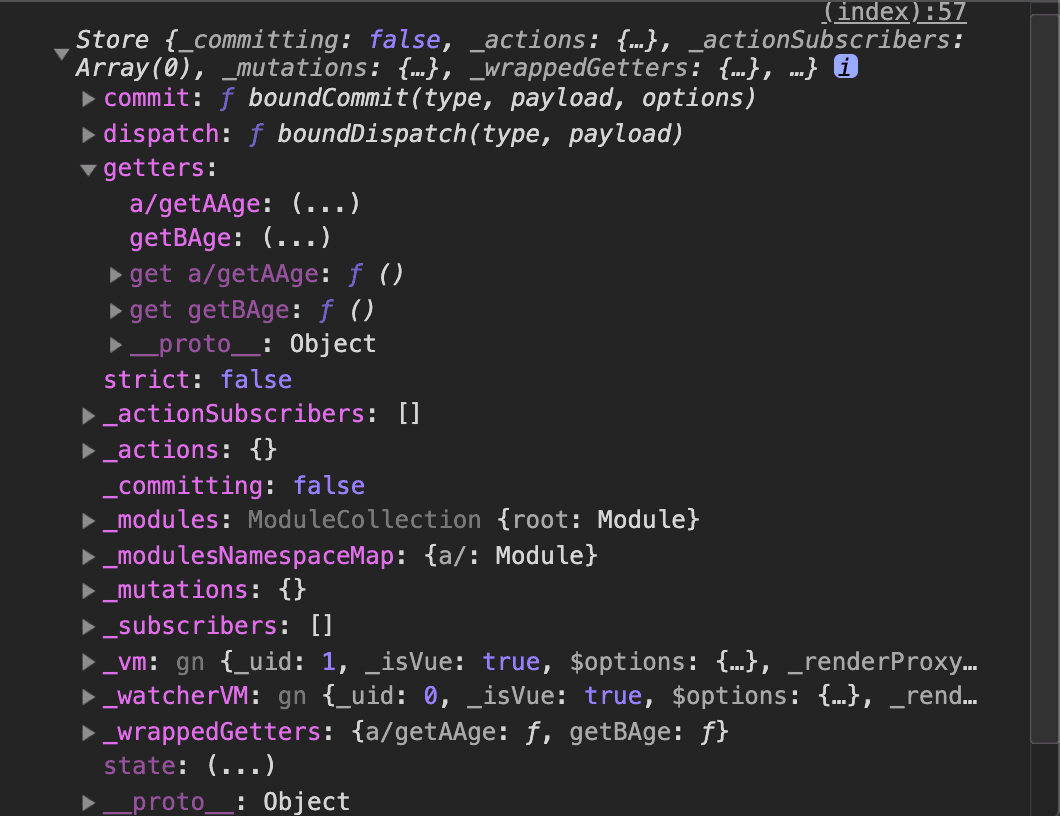
你會看到在 getters 裡面有兩個東西,一個叫做 getAAge 另一個叫做 getBAge,如果我們把 getAAge 這個 Module 加上 namespaced: true 之後,他就會變成這樣:

所以說,這樣我們再使用 Getters 的時候,寫法就會略有差異:
import { mapGetters } from 'vuex'

export default {
  name: 'MyComponent',
  computed: {
    ...mapGetters({
      getAAge: 'a/getAAge',
      getBAge: 'getBAge'
    })
  }
}
這些情況,在 mapActions, mapMutations 與 mapGetters 上面都適用。而,如果你的 Module 底下還有 Module,且也開啟 namespaced: true 的話,那就可能會有這種結構出現:
import { mapGetters } from 'vuex'

export default {
  name: 'MyComponent',
  computed: {
    ...mapGetters({
      getAAge: 'a/other/module/getAge'
    })
  }
}
最後,關於 Module 這個部分,也可以使用 registerModule 這個方法來註冊你的 Module,例如說:
store.registerModule('myModule', {
  // 你的 Module
})
你也可以註冊巢狀的 Module,例如:
store.registerModule(
  [ 'myModule', 'nested' ],
  {
    // 你的 Module
  }
)
另外,Vuex 另外也提供了一個方法,叫做 createNamespacedHelpers 用來取得有命名空間的資料,主要的差異用範例來看比較清楚。
這是原本的寫法,
import { mapGetters } from 'vuex'

export default {
  name: 'MyComponent',
  computed: {
    ...mapGetters({
      getAAge: 'a/other/module/getAge'
    })
  }
}
這是使用了 createNamespacedHelpers 的寫法,
import { createNamespacedHelpers } from 'vuex'
import { mapGetters } from createNamespacedHelpers('a/other/module')

export default {
  name: 'MyComponent',
  computed: {
    ...mapGetters({
      getAAge: 'getAge'
    })
  }
}
這樣看得出差異了嗎?當然,這個大前提是,如果你要取得的資訊是在同一組 Module 裡面,如果你是要跨出其他的 Module 的話,那麼就不能用這個方式。
關於非同步處理
如果你開啟了嚴謹模式,那麼你要修改資料就只能透過 Mutations 來做,但是,這個方法 不可以 使用非同步處理,所以,你必須要透過 Actions 來處理關於非同步的事情。
那麼,在 Actions 裡面,我們會有幾個東西可以使用:
const store = new Vuex.Store({
  state: {
    hello: ''
  },
  mutations: {
    setHello: function (state, data) {
      state.hello = data
    }
  },
  actions: {
    setHello: function ({ commit, dispatch, rootState, state }) {
      // 這邊可以做非同步處理,例如 AJAX
      axios({
        method: 'get',
        url: '/get/something',
        responseType: 'json'
      }).then(function (res) {
        commit('setHello', res.data)
      });
    }
  },
  getters: {
    getHello: function (state) {
      return state.hello
    }
  }
});
你會看到你可以使用:
commit這個函式是呼叫mutation裡面的方法。dispatch這個函式是呼叫action裡面的方法。rootState這個物件是整個 Store 的 state 資料。state這個物件是本地端( Local state )的資料。rootGetters這個物件是整個 Store 的 getters 資料。
所以,當我們做完 axios 的非同步傳輸後,可以使用 commit 或是 dispatch 來接續後面要做的事情。而 mutation 裡面,僅允許同步操作,這樣的非同步操作在 mutation 裡面是不能使用的。
其他具體的操作可以參考官方說明:
特別提到一點,剛剛的 commit 與 dispatch 由於 namespaced 的設定的關係,所以,他們的第三個參數,可以指定 { root: true },表示從 Vuex 根元件做呼叫一個方法,他可以根據你的 Module 的設定來 戳 到你指定的目標。
store.commit('a/other/module', {}, { root: true });
store.dispatch('a/other/module', {}, { root: true })
這個方法的應用情境,主要是在 不同的 Module 當中,需要去呼叫 其他的 Module 的時候,你必須要加上這個參數,這樣才能觸發到你想要的目標。不然依照 namespaced: true 的設定,在你的 Module 裡面的 commit 都是觸發你的本地端( Local state )的方法(包括 commit 或是 dispatch)。
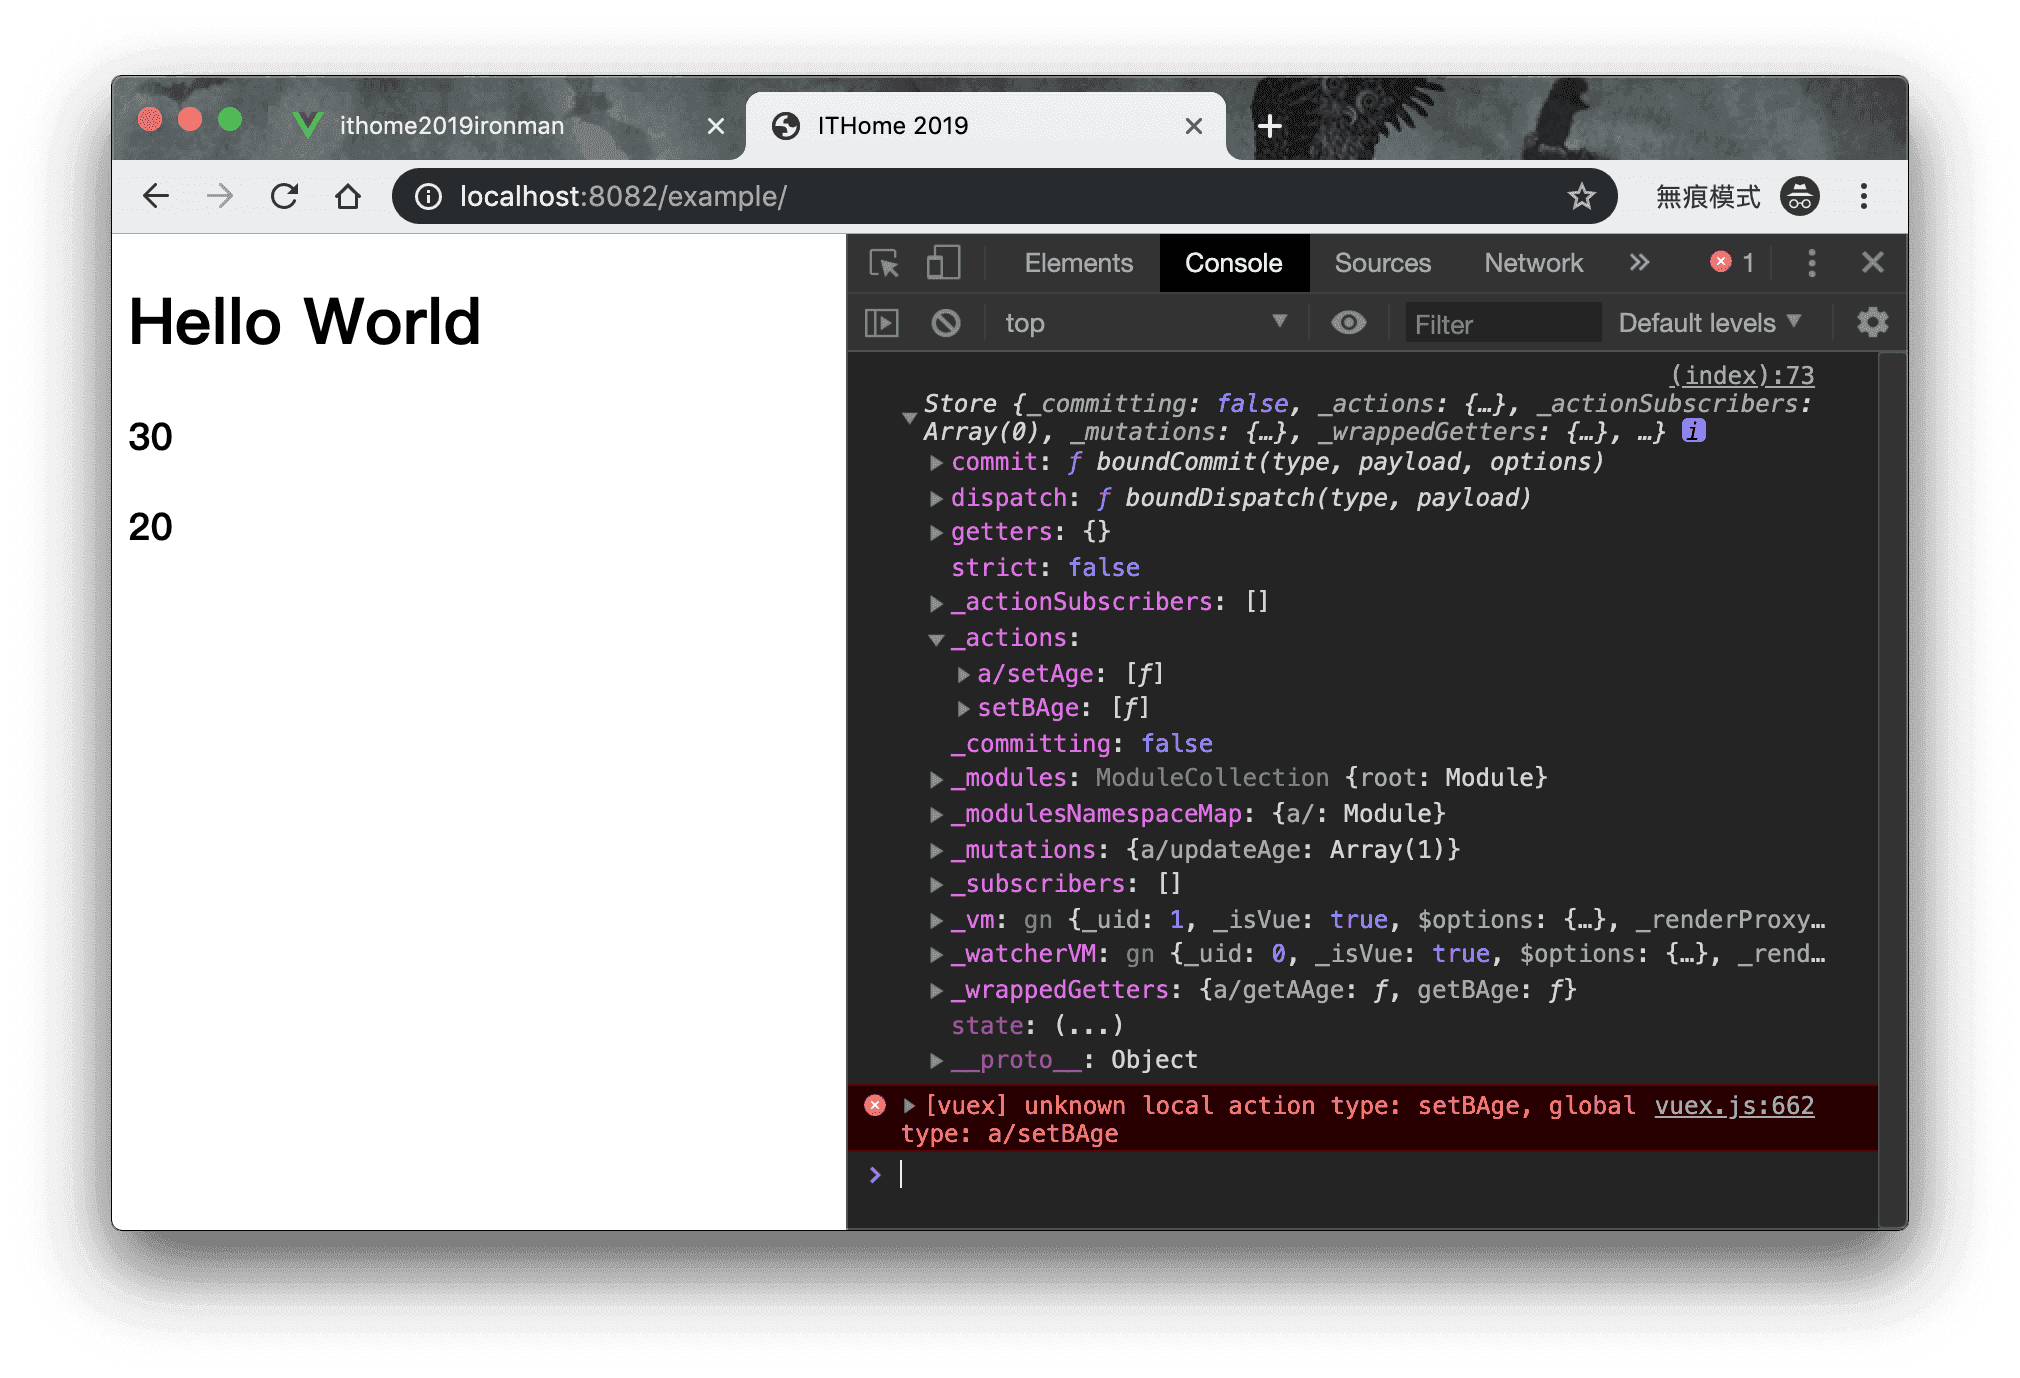
如果你的 Module 是 namespaced: true 的話,第三個參數沒有設定,就會被回報錯誤!

所以,當你在 Module 裡面,且 namespaced: true 的時候,想要呼叫其他人,就必須指定第三個參數為 { root: true } 來告訴他,請從 根 的位置去呼叫。上述的例子,你會看到我所展開的 Store 裡面,關於 _actions 的部分,其中包含了 a/setAge 與 setBAge 這兩個方法,這裡其實就是 根 的位置。
這樣,你應該可以理解第三個參數 { root: true } 實際上做了什麼事情了。
小結
這裡只是粗略的介紹一下 Vuex 的功能,實際上使用還是得看你的專案是不是真的需要。就如同官方說的,小專案用這樣的工具,確實是有點冗餘。
如果你是為了潮,那可以(欸不對)!

