
在這裡開始之前,我必須告訴你們一件事情,CKeditor 內含的 Event,也就是總共可以被 fire 的監聽事件,分門別類總共有 56 種之多!其中因為 IE 的關係,selectionChange 的監聽事件分出了 IE 專用的 selectionchange(是的,僅大小寫不同),再扣除測試的兩種監聽 someEvent 與 testEvent,還有原本就在 DOM 常見的監聽式以外,CKeditor 所使用的 Event 還是高達 46 種。
不過,這跟 Dialog 有什麼關係?好,要啟動 Dialog 之前,由於 Dialog 在 CKeditor 是一個 plugin,所以必須要先滿足一個條件:
確定 plugin 已經讀取完成,那麼,我們就必須監聽 pluginsLoaded,用以得知 plugin 已經載入完畢。
CKeditor 很慷慨的分享出 JavaScript API Document,但是我很殘酷的告訴你,event 到底在幹麼他支字未提。好的,暫且將 Event 放一邊,你只要知道有這件事情就好了。往後倘若遇到 fire 事件時,再回來查吧(文末會附上列表)。
我們在這裡所需要準備的環境,其實很簡單,由於 CKeditor 後來提供了 jQuery Adapter 的方式來初始化編輯器,所以我們就從 jQuery 開始。
	<script type="text/javascript">
	//<![CDDA[
	$(document).ready(function() {
	    var config = {};
	    $("#editor").ckeditor(function() { /*...callback here...*/ }, config);
	});
	//]]>
	</script>
然後,我們從 callback 的地方開始我們的 dialog 設定,在這裡面我們要做很多事情:
- 設定 Dialog
- 建立 Dialog
- 註冊 Dialog 元件
- 指定 Toolbar 按鈕
- 指定 Toolbar 按鈕命令
不囉唆,請看碼說故事。
	<script type="text/javascript">
	//<![CDDA[
	$(document).ready(function() {
	    var config = {};
	    $("#editor").ckeditor(function() {
	        var editor = this;
	        // 監聽 pluginsLoaded,完成才執行。
	        editor.on('pluginsLoaded', function( ev ) {
	            // 檢查要建立的 dialog 是否存在,不存在則建立。
	            if (!CKEDITOR.dialog.exists('myDialog')) {
	                // 註冊這個 Dialog,注意,官方範例中,這裡是使用載入外部 JavaScript 來完成的。
	                // 這裡的 Dialog 我直接取用上一篇的介紹,寫入檔案上傳的對話框。
	                CKEDITOR.dialog.add( 'myDialog', function( editor )
	                {
	                    return {
	            title : 'My Dialog',
	            minWidth : 400,
	            minHeight : 200,
	            contents : [
	            {
	                id : 'Upload',
	                hidden : true,
	                filebrowser : 'uploadButton',
	                label : editor.lang.image.upload,
	                // 在 Dialog 中註冊元件
	                elements :
	                [
	                    {
	                    type : 'file',
	                    id : 'upload',
	                    label : editor.lang.image.btnUpload,
	                    style: 'height:40px',
	                    size : 38
	                    },
	                    {
	                    type : 'fileButton',
	                    id : 'uploadButton',
	                    filebrowser : 'info:txtUrl',
	                    label : editor.lang.image.btnUpload,
	                    'for' : [ 'Upload', 'upload' ]
	                    }
	                ]
	            }
	            ]
	            };
	                });
	                // 與官方不同的是,我們把工具列命令放在這裡,當然是建立 dialog 之後在給命令。
	                editor.addCommand('myDialogCmd', new CKEDITOR.dialogCommand('myDialog'));
	                // 同樣的,註冊一個按鈕,也放在這裡面。
	                editor.ui.addButton( 'MyButton',
	        {
	            label : 'My Dialog',
	            command : 'myDialogCmd'
	        });
	            }
	        });
	    }, config);
	});
	//]]>
	</script>


	    var config = {
	    toolbar: [
	        // 前略
	        ['MyButton']
	    ]
	    };
在加入對話框的時候,發生了什麼事情?首先是對話框的名稱,請留意這個名稱在 dialog 中必須是獨一無二的。再來,我們來看看設定的部份:
- button
設定對話框按鈕,但是他不是實際可以使用的 API,請忽略他,因為他不能用(目前為只是這樣)。 - content
設定對話框內容,對話框的內容由contentDefinition產生物件並以陣列的方式傳入。 - title
設定對話框標題,必填! - minHeight
對話框最小高度。 - minWidth
對話框最小寬度。 - onCancel
對話框按下取消的時候,觸發這個函式。 - onLoad
對話框載入的時候,觸發這個函式。 - onOk
對話框按下確定的時候,觸發這個函式。 - resizable
變更對話框的尺寸,預設是無法變更,不過我套用了其他三種設定也無法使用,不知道是什麼緣故。可用的數值有:
CKEDITOR.DIALOG_RESIZE_NONE
CKEDITOR.DIALOG_RESIZE_WIDTH
CKEDITOR.DIALOG_RESIZE_HEIGHT
CKEDITOR.DIALOG_RESIZE_BOTH
接下來,我們來看 contentDefinition 做了什麼事情。他是用來定義對話框中顯示的元件,以物件方式傳入:
- accessKey
CTRL 熱鍵組合,可以快速切換到該頁內容。 - elements
對話框中的 UI 元件(有限制),使用uiElementDefinition產生物件並以陣列的方式傳入。 - title
該頁面的訊息。 - label
該頁面的頁籤(tab)。 - id
該頁面的 id 屬性。
最後,我們來看 uiElementDefinition 做了什麼事情。他是用來定義對話框內容元件 UI,以物件方式傳入:
- className
該物件所套用的 CSS 類別樣式。 - id
該物件所使用的 id 屬性。 - type
該物件的類別,這裡的類別決定你要放置的元件設定。 - onHide
該物件隱藏的時候,觸發這個函式。 - onLoad
該物件載入的時候,觸發這個函式。 - onShow
該物件顯示的時候,觸發這個函式。 - style
該物件可以設定的行內樣式。
這樣就結束了嗎?還沒還沒,我們再來針對 type 這個設定來看,uiElementDefinition 其實繼承(或說沿用)了 ui.dialog.uiElement 的類別。所以,他能做到的事情遠比你想像中的要複雜的多。我們先來看看到底可以在對話框中,能加入什麼東西。
- type: 'file'
提供一個檔案上傳的端口,通常搭配 fileButton 使用。 - type: 'fileButton'
將 file 所提供的檔案做上傳等動作,也可以搭配 CKFinder 做檔案總管之類的動作。 - type: 'hbox'
加入一個水平的方塊元件(通常是 DIV boxing)必須指定children,可與vbox搭配使用做出擬似表格的顯示。 - type: 'vbox'
加入一個垂直的方塊元件(通常是 DIV boxing)必須指定children,可與hbox搭配使用做出擬似表格的顯示。 - type: 'html'
直接寫入 HTML 標記語言,必須傳入指定內容(使用 html)。 - type: 'text'
加入一個input欄位,屬性為text,注意,並沒有password可用。 - type: 'textarea'
加入一個textarea欄位。 - type: 'checkbox'
加入一個checkbox項目。 - type: 'radio'
加入radio項目,必須傳入指定項目陣列(使用item)。 - type: 'select'
加入select項目,必須傳入指定項目陣列(使用item)。
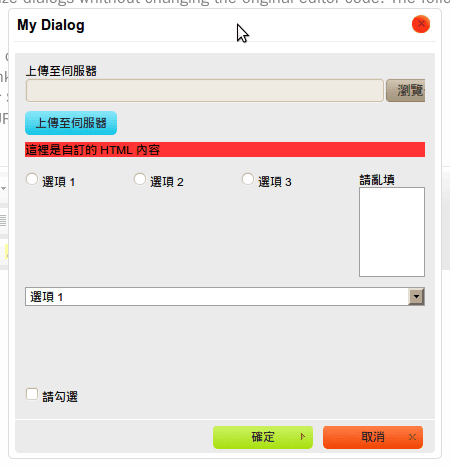
我們把上面的範例再拿來修改一下:
	elements :
	[
	    {
	    type : 'file',
	    id : 'upload',
	    label : editor.lang.image.btnUpload,
	    style: 'height:40px',
	    size : 38
	    },
	    {
	    type : 'fileButton',
	    id : 'uploadButton',
	    filebrowser : 'info:txtUrl',
	    label : editor.lang.image.btnUpload,
	    'for' : [ 'Upload', 'upload' ]
	    },
	    {
	    type : 'html',
	    html: '<div style="background-color:#f33;">這裡是自訂的 HTML 內容</div>'
	    },
	    {
	    type : 'vbox',
	    height : ['30%','70%'],
	    children : [
	        {
	        type : 'hbox',
	        widths : ['60%','40%'],
	        children : [
	            {
	            type : 'radio',
	            items : [
	                ['選項 1','1'],
	                ['選項 2','2'],
	                ['選項 3','3']
	            ]
	            },
	            {
	            type : 'textarea',
	            cols : 5,
	            rows : 5,
	            label : '請亂填'
	            }
	        ]
	        },
	        {
	        type : 'select',
	        style : 'width:100%',
	        items : [
	            ['選項 1','1'],
	            ['選項 2','2'],
	            ['選項 3','3']
	        ]
	        },
	        {
	        type : 'checkbox',
	        label : '請勾選'
	        }
	    ]
	    },
	]
那麼?你有覺得 Dialog 有好用一點點了嗎?至於剛剛說的 Event 列表,真的有人想看嗎?
Event 清單

themeSpace
saveSnapshot
ariaWidget
dialogDefinition
cancel
show
dialogShow
hide
dialogHide
ok
menuShow
key
contentDom
mode
dataReady
contentDomUnload
showScaytState
scaytDialog
afterCommandExec
contextmenu
beforepaste
pasteDialog
afterUndo
afterRedo
state
beforeCleanWord
paste
instanceReady
beforeModeUnload
selectionChange
selectionchange
pluginsLoaded
instanceCreated
destroy
instanceDestroyed
beforeCommandExec
beforeGetData
getData
getSnapshot
loadSnapshot
setData
afterSetData
insertHtml
insertElement
loaded
currentInstance
state
download