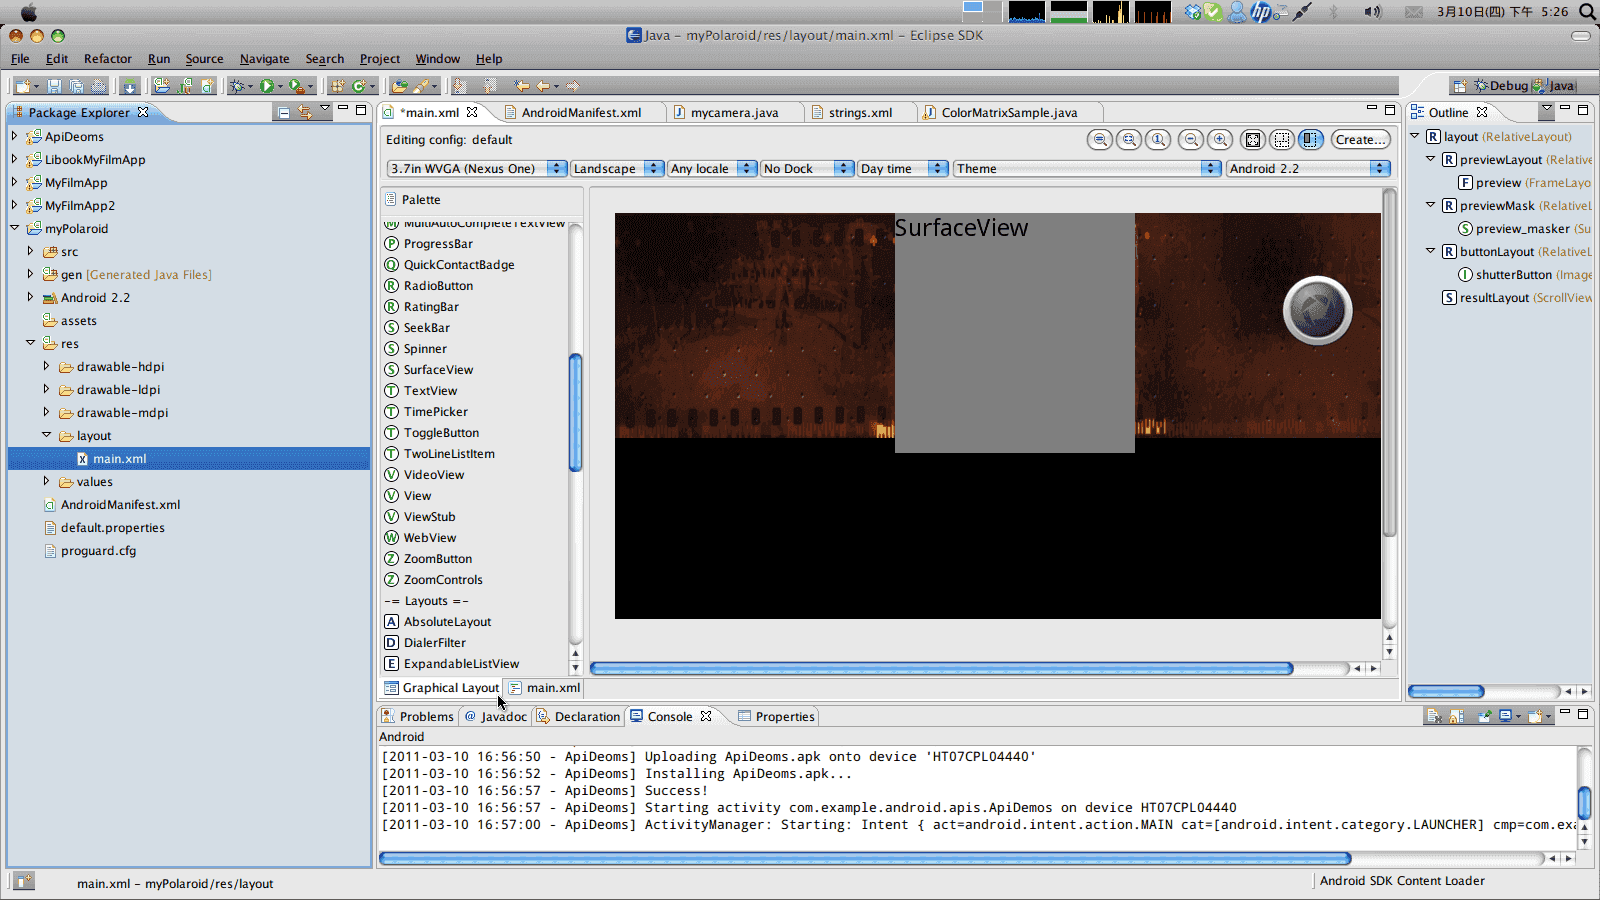
在 Eclipse 上面開發 Android App 其實算是很方便的一件事情,所有的工具他都幫你整合好了,你只要動手做就好了。只是,對於 Android App 的開發上,有一點很讓人頭大,那就是 UI 的製作。他的方式非常的工程師,由於我並不是一個師程工,所以我覺得這樣很困難也是很合理的(沒有誤)!
搞不好學 JAVA 都比畫他的 UI 要來的簡單(亂講)。
在電腦準備好開發環境後,打開 Eclipse,新建立一個 Android Project 之後,就可以開始畫 UI 地獄了(死)。有兩種方式,一種是用 TextEditor 打開 main.xml 硬上,另外一種是用 Eclipse 的圖形化模式來編輯。各有利弊,因為這個圖形化模式,跟實際在手機上執行的時候,結果不會一樣喔(啾咪)。

為什麼會不一樣?因為在手機或是平板上,實際解析度會因為分辨率(Density)的不同而不同。所以,在 UI 的製作上,有一個單位叫做 DIP,是用來讓你的畫面,在各種不同的裝置上,看起來會趨近於一致的一種設定方式。基本上的公式是這樣:
pixs = dips * (Density/160)
也就是說,如果裝置的分辨率是 160,那麼 10x10 dips 的矩形,換算成像素就是 10x10 pixs 的矩形。如果拿到分辨率是 240 的裝置上,那麼 10x10 dips 的矩形,就會變成 15x15 pixs。所以在製作 UI 的時候,取決於該裝置的分辨率(Density),而來換算你的畫素該怎麼配置。
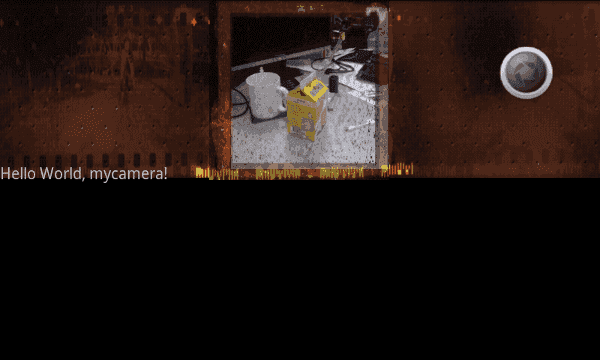
所以上面的畫面,在我的 Desire 上就會變成這樣:

大抵上會差不多,但是請留意畫面中白框位置,跟我預想的還是有些許落差。這是這個 UI 設計頗為麻煩的地方,在編輯器上不準,在裝置上更不準(倒)。所以要製作出很精準的 UI,恐怕得靠很多的經驗來慢慢地嘗試了,現在這個情勢看來似乎是無法避免。
順手筆記一些 Code,以防我老了忘記。
/* 在 AndroidManifest.xml 加入這行,可以強制應用程式使用橫式畫面 */
android:screenOrientation="landscape"
/*
 * 讓應用程式使用全螢幕
*/
requestWindowFeature(Window.FEATURE_NO_TITLE);
this.getWindow().setFlags(WindowManager.LayoutParams.FLAG_FULLSCREEN, WindowManager.LayoutParams.FLAG_FULLSCREEN);
/*
 * 拍照玩之後做相片的處理
 */
PictureCallback jpegCallback = new PictureCallback() {
    @Override
    public void onPictureTaken(byte[] data, Camera camera) {
            try {
                BitmapFactory.Options opts = new BitmapFactory.Options();
                opts.inDither = true;

                Bitmap originalBitmap = BitmapFactory.decodeByteArray(data, 0, data.length, opts);
                int width = originalBitmap.getWidth();
                int height = originalBitmap.getHeight();
                // 故意切成正方形,然後放大/縮小到 1440x1440
                int offsetLeft = (width - height) / 2;
                float scaledRatio = (float) 1440 / (float) height;

                Matrix scaleMatrix = new Matrix();
                scaleMatrix.postScale(scaledRatio, scaledRatio);

                Bitmap resizedBitmap = Bitmap.createBitmap(originalBitmap, offsetLeft, 0, height, height, scaleMatrix, true);
                BufferedOutputStream resizeOutStream = new BufferedOutputStream(
                    new FileOutputStream(new File(String.format(
                    "/sdcard/%d.jpg", System.currentTimeMillis())))
                );
                resizedBitmap.compress(CompressFormat.JPEG, 90, resizeOutStream);
                resizeOutStream.flush();
                resizeOutStream.close();

                Log.d(TAG, "onPictureTaken - wrote bytes: " + data.length);

                mPreview.mCamera.startPreview();

            } catch (FileNotFoundException e) {
                e.printStackTrace();
            } catch (IOException e) {
                e.printStackTrace();
            } finally {
            }
            Log.d(TAG, "onPictureTaken - jpeg");
    }
};
/*
 * 重新計算預覽區塊的相機畫面尺寸,這官方有,怕以後找不到筆記一下。
 */
public Size getOptimalPreviewSize(List<Size> sizes, int w, int h) {
        final double ASPECT_TOLERANCE = 0.05;
        double targetRatio = (double) w / h;
        if (sizes == null) return null;
        Size optimalSize = null;
        double minDiff = Double.MAX_VALUE;
        int targetHeight = h;
        // Try to find an size match aspect ratio and size
        for (Size size : sizes) {
            double ratio = (double) size.width / size.height;
            if (Math.abs(ratio - targetRatio) > ASPECT_TOLERANCE) continue;
            if (Math.abs(size.height - targetHeight) < minDiff) {
                optimalSize = size;
                minDiff = Math.abs(size.height - targetHeight);
            }
        }
        // Cannot find the one match the aspect ratio, ignore the requirement
        if (optimalSize == null) {
            minDiff = Double.MAX_VALUE;
            for (Size size : sizes) {
                if (Math.abs(size.height - targetHeight) < minDiff) {
                    optimalSize = size;
                    minDiff = Math.abs(size.height - targetHeight);
                }
            }
        }
        return optimalSize;
    }
接下來就是要實作檔案上傳,還有找找看是否有像是分享到 Facebook 相本的那種上傳功能,我好愛背景上傳啊!這樣可以省很多事情。大概就這樣啦,如果有想要 Source Code 的可以自己跟我掱!

